The most advanced design customization is highly recommended to use WordPress responsive theme such as Flatsome. Depending on the theme you use, the sophistication of built-in design customization can vary greatly. Even a powerful design interface has its limits. The ultimate control over design lies with more advanced techniques, and that’s what this lesson is all about. This lesson deals with cascading style sheets (CSS). Although they’re not difficult to use, they do require precision, which is a nice way of saying that you can easily mess things up simply by leaving out a bracket or misspelling a word.
The basic idea behind advanced theme customization is that you’re going to override the theme’s styling, and there are two ways of doing that:
- Adding custom CSS at some point after the theme CSS has loaded
- Making a Child theme that uses the original theme as its Parent
Both enable you to add your own CSS, but the Child theme method opens up the possibility of modifying or adding theme files as well.
1. Using Custom Css
Many themes, even ones with sophisticated design interfaces, have a method of adding your own custom CSS. Whether it’s a box in the Customize menu (Figure 1 A), a Custom CSS plugin screen (Figure 1 B), or a theme’s custom CSS option box (Figure 1 C), you can write CSS that overrides the theme’s styling.
You need to understand that whether you do it yourself or hire someone to make these styling changes, tools like this are useful because they don’t change anything in the theme itself. So even if you do make a mistake or change your mind, you can easily get back to the original theme instantly.
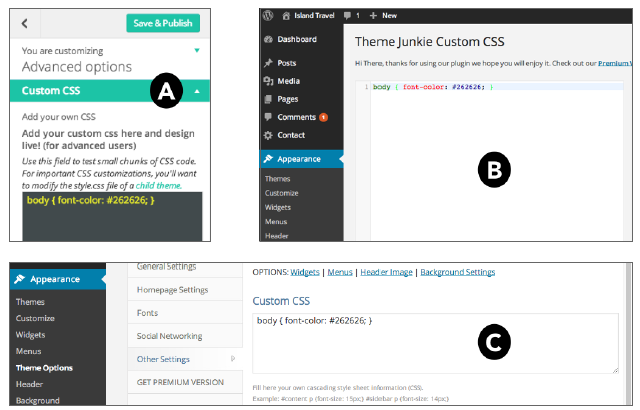
FIGURE 1
What if your theme does not provide one of these ways of overriding CSS? Fortunately, several plugins can add that functionality; several are mentioned at the end of the lesson. Ensure that the plugin properly loads the CSS so that it overrides the theme and not vice versa.
2. Using A Child Theme
If you need to do more than adjust a few style sheet rules, you probably need to create a Child theme.
2.1. What Is a Child Theme?
The concept grew out of the realization that often the changes people wanted to make to a theme require modification of the actual template files and not just adding a custom style sheet of some sort. For example, people want the menu placed in a different spot or need some extra widget areas.
So the WordPress developers devised a simple answer: a parent-child theme hierarchy, which says, if the necessary files don’t exist in the child theme, look in the designated parent theme. For example, if you want to modify the header.php file in the parent theme, simply copy it, make changes, and drop the new version (still named the same way, of course) into the corresponding location in the child theme folder. Because the child theme is active, WordPress first checks its folder. In this case, it would find header.php and not look in the Parent folder. If the file isn’t present in the child theme folder, WordPress looks for header.php in the parent theme folder.
But why not simply make a copy of the original theme, rename it, and then start making your own changes? That’s certainly an option, but there are several reasons why you should use the Child theme route:
- Many child themes are primarily concerned with changing the look of the parent, so they consist of just a style.css file and maybe some graphics files or a functions.php file. It’s much easier to deal with these few files than a full-fledged theme.
- You’ll miss out on upgrades to the original theme.
- It makes it easy to know what you’ve changed because you’re dealing only with the files that are different from the parent.
- You always have the original set of files to fall back on—they’re already installed in WordPress.
- The parent theme remains intact and your modifications are clearly separate. (Make sure you give credit in your child theme—parents always like that.)
In addition, when you see how easy it is to make a child theme, you’ll just say, “Why not?” Let’s start.
2.2. Creating a Child Theme
Only one file is required to create a child theme: style.css. That’s it.
As long as it’s formatted correctly (which is easy) and placed in a uniquely named folder in the /wp-content/themes directory, WordPress will see it as a theme and display it in the Theme Library. I’ll go over that again shortly, but I want you to start building the style.css file.
I’ve created an example of the most basic file you need in Figure 2.
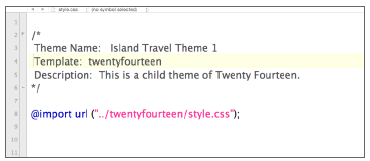
FIGURE 2
The first line must have the /* because that tells the system that it’s a comment and not part of the rules for the style sheet.
On the next line, type Theme Name: followed by the name of your theme. The actual name can be whatever you want. Make it something clear because this is the name that will appear in your Manage Themes directory, and it should make it easy to know which one you’re choosing. I’m going to use Island Travel Theme 1.
The only other required line must begin with Template: followed by the name of the folder where the parent theme resides. That’s why the name is in lowercase—it’s not the Theme Name like the one you just created. This is the folder name in the Themes directory of wp-content. This is how WordPress will know where to look for files that aren’t in your child theme.
There’s other information you can put in the comment area of your Child theme. In this case I’ve put a Description line, which will be used in my Theme Library listing and help remind me who the Parent is for this theme.
Now you need the closing comment symbols */. (Notice that it’s reversed this time—asterisk first, then the forward slash.) This means the comments are over and it’s time for the CSS rules.
But there’s one more thing you need to do: Tell your browser to load the Parent stylesheet or you’ll have no styling at all:
@import url(“../twentyfourteen/style.css”);
Use the @import rule to do that, and the URL you specify needs to be relative to your child theme. The … tells your browser to look outside the child theme for a folder called twentyfourteen and go in and grab style.css.
That’s all you absolutely have to have in your child theme’s style.css file.
With the basics of your style sheet done, save the file from your text editor by creating a new folder with a short but unique name, so there’s no chance of another theme having the same folder name. This is the folder that’s going to be put into /wp-content/themes, so it has to be lowercase with no spaces. (A dash is okay between words or numbers.) I’m going to use the name island-travel-theme-1. That’s not going to be only unique, but it also allows me to keep it straight should I add other Island Travel Child themes in the future.
If you’re comfortable using an FTP program to transfer files to your server, you can simply upload this folder in to /wp-content/themes.
If you prefer to use the upload method of installing themes explained in Lesson 28, “Theme Installation and Basic Customization,” you need to first compress or zip up the folder.
Make sure the Parent theme is in your Theme Library. If it’s not, the upload process will give you an error. Or if you FTP the folder, there will be an error when you go to the Theme Library.
3. More Ways To Customize
When you work directly with CSS, either through a custom CSS file or a Child theme’s style sheet, the possibilities for change are virtually unlimited. Add in the capability of a Child theme to include new templates or change existing ones, and you have complete control over the look of your site. But there’s another option available in some themes: hooks.
For example, say you wanted a navigation bar to appear above the header area instead of below it, and your theme does not have a Customize option to do that. There are two ways to accomplish this in any theme:
- Changing some CSS rules
- Copying the header.php file to your Child theme and physically moving the code that creates the navigation bar
But some themes are coded in such a way that you can add your own code at certain points in the layout without touching the theme files. These points are called hooks. Not only can you add your own code, you can remove the theme’s code.
With the example of moving a navigation bar in mind, the third option becomes removing the theme’s coding for the navigation from one hook and placing it into another.
You work with hooks in the functions.php file of a Child Theme, using PHP and HTML, so this certainly isn’t an option for everyone, but if you’re hiring a developer you’ll have a sense of how they are able to manipulate your theme.
Here’s another example: making the date of a Post disappear.
- You could write some CSS rules to hide the date: .entry-date { display: none; }
- You could copy the file where the date is inserted and save it in your Child theme, and then comment out the date coding or remove it altogether.
- Or there may be a hook in your theme for the area just below the Post title that enables you to remove the date from the display, using a PHP function in the functions.php file of your Child theme.
And just so you know: WordPress has hundreds of hooks and many plugins have them as well, so the extent to which you can customize without touching core files is almost limitless.
In addition, any theme can be manipulated to look as different as you want, to the extent that you can keep using the same Parent theme forever and simply update the look of your site by creating new Child themes.