It’s absolutely crucial these days to connect with your audience through the social media net- works it uses the most. You don’t need to be on ten different social media sites; only use the ones you need to reach your visitors.
You can connect your website to social media in four ways:
- Helping visitors follow you on your accounts
- Letting visitors share your content through their accounts
- Posting directly to social media from your website
- Displaying your social media feeds (your activities) on your site
Although entire books are written on each of these topics, this lesson covers them briefly, showing you how they work in WordPress.
1. Helping Visitors Follow You
Social media networks want you to bring traffic to your page or profile, so they make it easy to include follow buttons on your website. The individual terminology may vary, but the idea is that you want visitors to follow what you do on that particular network: liking a Facebook page, following a Twitter account, or joining a Google+ circle, and so on.
Twitter is used for the example here, but the process is similar no matter what network you use.
The first thing you need to do is log in to your account so that the resulting button is tied to your credentials. Then look for a link that says something such as Promote, Resources, or Widgets (not to be confused with WordPress Widgets).
From the available tools, you want the one that typically says “follow” or some similar termi- nology. Figure 1 shows several buttons options for Twitter.
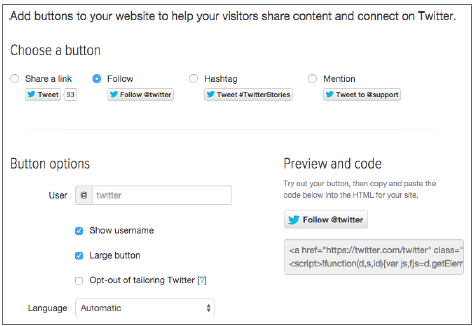
FIGURE 1
You can set a number of parameters, including the look of the button. Figure 1 offers only a choice of size, but the options could include colors, logo type, and more.
As you set the parameters, the HTML code changes accordingly. When you finish, simply copy that HTML and return to your WordPress site.
Under Appearance ➪ Widgets you can find the Text Widget on the left side. Click it, and select the Widget Area where you want it to display. The box opens and you can paste it in, as shown in Figure 2 A.
Of course, you can then add more follow buttons from other social networks, but for the moment, you can see what the resulting button looks like on the front end of the Island Travel site in Figure 2 B.
And that’s all there is to it. Exactly what happens when you click a follow button depends on the network. For Twitter, visitors would be given the opportunity to follow Island Travel on Twitter.
For plugins that enable you to display follow buttons for social networks, they typically send visi- tors to your page or profile on the particular network, where they can like, follow, or whatever that network may do.
Adding follow buttons on all pages of your site is fine when it’s just you to be followed. However, what if you have one or more authors or staff members, for example, with their own social media accounts?
WordPress Profile Pages do not have built-in social media fields that enable each User to enter their own social contact information. Fortunately, there are plugins that add social media fields to the Profile Page and then display those links in Author boxes. (A couple are mentioned at the end of the lesson.)

FIGURE 2
2. Letting Visitors Share Your Content
People enjoy sharing something fascinating, funny, or unusual. Assuming you give visitors that kind of content, make it easy for them to share it with friends via social media.
Like the follow button, most social networks offer the capability to embed a share button on your site, but you might ask, “Do I need to create a new button for every Post or Page?” After all, you want visitors to share the unique URL of the web page they’re on. Fortunately, share buttons are smart and can find the URL automatically.
The process for creating a share button is virtually identical to creating a follow button. For Twitter, you create them from the same screen. In Figure 3, you can see the share button version of the Twitter screen.
As with the follow button, I put the generated HTML into a Text Widget in the sidebar of Island Travel, but notice in Figure 4 that the title Share This with Your Friends makes it clear what the button does.
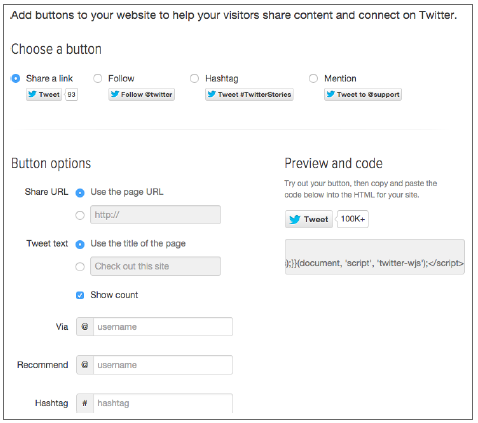
FIGURE 3
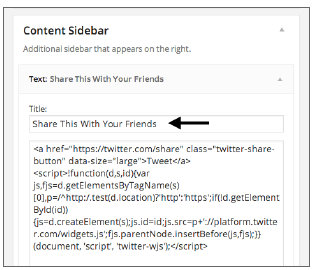
FIGURE 4
And on the front end of the site, you can see in Figure 5 the resulting pop-up boxes on two sepa- rate web pages, allowing me to share the URL of the particular page. The button has automatically inserted the URL, so I need only one button.
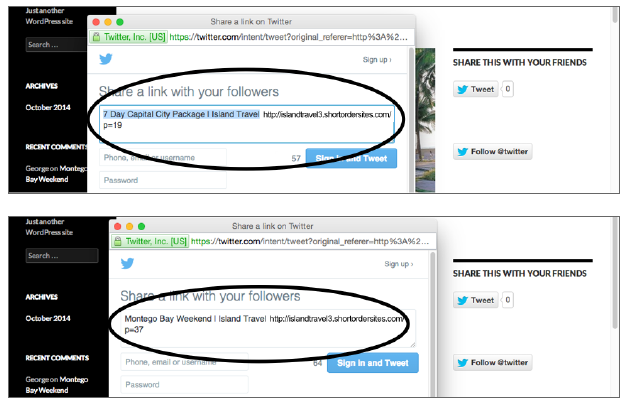
FIGURE 5
Of course, you could add more share buttons to this Widget, depending on how many social net- works you want your visitors to have access to. And with a plugin that enables you to choose where a Widget appears, you could restrict this share Widget to just Blog web pages.
Now the sidebar isn’t the best place for share buttons; putting them at the beginning or end of Posts, for example, is handier for visitors. In the case of the Island Travel theme, I don’t have Widget Areas in either of those locations. Other themes may offer those, or there are plugins so that you can cre- ate your Widget Areas where you want.
3. Posting Directly To Social Media
When you create a new Post on your website, it would be nice not to have to stop and log in to various social media accounts to let people on those networks know about your new Post. If you could automatically post to one or more social media accounts when you press the Publish button in WordPress, that would be a huge timesaver, which means it’s more likely to actually get posted.
Unlike follow or share buttons, this kind of functionality is best handled with a plugin, as discussed at the end of the lesson. That’s because there’s integration required with WordPress Post and Page screens, and that gets complicated.
In the end, what you’ll have, depending on the plugin, is the ability at the time of publishing a Post or a Page to choose whether and what text/imagery to send to one or more social networks. An example of a meta box that gets added to your Posts is shown in Figure 6.
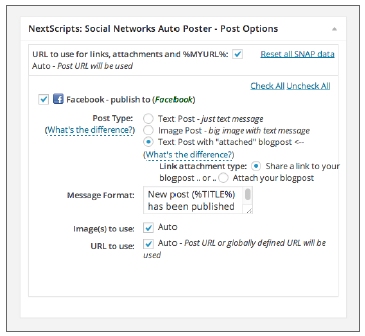
FIGURE 6
Notice how you have control over what is published, in this case, to Facebook. (This varies depend- ing on the plugin.) You need to customize what is sent out so that you can personalize it for the par- ticular network you’re sending to.
4. Displaying Social Media Activity
Another way to involve visitors with social media is to display feeds from your social media accounts or from the accounts of others.
4.1. Feeds from Your Accounts
If you’re active with your social media accounts, such as Twitter or Facebook, the content you gener- ate on those sites could be useful on your WordPress site. Luckily, you can select simple ways from WordPress, out of the box, to display social media feeds on your site. At the end of the lesson you see some plugins that can make the process even simpler, or add functionality.
To get your Twitter feed (or timeline) on to your site, the process is similar for most social media tools. As with the follow and share buttons, you need to navigate to where your social network provides tools or resources for promoting your account. Look for a tool that displays your account activity (or feed, profile, and so on).
Many sites make it easy, as Twitter does in Figure 1 A, to customize how the feed looks on your site, how many items it displays, and so on. When you finish customizing, click something such as Finish & Grab Code or Generate Code, and you’re presented with the HTML you need to paste into WordPress.
Simply go to Appearance ➪ Widgets, and using the Text Widget, assign it to the Widget Area you want; then paste in the HTML. When you save the Widget, your Twitter timeline displays on your site just as in the preview when you set it up. Figure 7 shows a sample feed.
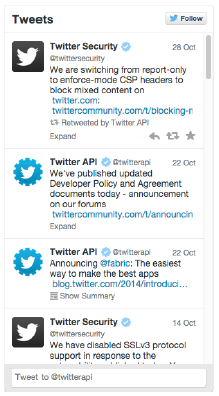
FIGURE 7
Some social networks offer different versions of feeds or show thumbnails of some of your followers or the latest images from your account. You want to think about what will be most intriguing for your visitors.
For example, I always enjoy seeing that friends on Facebook have liked the same website that I like or that someone well known in a particular field has liked it. That’s all part of what people mean when they talk about “social proof.”
4.2. Feeds from Other People’s Accounts
With many social networks, you’re not limited to displaying your own feed. Any publicly available feed is an option as well. So you could display the Twitter timeline of a related industry association or a writer you admire. For Twitter, you can embed four types of timelines:
- User Timelines—The public tweets of any user
- Favorites—Shows all tweets that a user has favorited
- Lists—Public compilations of user tweets you create or you subscribe to
- Searches—Shows customized real-time search results from Twitter
Be aware that you’re opening yourself up for all sorts of content with a search feed: possibly from competitors or possibly offensive. The more likely scenario for this kind of feed is when your orga- nization or business uses a hash tag, such as #ourconference. The feed would pull in any tweets that use that tag.
Again, this is meant to give you only a sense of what’s possible. Other social networks have their own versions of these or other kinds of feeds.