To install Joomla on a remote server, you have to do two things:
- Register a domain name
- Book a web space on a server
If you do not already own a domain name, there are a great many services available on the Web that will enable you to register one. Here are a few:
- dreamhost.com/
- hostgator.com/
- godaddy.com
- hostpapa.in
I have registered a domain by name (bmharwani.net at godaddy.com) and booked approximately 100GB of space on a server via a web–hosting provider company. Before you proceed, ensure the following about your hosted account:
- PHP is installed and enabled.
- You have a MySQL database for the web site and you know its database name, username, and password.
You just need to upload the Joomla ZIP file to the public_html folder on the remote server (or whatever folder is provided by your hosting company) and then unpack it. You can even use File Manager to extract the files. Open the browser and type in your domain name (in my case, www.bmharwani.net), after which you will see the first Joomla installation screen. The rest of the procedure should then be exactly same as local installation.
1. Using One Click Installers
Another way to install Joomla is to use the one-click installers (also called auto installers) provided by the web–hosting service provider, available in the Control Panel. Fantastico is one of the most commonly used auto installers provided by most hosting companies. The Control Panel, also called cPanel, is a premier software package that makes life easier for web hosts and web site owners. It offers easy-to-use, powerful tools that perform essential tasks easily. It provides a GUI interface to help web site owners manage their sites, and includes video tutorials and onscreen help that enable hosting customers to manage their own accounts without requiring any help from support staff. It also includes virus protection, root kit detection, and a host of other tools to keep servers secure. To access cPanel, open the browser and point it at the following address: www.bmharwani.net/cpanel.
You will be asked to specify the username and password. Enter the username and password supplied to you by the web–hosting service provider while booking the web space. After the correct username and password are entered, cPanel will open (see Figure 2-31).
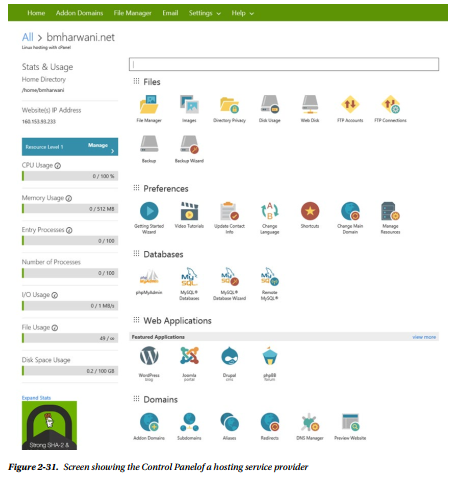
Figure 2-31 shows the Control Panel of a hosting service provider that provides executables for various CMSs. These executables are easy-to-use files that facilitate the installation of many open source applications on web-hosting accounts. These executables are in fact the wizards that upload files and configure databases with just a few mouse clicks. The figure shows the executables for WordPress, Joomla, Drupal, and other CMSs that are automatically provided by a hosting service provider.
To execute the Joomla wizard, click the Joomla icon under the Web Applications category; you should see a screen displaying a small introduction to Joomla along with its home page link (see Figure 2-32).
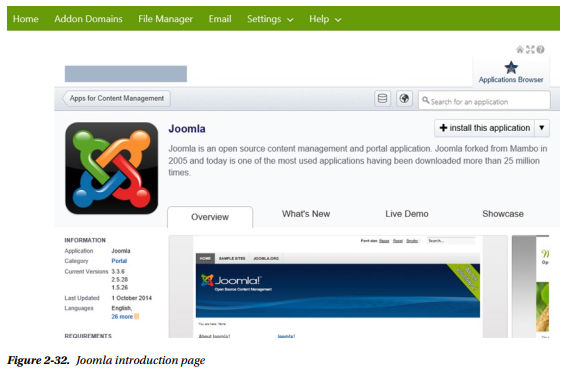
Select the Install This Application link because you are installing Joomla for the first time in your web space. The screen shown in Figure 2-33 will pop up for you to enter admin and database settings for the Joomla site.
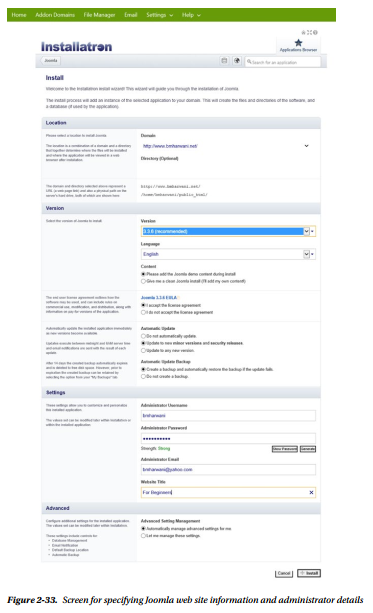
You will be asked to specify certain information, including the following (refer to Figure 2-33):
- The domain name to install Joomla on: enter the name of your web domain here (mine is bmharwani.net).
- The Joomla version to install: select the latest (3.3.6).
- The language to be used for installing Joomla: leave it at the default (English).
- The end user license agreement: accept the agreement.
- The administrator username and password: you will be prompted to enter the username and password whenever you open the Administrator interface for your Joomla web site.
- The e-mail ID of the administrator: enter your e-mail address.
- The web site title: enter the web site title here (mine is For Beginners).
After entering all the preceding information, click the Install button. The Joomla files will be installed on your remote server. Figure 2-34 displays a screen that verifies that Joomla is successfully installed on the remote server.
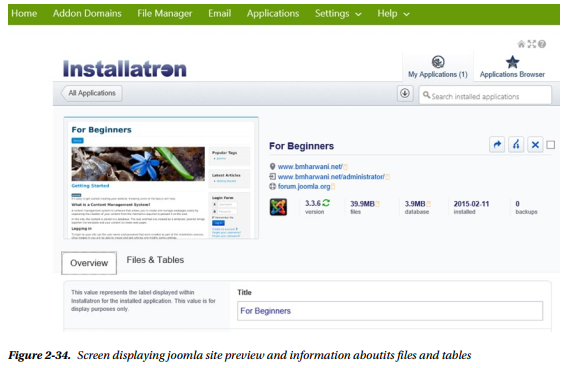
Also, you are given the URLs to access the web site and the Administrator interface: http://bmharwani.net/ and http://bmharwani.net/administrator/, respectively. To see your Joomla web site, you point the browser at http://bmharwani.net/; and to manage its content, you open its Administrator interface by pointing the browser at http://bmharwani.net/administrator/. If you click the Files & Tables button, you’ll get complete information about the MySQL tables automatically created for you (see Figure 2-35).
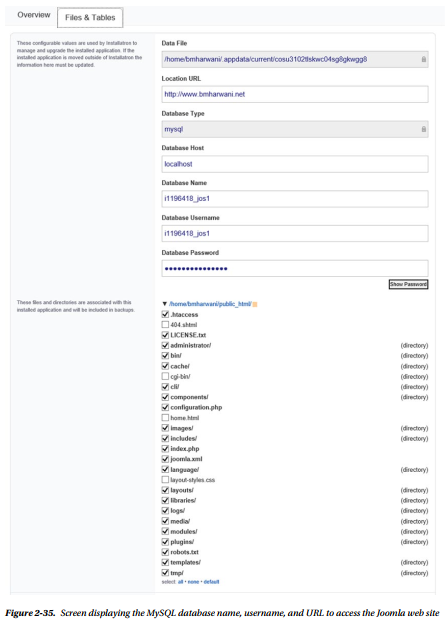
Figure 2-35 shows that the MySQL database and MySQL user are being created as i1196418_jos1 (this name is provided by the web-hosting service provider and can vary). That is, the MySQL database is created as i1196418_jos1, and the MySQL user is also created as i1196418_jos1. This also means that your Joomla web site will be stored in the i1196418_jos1 database on the remote MySQL server of the web-hosting service provider. (Remember this database name because it may be required for future maintenance tasks.) The URL to access the Joomla web site is also provided: http://bmharwani.net.
2. Using Administer Interface
While opening the Administrator interface, you will be prompted to enter the administrator username and password (that you entered in Figure 2-33). If you enter the correct username and password, the Administrator interface will be invoked, as shown in Figure 2-36.
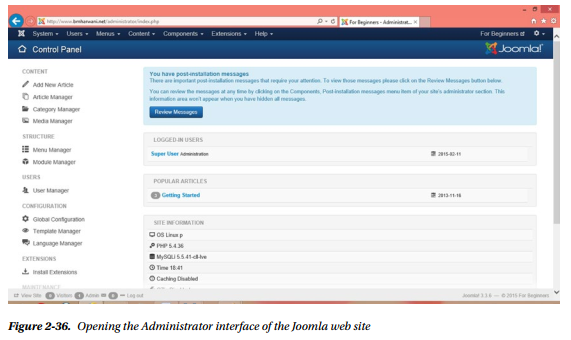
When the Administrator interface opens, you’ll be shown a Control Panel that has a list of managers and menus used to maintain web site content. To see the Joomla web site, point the browser at http://bmharwani.net/; and you should see a fully functional web site, as shown in Figure 2-37.
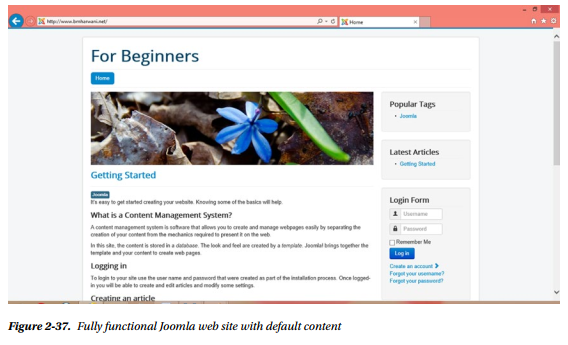
The content and modules that you see are provided as sample data, which you can remove at any time through the Administrator interface. If the Joomla site doesn’t open, and you get some “Hello” message instead, it means that there is a file named index.html in your home directory that is preventing your index.php file (the home page of your Joomla web site) to execute. Web-hosting companies usually provide a default opening file (index.html) when creating a web space account. This index.html file just displays a “Hello” or “Welcome” message. It has to be deleted to invoke the opening web page (index.php) of your Joomla site. The location of the home directory is specified by the web–hosting service provider, and it is usually public_html.
Connect to your domain with some FTP client software, go to the public_html folder, and delete any file with the primary name index. After you take care of this, your job should be done! Just refresh the browser, and a fully functional Joomla web site will be displayed on the screen.
Source: Harwani B M (2015), Foundations of Joomla!, Apress; 2nd ed edition