The Database Engine provides various tools that are used for different purposes, such as system installation, configuration, auditing, and performance tuning. (All these tools will be discussed in subsequent chapters of this book.) The administrator’s primary tool for interacting with the system on Windows platforms is SQL Server Management Studio. Both administrators and end users can use SSMS to administer multiple servers, develop databases, and replicate data, among other things.
NOTE Starting with SQL Server 2017, SQL Server Management Studio is an independent component. This means that SSMS no longer is a component of the Database Engine and therefore requires its own install. Making SSMS a completely stand-alone product, not tied to any specific version or edition of SQL Server, allows Microsoft to achieve significantly shorter release cycles for the tool. The advantage over the old, integrated model is that users sometimes had to wait months or even years for any new SSMS features. In this book we will discuss (and use) SSMS Version 18.1.
The installation of SQL Server Management Studio is straightforward. Go to www .microsoft.com, click the magnifying-glass icon in the upper-right corner, type SSMS in the Search box, press enter, and click the Download SQL Server Management Studio (SSMS) link in the search results. On the page that opens, confirm that your machine is running a supported version of Windows and then click the Download SQL Server Management Studio link for the current version of SSMS (18.1 at the time of writing). After it downloads, execute the corresponding .exe file, click Install, and wait for the installation to complete.
To open SQL Server Management Studio, just click the corresponding icon, or click Start and type Management Studio in Windows Desktop Search. SQL Server Management Studio comprises several different components that are used for authoring, administration, and management of the overall system. The following are the main components used for these tasks:
- Registered Servers
- Object Explorer
- Query Editor
- Solution Explorer
- Data Discovery and Classification
The first two components in the list are discussed in this section. The latter three components are explained later in this chapter in “Authoring Activities Using SQL Server Management Studio.”
To get to the main SQL Server Management Studio interface, you first must connect to a server, as described next.
1. Connecting to a Server
When you open SQL Server Management Studio, it displays the Connect to Server dialog box (see Figure 3-1), which allows you to specify the necessary parameters to connect to a server:
- Server Type For purposes of this chapter, choose Database Engine.
- Server Name Select or type the name of the server that you want to use. (Generally, you can connect SQL Server Management Studio to any of the installed products on a particular server.)
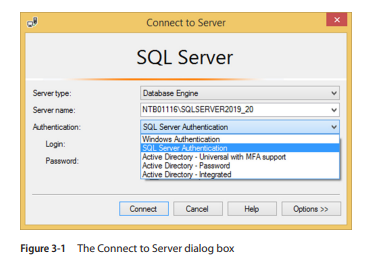
- Authentication Starting with SQL Server Management Studio 17.2, the Connect to Server dialog box supports an extra three authentication methods that are used to connect to Azure SQL Database and Data Warehouse instances. The supported authentication methods are listed here:
- Windows Authentication You connect to the Database Engine using your Windows account. This option is recommended by Microsoft.
- SQL Server Authentication The Database Engine uses its own authentication.
- Active Directory – Universal with MFA support This is an interactive authentication method that supports Azure Multi-Factor Authentication, which provides strong authentication with a range of easy verification options you can choose from.
- Active Directory – Password and Active Directory – Integrated These are non-interactive authentication methods supported by Azure Active Directory Authentication and can be used in many applications such as the ODBC and JDBC.
Note that the last three types of authentication will not be discussed further in the book because it doesn’t cover Microsoft Azure.
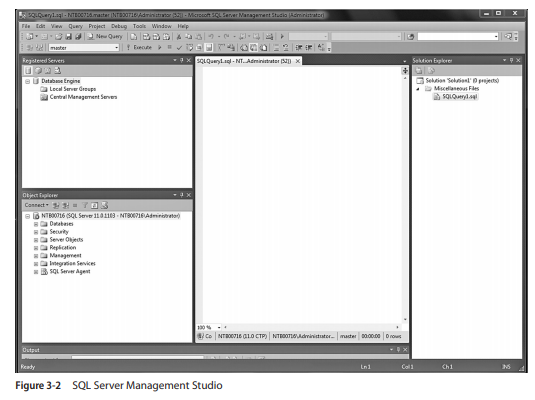
When you click Connect, the Database Engine connects to the specified server. After connecting to the database server, the default SQL Server Management Studio window appears. The default appearance is similar to Visual Studio, so users can leverage their experience of developing in Visual Studio to use SSMS more easily. Figure 3-2 shows the SQL Server Management Studio window with several panes.
NOTE SQL Server Management Studio gives you a unique interface to manage servers and create queries across all SQL Server components. This means that SSMS offers one interface for the Database Engine as well as for Analysis Services, Integration Services, and Reporting Services. This chapter demonstrates the use of SQL Server Management Studio only with the Database Engine.
1. Registered Servers
Registered Servers is represented as a pane that allows you to maintain connections to already used servers (see Figure 3-2). (If the Registered Servers pane isn’t visible, select its name from the View menu.) You can use these connections to check a server’s status or to manage its objects. Each user has a separate list of registered servers, which is stored locally.
You can add new servers to the list of all servers, or remove one or more existing servers from the list. You also can group existing servers into server groups. Each group should contain the servers that belong together logically.
2. Object Explorer
The Object Explorer pane contains a tree view of all the database objects in a server. (If the Object Explorer pane isn’t visible, select View | Object Explorer.) The tree view shows you a hierarchy of the objects on a server instance. Hence, if you expand a tree, the logical structure of a corresponding server will be shown.
Object Explorer allows you to connect to multiple servers in the same pane. The server can be any of the existing servers. This feature is user friendly, because it allows you to manage all servers of the same type or different types from one place.
NOTE Object Explorer has several other features, explained later in this chapter.
3. Organizing and Navigating SQL Server Management Studio’s Panes
You can dock or hide each of the panes of SQL Server Management Studio. By right-clicking the title bar at the top of the corresponding pane, you can choose between the following presentation possibilities:
- Float The pane becomes a separate floating pane on top of the rest of the SSMS panes. The pane can be moved anywhere around the screen.
- Dock Enables you to move and dock the pane in different positions. To move the pane to a different docking position, click and drag its title bar and drop it in the new position.
- Dock as Tabbed Document You can create a tabbed grouping using the Designer window. When this is done, the pane’s state changes from dockable to tabbed document.
- Hide Closes the pane. (Alternatively, you can click the x in the upper-right corner of the pane.) To display a closed pane, select its name from the View menu.
- Auto Hide Minimizes the pane and stores it on the left side of the screen. To reopen (maximize) the pane, move your mouse over the tabs on the left side of the screen and click the push pin to pin the pane in the open position.
NOTE The difference between the Hide and Auto Hide options is that the former option removes the pane from view in SQL Server Management Studio, while the latter collapses the pane to the side panel.
To restore the default configuration of SSMS, choose Window | Reset Window Layout. The Object Explorer pane appears on the left, while the Object Explorer Details tab appears on the right. (The Object Explorer Details tab displays information about the currently selected node of Object Explorer.)
NOTE You will find that SSMS often offers several ways of accomplishing the same task. This chapter will indicate more than one way to do things, whereas only a single method will be given in subsequent chapters. Different people prefer different methods (some like to double-click, some like to click the +/- signs, some like to right-click, others like to use the pull-down menus, and others like to use the keyboard shortcuts as much as possible). Experiment with the different ways to navigate, and use the methods that feel most natural to you.
Within the Object Explorer and Registered Servers panes, a subobject appears only if you click the plus (+) sign of its direct predecessor in the tree hierarchy. To see the properties of an object, right-click the object and choose Properties. A minus (-) sign to the left of an object’s name indicates that the object is currently expanded. To compress all subobjects of an object, click its minus sign. (Another possibility would be to double-click the folder, or press the left arrow key while the folder is selected.)
Source: Petkovic Dusan (2020), Microsoft SQL Server 2019: A Beginner’s Guide, Seventh Edition-McGraw-Hill Education.