After you upload images to WordPress, you can make corrections using the built-in Image Editor. Although it provides only basic functions, they’re enough to handle the three most common issues users face:
- Replacing the default Thumbnail created by WordPress
- Changing the dimensions of the full-sized version of the image
- Mirroring an image left or right so that it faces a new direction
You can use the cropping, scaling, and flipping tasks to see how the Image Editor works.
But first, check out a map of how to get to the Image Editor from the grid view of the Media
Library and from the list view, as shown in Figure 1.
You can also get to a version of the Image Editor through the Image Details window, as shown in Figure 2.
As you can see, the Image Editor looks slightly different depending on where it’s used, but they have the same functionality. For consistency, the examples in this lesson are based on the Edit Media screen.
If your screen is wide enough, on the Edit Media version, the image Save box will be to the right of the Image Editor, and that can crowd things. You can easily move it by switching to one column using Screen Options.
On tablets and smartphones the screen automatically switches to a single column. But smart- phone users beware: In portrait mode it’s difficult to do anything more than enter numbers to scale or crop, as shown in Figure 3.
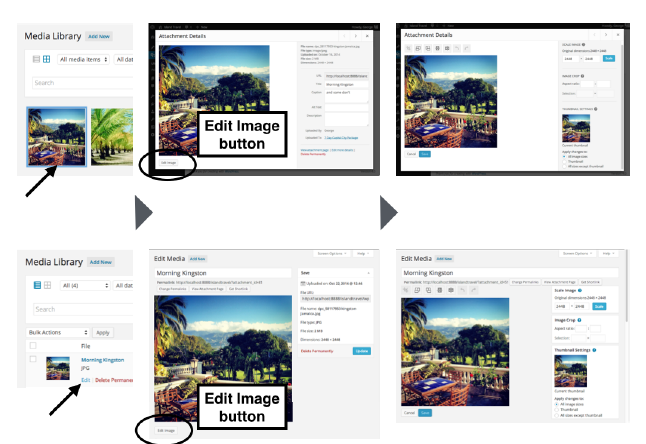
FIGURE 1
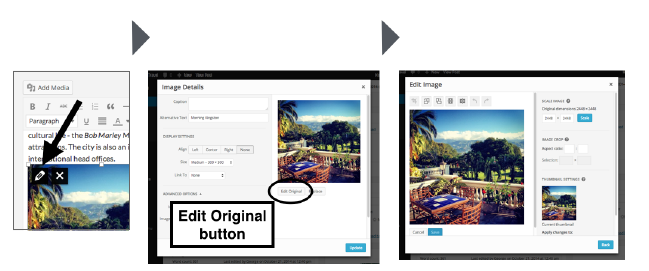
FIGURE 2
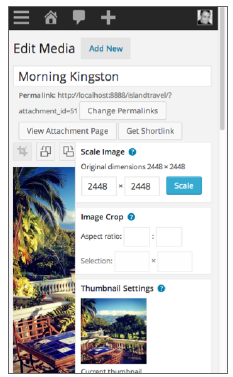
FIGURE 3

You need to understand the limitations of the Image Editor. It is not a mini-Photoshop. You can’t adjust colors, remove red-eye, or add effects or text. These are all tasks you would need to perform before uploading an image to WordPress.
The “Plugins” section at the end of this lesson point you to some plugins that try to bring some of this added functionality to WordPress. However, you might be better off using a dedicated image program on your device or one online. Let WordPress do its job, and leave complex image manipu- lation to software built for that job.
Because of the nature of the tasks covered in this lesson, they’re not easy to convey in words and images. Watching the videos online and simply trying out the Image Editor can make things clearer (see the end of the lesson for the URL to the videos).
1. The Image Editor Functions
Following is a full list of functions for the Image Editor:
- Crop
- Rotate Left or Right (counter-clockwise or clockwise)
- Flip Horizontally or Vertically
- Undo or Redo an operation
- Scale
Figure 4 shows a close-up of the function icons just above the image you’re working with.
FIGURE 4
Scaling has its own button over on the right side, along with a box to adjust your cropping by dimensions, as shown in Figure 5.

FIGURE 5
If you click the blue question marks beside each box’s title, explana- tions display, showing how the functions work.
2. Cropping An Image
The default setting for the thumbnail-sized images created by WordPress is a 150 x 150 pixel area from the center of the original. In many cases, that works fine. But sometimes what’s at the center is not what you want visitors to see as the thumbnail.
The Crop function of the Image Editor enables you to choose the area of the original to use for the thumbnail. Here’s how it works:
Before doing anything else, check the Thumbnail Settings box on the right, as shown in Figure 6.
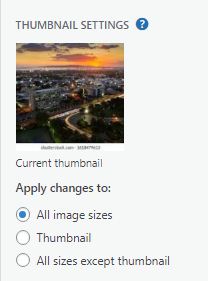
FIGURE 6
You see a picture of the current thumbnail and Apply Changes To setting. This determines to which images your cropping (or any other edits) will be applied. Make sure it’s set to Thumbnail. If you don’t, you’ll end up cropping all sizes of the image, and that’s rarely what you want.
Now you can start dragging your cursor anywhere in the image. This darkens the rest of the image and creates a box with an animated border and drag points or handles, as shown in Figure 7.
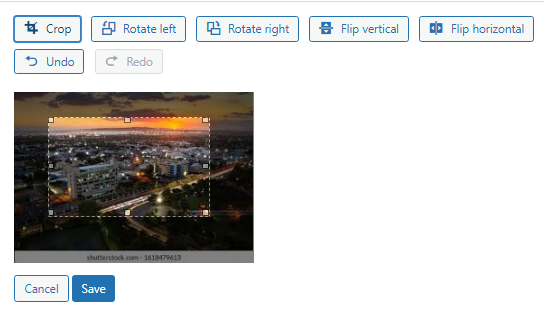
FIGURE 7
The default setting for WordPress Thumbnails is a square, so drag one of the handles on the box until it’s roughly a square. On the right in the Image Crop box, you can see Aspect Ratio. Set that ratio as 1:1 and WordPress automatically adjusts the box to make it square.
You can also drag the edges of the box until the numbers in the Selection fields match. Or in cases in which you have a specific size you need to crop to, you can simply enter the values in those fields. However, you can’t enter any numbers into the Selection fields until you click on the image and start a selection region. Then, when you enter values into the fields, the selection region resizes to match those values.
Placing your cursor inside the selection area allows you to move it around the image. Now that the box is square, as you move it around the image, you can see exactly what area would display as a thumbnail.
When you find a good spot, click the Crop button, which is at the far left of the icons on top of your image. At that point you see the cropped version, and the Save button becomes active. Before saving, it’s a good idea to check again and make sure this change is going to be applied only to Thumbnails. When you’re sure, click Save.
You should now see the new version of the thumbnail in the Thumbnail Settings area. Of course, the new version is what you’ll see throughout the back end of the site (say, the Media Library) and on the front end of the site (in a listing of blog posts, for instance).
3. Scaling An Image
In some cases the problem with an image is that its dimensions are too large in full-size mode. For example, many lightbox plugins automatically show the full-size image when you click a thumbnail, but if it’s larger than the screen, that’s a problem. Using the Image Editor to scale down the dimen- sions of an image is a great solution.
The Scale Image box at the right side of the Image Editor shows you the dimensions of the origi- nal and then has a box for the width and the height where you can enter a new value, as shown in Figure 8 A.
You cannot enter different values for width and height because you’re scaling the existing relation- ship. This example has a square original. When you enter a value in one box, the other adjusts proportionately. And that’s it; you’re ready to click Scale.
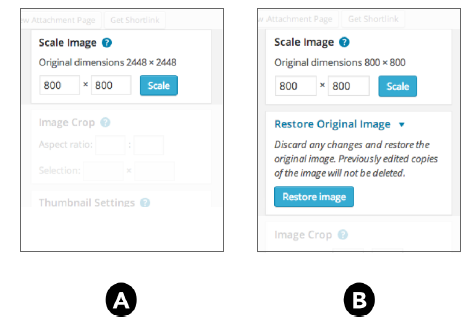
FIGURE 8
Although it may seem that the scaling function is reducing the dimensions of the original image, WordPress is actually creating a new “full-size” image to be used in place of the original. As you can see in Figure 8 B, there’s a Restore button after completing the scaling, and it will bring back the original image.
So if your intent is to get rid of an overly large image taking up space on the server, scaling with the Image Editor is not the answer. The original is still there, and you now have a new image on the server as well.
There are plugins that can change the dimensions of the original image, thereby bringing it down in file size as well. Some of these are mentioned at the end of this lesson.
4. Controlling WordPress Image Dimensions
With the Image Editor, scaling is limited to the full-size version of an image. But suppose you want to change the dimensions of the medium-sized version of an image or the thumbnail version? Although you can’t do that for individual image sizes, you can do it for all images on the site.
Under Settings ➪ Media you can find the sizings for the additional images that WordPress creates when you upload images, as shown in Figure 9.
In the case of Thumbnails, for instance, you might want smaller or larger square images throughout your site, or you might want a rectangular look. Adjusting the values for width and height deter- mine the size and shape of the cropping.
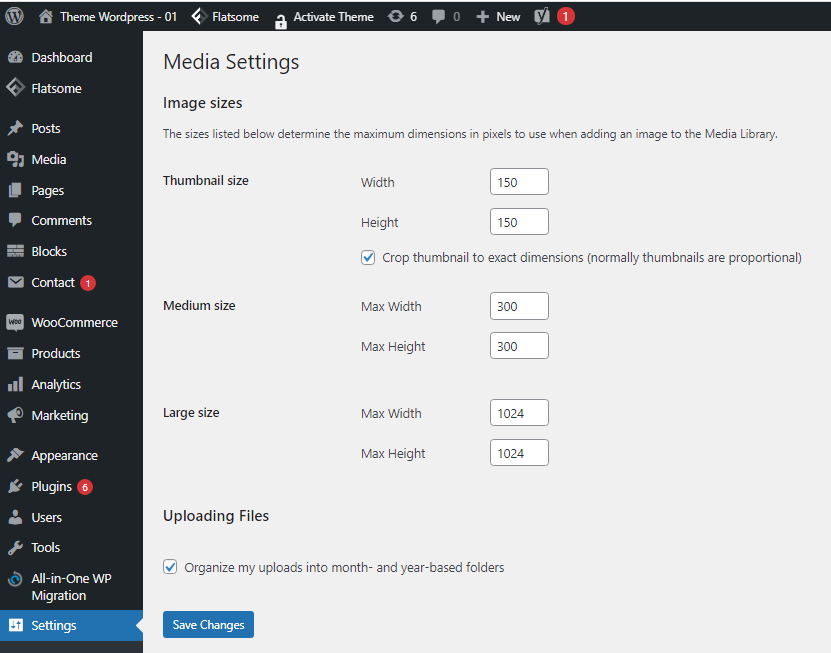
FIGURE 9
You can also remove cropping for the Thumbnail size altogether, at which point the numbers func- tion like Medium and Large, and WordPress resizes the entire image by the number of pixels on the longest size. In other words, your thumbnails would no longer be a portion of the image but a small version of the whole image.
5. Flipping An Image
You can flip an image either vertically or horizontally. A vertical flip is usually needed only when you’ve uploaded an image to WordPress and not realized that it was upside down coming out of your camera.
Just click the Flip Vertically button, and you see the change. Before you click Save, though, make sure the Apply Changes To is set to All Image Sizes because, of course, you want them all to be right-side up.
In the case of horizontal flipping, the most common scenario is when an image would look better facing the other direction. For example, you may want the face of a person looking in the direction of your text instead of away from it. It sounds like a little thing, but a visitor’s eyes get drawn in a certain direction for many different reasons, and human gaze is a major one.
Again, you simply click the Flip Horizontally icon, and the image will be changed. Make sure it applies to all images, and then click Save.
Keep in mind that flipping an image applies to all sizes of the image, unless you’ve limited it to the Thumbnail. But usually when you try to mirror an image, it’s already in a Post. Maybe you don’t want all other versions of the image to be flipped horizontally. In that case, you need to make a flipped ver- sion of your image in another program and upload that to WordPress for use in the particular Post.