After you insert an image into a Post, there may be changes you want to make: alignment to the text, position on the page, and so on. This lesson looks at working with images after they’re in the Content Editor, including some of the design considerations when laying out your content.
1. The Image Details Window
Much of your work with images in the Content Editor will involve changing settings, and you do that through the Image Details window.
When you click an image in the Content Editor in WordPress 4.0, two icons appear at the top left (Figure 1 A). As of WordPress 4.1 you’ll see a bar with icons, as shown in Figure 1 B.
In WordPress 4.1 you have alignment icons, while in both versions, the X icon deletes the image (if you accidentally press this, just insert the image again) and the pencil icon leads to the Image Details pop-up, shown in full in Figure 2.
Much of this window accesses settings you worked with in the Media Uploader (you could add or change a caption here), but some are new. For example, you can access the image editor to perform cropping and other functions, which are covered in Lesson 14, “Using the WordPress Image Editor.”
1.1. Aligning Images
When I inserted an image into the 7 Day Capital City Package, it was sitting by itself between two sections of text, as shown in Figure 3 A. That doesn’t look great. It would be nice to have the text flow around the image, the way it does in Figure 3 B.
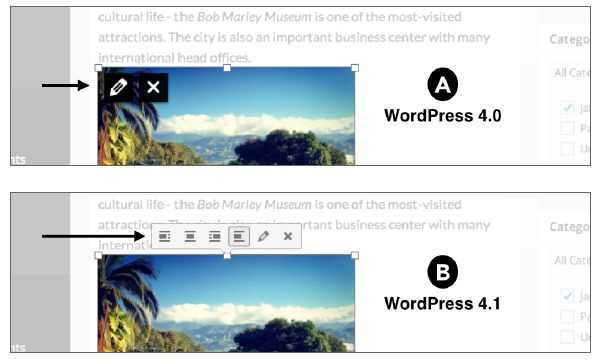
FIGURE 1
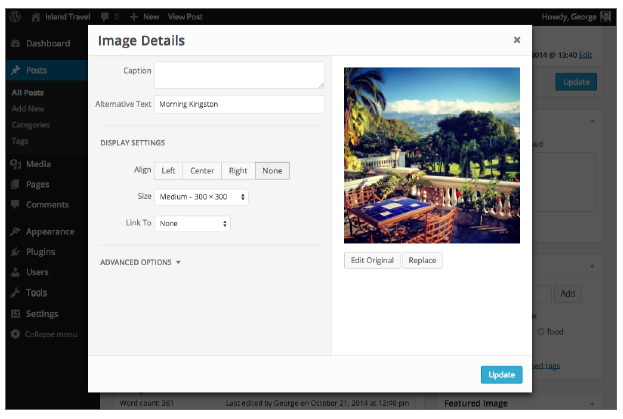
FIGURE 2
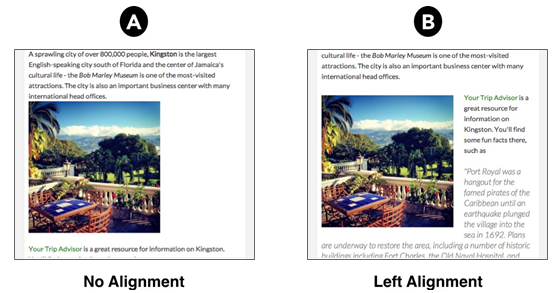
FIGURE 3
That’s where the Image Details window comes in. You simply choose your alignment, click Update, and it repositions relative to the text. If you need to actually move the image after aligning, that is covered shortly.
As noted above, as of WordPress 4.1, you can adjust the alignment without having to click through to the Image Details window. Simply click on the image and the alignment buttons are displayed.
1.2. Replacing Images
Sometimes, you may need to switch one image for another. Perhaps you have a new staff photo or an updated cover for a book.
WordPress has a Replace function in the Image Details window that can save a few steps instead of deleting the image and inserting a new one. The trick is to make note of the display settings for the image you’re replacing.
When you click the Replace button, a Replace Image screen displays, which is basically the Insert Media screen, but the current image is checked and it’s details are visible on the right, as shown in Figure 4.
If the new image needs to be uploaded, use the Upload Files tab, or if it’s already in the Media Library, simply check the image.
Replicate the old image settings in the new image attachment display settings (alignment, size, and so on) and then click the blue Replace button at the lower right.
You return to the Content Editor, and the new image will have replaced the old in exactly the same position (assuming you used the correct settings).
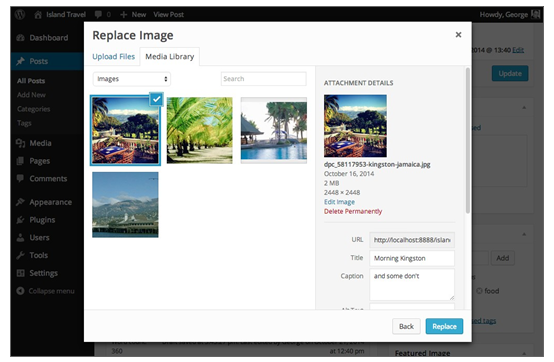
FIGURE 4
1.3. Advanced Options
Most people won’t need to touch these settings, and that’s why they’re hidden by default, as shown in Figure 5 A.
One setting that could be valuable in special circumstances is the ability to give the image a class, so that a designer (or you, if you know CSS) could write rules to style it.
You could do this for an individual image, but the real power is in assigning a class to, say, all images in Posts of a certain Category. Then, with that one CSS rule, you could change all the images in that Category.
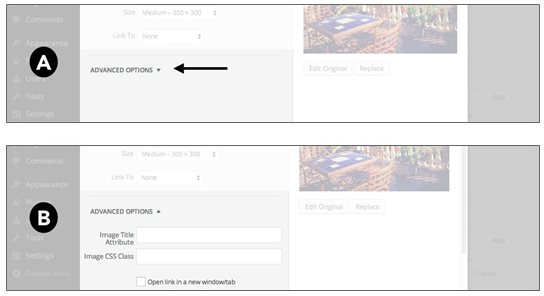
FIGURE 5
2. Moving Images
When inserting an image into a Post, it appears wherever you had placed your cursor. But what if you need to move the image after inserting? Fortunately, it’s as easy as dragging and dropping.
The trick with moving an image is keeping your eye on the cursor to tell you exactly where you’re moving to.
As you can see in Figure 6 A, when you click and drag an image, a transparent copy is made, and that’s what you actually drag around.
I’ve zoomed in on Figure 6 B to show you that the text cursor follows along just in front of your mouse pointer while you drag. That’s how you can tell when you’ve reached the exact point in the text where you’d like to have the image.
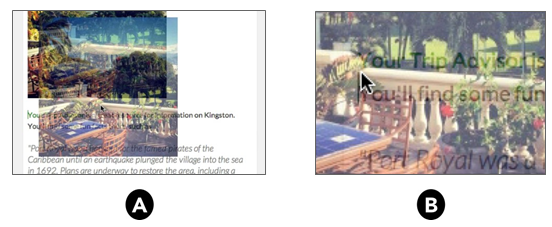
FIGURE 6
The process is much easier to follow in a video that I created for this lesson, so I recommend watch- ing that at the website URL given at the end of the lesson, and then trying it yourself.
Remember that whatever alignment setting you have for the image will continue to apply, so even if you think you’re dropping the image at a certain point in the text, alignment may change it somewhat.
3. Resizing Images
You have three options for resizing an image that you’ve inserted into a Post:
- Choose a different version of the image.
- Use HTML to resize it in the browser.
- Physically resize the image, or crop it using the Image Editor.
Lesson 14 covers the Image Editor and the third option. Here the first two options are discussed.
Choosing a different version of the image means selecting one of the other sizes that WordPress automatically creates when you upload an image. To do that, you can access the Image Details win- dow by clicking the image in the Content Editor and then the pencil icon at the top left. Then it’s simply a matter of choosing from the available sizes, as shown in Figure 7.
The new version appears in the window, and you can just click Update and the image in the Content Editor is replaced.
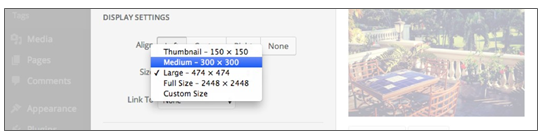
FIGURE 7
The second option for resizing an image is to specify a custom size in the Image Details window. It’s the final choice at the bottom of the size drop-down in Figure 8 A. When you choose it you get the width and height boxes, as shown in Figure 8 B.

FIGURE 8
If you change the width, you’ll notice that the same number automatically appears in the height box, and vice versa. You might think you’re going to get a square image, but what you’re actually telling WordPress is: Whichever is the longer side, make it this size and keep the other side proportionately large. That way there’s no worries about distorting your image.
If you don’t know exactly how large you want the image, simply try it, see how it looks, and then edit the size again until you get the effect you want.
You can custom-size your image directly in the Content Editor by using the drag points you see around the edges when you click on the image, as highlighted in Figure 9.
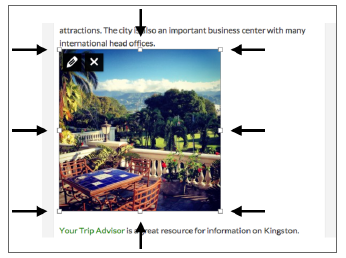
FIGURE 9
By clicking and dragging on any one of the tiny white boxes, you can resize your image live, and WordPress keeps the proportions of the image as you drag. That way you can better tell when you have the size you want. The sequence in Figure 10 illustrates how this works.
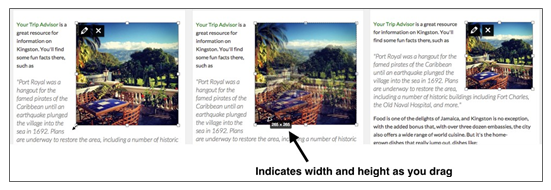
FIGURE 10
Now custom-sizing your image (either method) may be handy, but it’s not ideal. It can cause two issues:
- The image may not look as crisp compared with displaying at its natural size.
- The browser has to work to resize the image as the page loads, and this can contribute to slower loading of the page (particularly if you have several resized images on the page).
These problems don’t always arise, but you need to be aware of them.
4. Design Considerations For Image Placement
There are a few things to watch for when you’re inserting images into the Content Editor, or you can end up with some messy-looking web pages. Luckily, the simplicity of working with images makes it easy to quickly correct such problems.
Often when you insert an image that’s left-aligned or right-aligned so that text flows around it, you end up with a couple words dangling below the image, as shown in Figure 11 A.
By simply resizing your image slightly, you can get rid of those orphaned words, as shown in Figure 11 B.
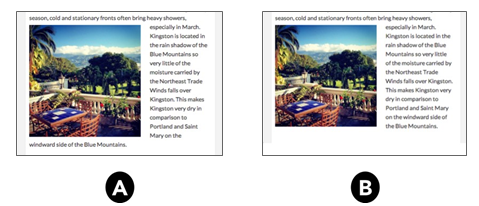
FIGURE 11
If you have multiple images in a Post, try to give some breathing space between them. You can see how crowded things got in Figure 12 A, but simply by repositioning the second image, Figure 12 B is much easier on the eye.
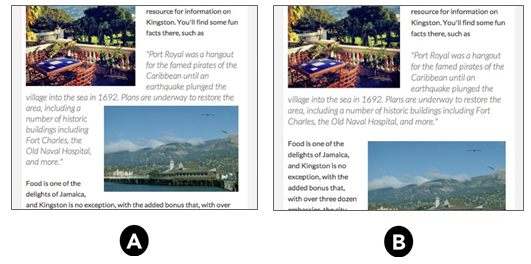
FIGURE 12
A third common issue is having an image that’s too wide so that you end up with the kind of narrow column of text trying to flow around it in Figure 13 A. Again, a simple resizing of the image can relieve that (Figure 13 B). Or if you don’t want the image any smaller, simply remove the left or right alignment so that the image is on its own line, as shown in Figure 13 C.
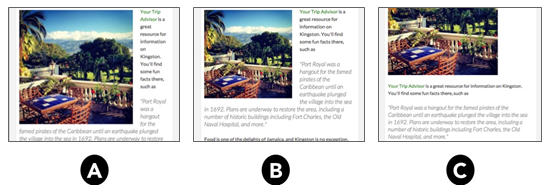
FIGURE 13
Finally, there’s the question of putting two images side by side. It’s a matter of setting the alignment of each to “left” and then dragging and resizing until they look good. (The video for this lesson demonstrates this more easily. See the end of the lesson for the URL to the videos.)
Another method that avoids resizing issues is to create a Gallery using the two images, set the col- umns to 2, and probably size the images to medium instead of the default Thumbnail. The Gallery styling takes care of lining up the two images side by side. Working with Galleries is covered in Lesson 15, “Working with Image Galleries.”