The CSS Pseudo-elements Module Level 4 specification clarifies behavior for existing pseudo-elements and defines several new ones. We’ll focus on the ones that currently have browser support:
- ::after inserts additional generated content after the content of an element
- : -.before inserts additional generated content before the content of an element
- ::first-Letter selects the first letter of an element
- : :first-Line selects the first line of an element
- :-.marker styles bullets and numbers for list items and the <summary>element
- ::pLacehoLder styles placeholder text for form controls using the placeholder attribute
- : -.selection styles text selected by the cursor
Of these, ::first-Letter , ::first-Line , ::selection , ::marker and ::placeholder affect content that’s part of the document source. The :-.before and ::after pseudo-elements, on the other hand, inject content into a document. Let’s look at each of these pseudoelements more closely.
::before and ::after
Most pseudo-elements allow us to select content that’s already part of the document source—that is, the HTML you authored—but that’s not specified by the language. But ::before and ::after work differently. These pseudo-elements add generated content to the document tree. This content doesn’t exist in the HTML source, but it’s available visually.
Why would you want to use generated content? You might, for example, want to indicate which form fields are required by adding content after their label:
/* Apply to the label element associated with a required field */
.required::after {
content: ‘ (Required) ‘;
color: #c00;
font-size: .8em;
}
Required form fields use the required HTML property. Since that information is already available to the DOM, using ::before or ::after to add helper text is supplemental. It isn’t critical content, so it’s okay that it’s not part of the document source.
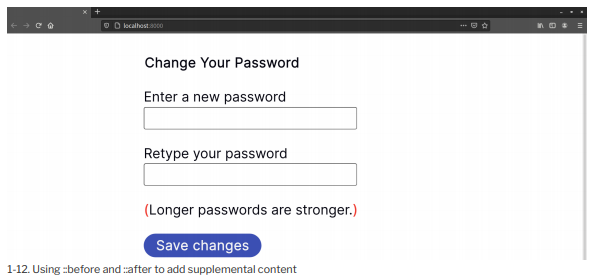
Another use case for ::before or ::after is adding a prefix or suffix to content. For example, the form mentioned above might include helper text, as shown here:
<form method=”post” action=”/save”>
<fieldset>
<legend>Change Your Password</legend>
<p>
<label for=”password”>Enter a new password</label>
<input type=”password” id=”password” name=”password”>
</p>
<P>
<label for=”password2″>Retype your password</label>
<input type=”password” id=”password2″ name=”password2″>
</p>
<p class=”helptext”>Longer passwords are stronger.</p>
<p><button type=”submit”>Save changes</button></p>
</fieldset>
</form>
Let’s enclose our helper text in red parentheses using ::before and :-.after :
.helptext::before,
.helptext::after {
color: hsl(340, 82%, 52%);
}
.helptext::before {
content: ‘( ‘;
}
.helptext::after {
content: ‘)’;
}
The result is shown below.
Both ::before and ::after behave similarly to other descendant elements. They inherit the inheritable properties of their parent, and are contained within it. They also interact with other element boxes as though they were true elements.
This means that we can use ::before and ::after with CSS Grid and Flexbox. One use case is decorated headings, such as the one shown below.

The CSS required to create this heading is as follows:
h1 {
display: grid;
grid-template-columns: ifr auto ifr;
gap: 3rem;
}
h1::before, h1::after {
content: ‘\00a0’;
background: url(‘decoration.svg’) repeat-x center / 50% auto;
}
You can read more about CSS Grid and Flexbox layout in Chapter 5, “Layouts”.
Source: Brown Tiffany B (2021), CSS , SitePoint; 3rd edition.