You can get started with AngularJS development with a browser, a text editor, and a web server. One of the nice aspects of working on client-side web app development is that you can pick and mix from a wide range of development tools to create an environment that suits your working style and coding practice. In the sections that follow, I describe the environment I use so that you can re-create it on your own workstation. (You don’t have use my tools, but doing so ensures that the examples work as expected. If you decide to use a different set of tools, then skip to the “Performing a Simple Test” section later in the chapter to make sure everything works.)
■ Tip A popular tool for client-side development is Yeoman (http://yeoman.io), which provides a tightly integrated development pipeline for client-side development. I don’t get on with Yeoman: It has some issues on Windows (which I use for most of my development), and I find the overall approach to be a little too proscriptive. That said, it has some nice features and may well suit you better than it does me.
1. Choosing a Web Browser
AngularJS works in any modern web browser, and you should test your app in all of the browsers that your users are likely to use. You will need a go-to browser for development purposes, however, so that you can set up your development environment to show the current state of the application and perform basic testing.
I’ll be using Google Chrome in this book, and I suggest you do the same. Not only is Chrome a solid browser, but it complies well with the latest W3C standards and has excellent F12 developer tools (so-called because you access them by pressing the F12 key).
The most compelling reason to use Chrome for development is that Google has created a Chrome extension that adds support for AngularJS to the F12 tools. It is a useful—if unpolished—tool, and I recommend you install it. The URL to the Chrome extension store is painfully long and impossible to type correctly, but you’ll find the URL easily if you search for Batarang AngularJS.
2. Choosing a Code Editor
You can use any text editor for AngularJS development. Two popular choices are WebStorm (www.jetbrains.com/webstorm) and Sublime Text (www.sublimetext.com). Both of these editors are paid-for products and are available for Windows, Linux, and Mac OS. Both offer enhancements over regular editors that make working with AngularJS easier.
Nothing polarizes developers like code editors, and I find that I am unable to work effectively with either WebStorm or Sublime Text, both of which constantly annoy me. Instead, I use Microsoft’s Visual Studio Express 2013 for Web, which is available without charge and has built-in support for working with AngularJS (see www.microsoft.com/visualstudio/express for details and make sure you get the Express for Web edition). Visual Studio runs only on Windows, of course, but is an excellent IDE and has a code editor that I think is second-to-none.
■ Tip You can pick any editor to follow the examples in this book. As long as your preferred editor can write HTML and JavaScript files (both of which are plain text), then you will be able to follow along without any problems.
3. Installing Node.js
Many development tools that are commonly used for client-side web app development are written in JavaScript and rely on Node.js to run. Node.js is built from the same JavaScript engine that is used in the Google Chrome browser but has been adapted to work outside the browser, providing a general-purpose framework for writing JavaScript applications.
Go to http://nodejs.org and download and install the Node.js package for your platform (there are versions available for Windows, Linux, and Mac OS). Make sure you install the package manager and that the installation directory is added to your path.
To test the Node.js installation, open a command line and type node. Wait until the prompt changes and then enter the following (on a single line):
function testNode() {return “Node is working”}; testNode();
When used interactively, Node.js will evaluate input as JavaScript, and you will see the following output if the installation has been successful:
‘Node is working’
■ Note There are lots of ways to configure Node.js and make a web server out of it. I am going to use the simplest and most reliable, which is to install the add-on modules I need locally within the Node.js installation directory. See http://Nodejs.org for other configuration options.
4. Installing the Web Server
A simple web server will suffice for development, and I create one using a Node.js module called Connect. From within the Node.js installation directory, run the following command:
npm install connect
NPM is the node package installer, and it will pull down the files required for the Connect module. Next, create a new file called server.js (still within the Node.js installation folder) and set the contents so they match those shown in Listing 1-4.
Listing 1-4. The Contents of the server.js File
var connect = require(‘connect’);
connect.createServer(
connect.static(“../angularjs”)
).listen(5000);
This simple file creates a basic web server that will respond to requests on port 5000 and serve up files contained in a folder called angularjs, which is at the same level as the Node.js installation folder on the disk.
5. Installing the Test System
One of the most important aspects of AngularJS is the support it has for unit testing. In this book, I’ll be using the Karma test runner and the Jasmine test framework, both of which are widely used and easy to get along with. From within the Node.js installation directory, run the following command:
npm install -g karma
NPM will download and install all the files that Karma requires. There is no further configuration required in this chapter. I’ll return to Karma in Chapter 25.
6. Creating the AngularJS Directory
The next step is to create a directory from which you will serve up your AngularJS applications during development. This allows you to check your progress as you code and organize all of your files consistently. Create a folder called angularjs at the same level on the disk as the Node.js installation folder. (You can use a different location, but remember to change the contents of the server.js file to match your choice.)
6.1. Getting the AngularJS Library
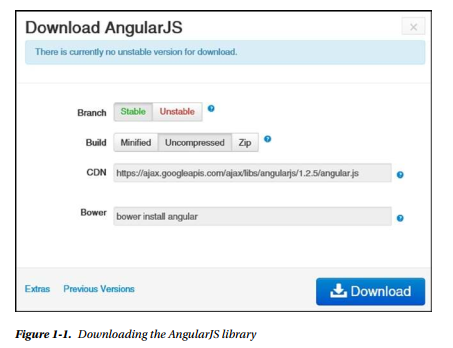
The next step is to download the latest stable release of AngularJS from http://angularjs.org. Click the Download link on the main page and ensure that the Stable and Uncompressed options are checked, as shown in Figure 1-1. As the figure shows, you can select an unstable (prerelease) version, get a minified version, or use a content distribution network (CDN), but for this book I am going to use a local copy of the uncompressed library. Save the file as angular.js in the angularjs directory.
As I write this, the current stable version of AngularJS is 1.2.5, which I will be using throughout this book. It takes time for a book to be edited and published, so there may be a later version available by the time you read this; however, the AngularJS API for the stable releases doesn’t change, so you should not encounter any problems using newer versions.
■ Tip There is a Previous Versions link on the download menu that will allow you to get exactly the same version I have used in the examples.
6.2. Getting the AngularJS Extras
If you look closely at Figure 1-1, you will see an Extras link in the bottom-left corner. This provides access to some additional files that extend the functionality of the core AngularJS library. I use some of the files in later chapters, and in Table 1-1 you can see a complete list of the extra files you will need and the chapters in which they are used.
6.3. Getting Bootstrap
I will be using the Bootstrap CSS framework to style the content in the examples throughout this book. Bootstrap isn’t required when working with AngularJS, and there is no direct relationship between the two packages, but Bootstrap has a nice set of CSS styles that will let me create clear content layouts without having to define and endlessly redefine custom CSS styles.
Go to http://getbootstrap.com and click the Download Bootstrap button. You will receive an archive that contains JavaScript and CSS files. Copy the following files into the angularjs folder alongside the angularjs file:
- bootstrap-3.0.3/dist/css/bootstrap.css
- bootstrap-3.0.3/dist/css/bootstrap-theme.css
Don’t re-create the file structure—copy the files into the angularjs folder. I introduce Bootstrap properly in Chapter 4. (As the file names suggest, the current version of Bootstrap as I write this is version 3.0.3.)
■ Tip Bootstrap consists of CSS files and a JavaScript file. I’ll be using the CSS files in all of the examples in this book, but I don’t use the JavaScript features at all since they are not required to explain how AngularJS works.
OPTIONAL: LIVERELOAD
AngularJS app development tends to be iterative, requiring lots of small changes that are then viewed in the browser. I use a tool called LiveReload (http://iivereioad.com) that monitors the files in a folder and automatically reloads the browser when a change is detected. This may seem like a small thing, but it is a huge timesaver, especially since you can have multiple browsers and browser windows updated simultaneously. As I write this, the Windows version is at an alpha release, but it works well. The Mac OS version is more mature and is available for $9.99. (To be clear, I don’t have any relationship of any kind with any software company. All of the tools that I use for my books are provided by Apress, or I purchase them myself. When I recommend a tool, it is because I like working with it, and I receive no compensation or special treatment of any kind.)
6.4. Getting Deployd
In Chapter 6, I begin the process of creating a substantial example application, and for that I need a server to which I can send HTTP queries to obtain data. I also need this facility in Part 3, where I explain the AngularJS features for Ajax and for consuming RESTful web services.
The server that I have chosen for this task is called Deployd and is available from Deployd.com. Deployd is an excellent cross-platform tool for modeling APIs for web applications. It is built on top of Node.js and MongoDB, which allows it to store data as JSON (actually a close derivative of JSON, but the differences don’t matter for this book), and server-side behaviors are written using JavaScript.
Sadly, the future of Deployd seems uncertain. The business model behind the project was to allow easy deployment of back-end services to cloud providers, but that doesn’t seem to have caught on. As I write this, there hasn’t been any active development on the project for a while and it is possible that the developers have moved on to other projects. The Deployd tools can still be downloaded and installed locally and, if you should want, deployed to any cloud provider that supports Node.js and MongoDB. Although active development of Deployd may have ceased, the project is open source. All of the source code, installers, and documentation are available at https://github.com/deployd/deployd as well as http://deployd.com. I have also included the Windows and Mac installers for Deployd in the source code download that accompanies this book, available from www.apress.com. Download and install Deployd for your platform. No further setup is required at the moment, and I’ll show you how to use Deployd in Chapter 6.
7. Performing a Simple Test
To make sure everything is installed and working, create a new HTML file called test.html in the angularjs folder and set the contents to match Listing 1-5.
Listing 1-5. Testing for AngularJS and Bootstrap in the test.html File
<!DOCTYPE html>
<html ng-app>
<head>
<title>First Test</title>
<script src=”angular.js”></script>
<link href=”bootstrap.css” rel=”stylesheet” />
<link href=”bootstrap-theme.css” rel=”stylesheet” />
</head>
<body>
<div class=”btn btn-default”>{{“AngularJS”}}</div>
<div class=”btn btn-success”>Bootstrap</div>
</body>
</html>
Some parts of this file may be new to you: the ng-app attribute on the html element and {{AngularJS}} in the body element come from AngularJS; the btn, btn-default, and btn-success classes are from Bootstrap. Don’t worry about what these mean or do at the moment—the purpose of this HTML document is to check that the development environment is set up and working. I explain how Bootstrap works in Chapter 4 and, of course, explain everything you need to know about AngularJS throughout the rest of this book.
7.1. Starting the Web Server
To start the web server, run the following command from the Node.js installation directory:
node server.js
This will load the server.js file created earlier in the chapter and start listening for HTTP requests on port 5000.
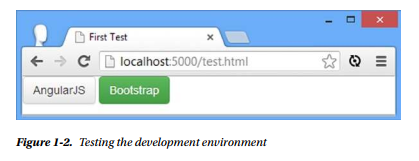
7.2. Load the Test File
Start Chrome and navigate to the URL http://localhost:5000/test.html. You should see the result in Figure 1-2.
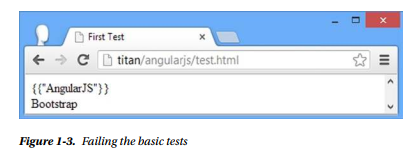
In Figure 1-3, you can see what happens if neither AngularJS nor Bootstrap works properly. Notice that you can see the brace characters ({ and }) in the AngularJS test and that the content isn’t presented as buttons (which is performed by Bootstrap). Check the configuration of your web server, check that you have placed the correct files in the angularjs folder, and try again.
Source: Freeman Adam (2014), Pro AngularJS (Expert’s Voice in Web Development), Apress; 1st ed. edition.