The header of our theme will look as shown in the following screenshot:
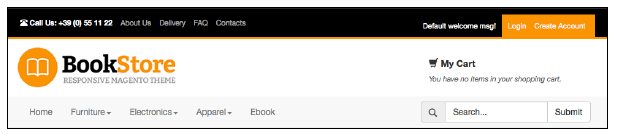
As you can see, there are three main sections that I will call the top header (the black line on the top), the main header (the white one), and the navigation bar.
To customize our header, open the header.phtml file located at app/design/frontend/bookstore/default/page/html and create the basic structure with the Bootstrap scaffolding. Our header file code will look as follows:
<!– TopBar –>
<div id=”topbar”>
<div class=”container”>
<div class=”row”>
…
</div>
</div>
</div>
<!– Header –>
<div id=”header”>
<div class=”container”>
<div class=”row”>
</div>
</div>
</div>
<!– Navigation –>
<nav>
. . .
</nav>
Let’s discuss the preceding code in detail:
- In the first block, inside the top header div element, we put some custom links or custom text in the left, and the user area in the right
- In the second block, we have the main header with the logo and the cart
- In the third block, we will have the navigation bar with the menus and the search form
Now we will see how to customize each block of the header.
1. Creating the top header
The top header div element, will include:
- A CMS block with custom links on the left
- A user area
1.1. CMS block links
To put CMS custom links on the left, we have to perform the following steps:
- Create a custom CMS
- Declare it in xml.
- Finally, declare the block with a PHP statement in the phtml file.
1.1.1. Creating the CMS block with the links
From the admin panel, navigate to CMS | Static Blocks and create a new block with the following information:
- Block ID: topbar_cmslinks
- Block Html Code:
<ul class=”list-inline”>
<li><span class=”glyphicon glyphicon-phone-alt”></
span> <strong>Call Us: +39 (0) 55 11 22</strong></li>
<li><a href=”{{store_url=”}}”>About Us</a></li>
<li><a href=”{{store_url=”}}”>Delivery</a></li>
<li><a href=”{{store_url=”}}”>FAQ</a></li>
<li><a href=”{{store_url=”}}”>Contacts</a></li>
</ul>
Note: We are using a predefined Bootstrap class, list-inline, in the ul tag to display inline links.
1.1.2. Declaring the CMS block in the local.xml file
Open the local.xml file and in the default handle add the following:
<reference name=”header”>
<block type=”cms/block” name=”topbar_cmslinks” as=”topbar_cmslinks”>
<action method=”setBlockId”>
<block_id>topbar_cmslinks</block_id>
</action>
</block>
</reference>
Note: We insert the block into the reference name header.
The as=”” statement is by which a template calls the block. In PHP, you will see <?php echo $this->getChildHtml(‘topbar_cmslinks’) ?>, which indicates that it correlates to <block . . . as=’topbar_cmslinks’> in local.xml.
1.1.3. Declaring the CMS block with a PHP statement in header.phtml
We can declare the CMS block with a PHP statement in header.phtml, as shown in the following code:
<!– Top Bar –>
<div id=”topbar”>
<div class=”container”>
<div class=”row”>
<div class=”col-md-8″>
<?php echo $this->getChildHtml(‘topbar_cmslinks’) ?>
</div>
</div>
</div>
</div>
To explain better what $this-> is, I quote Nick Jones’s explanation:
“All Magento templates have a corresponding block instance. The $this statement exposed to us is the block instance, as if we were inside a method of the object.”
See Mage_Core_Block_Template::fetchView. More details and sources are available at http://www.nicksays.co.uk/magento-this/.
The getChildHtml(‘topbar_cmslinks’) statement loads the block defined in local.xml.
The left section is now completed.
1.2. The right part of the top header
Now let’s work on the right part, the user area.
About this block, please note that we will not use the default Magento top links, but a custom piece of code that will display only the conditional links for the user.
The idea is to display the welcome message and two links, Register and Login, for the users who are not logged in, and two links, My Account and Logout links, for the users who are logged in. To do this, Magento has a function that checks the status of the user’s session. We will replace the User Area text that we used before in the header code with the following condition:
<!– Top Bar –>
<div id=”topbar”>
<div class=”container”>
<div class=”row”>
<div class=”col-md-8″>
<?php echo $this->getChildHtml(‘topbar_cmslinks’) ?>
</div>
<div class=”user-links col-md-4″>
<span class=”welcome pull-left”>
<?php echo $this->getLayout()->getBlock(‘header’)->getWelcome() ?>
</span>
<ul class=”list-inline pull-left”>
<?php if ($this->helper(‘customer’)->isLoggedIn()): ?>
<li>
<a title=”<?php echo $this-> (‘My Account’) ?>” href=”<?php echo $this->getUrl(‘customer/account’) ?>”>
<?php echo $this-> (‘My Account’) ?>
</a>
</li>
<li>
<a title=”Log Out” href=”<?php echo $this->getUrl(‘customer/ account/logout’) ?>”>
<?php echo $this-> (‘Logout’) ?></a>
</li>
<?php else: ?>
<li><a href=”<?php echo $this->getUrl(‘customer/account/ login/’)?>”>
<?php echo $this-> (‘Login’) ?></a></li>
<li><a href=”<?php echo $this->getUrl(‘customer/account/ create/’)?>”>
<?php echo $this-> (‘Create Account’) ?></a></li>
<?php endif;?>
</ul>
</div>
</div>
</div>
</div>
Now, add a little bit of CSS to customize it a little. Insert the following CSS code in your styles.css file in the skin folder (skin/frontend/bookstore/default/ css/):
/* TopBar */ #topbar {
background:none repeat scroll 0 0 #000;
color:#FFF;
font-size:12px;
padding:10px 0 0;
border-bottom:3px solid #FA9221;
}
#topbar ul {
margin:5px 0 0;
}
#topbar a {
color:#9F9F9F;
}
#topbar a:hover {
color:#f89223
}
#topbar .user-links .welcome {
padding:10px;
}
#topbar .user-links ul {
background:none repeat scroll 0 0 #FA9221;
margin:0;
padding:10px;
}
#topbar .user-links a {
color:#fff;
}
2. Creating the main header
The main header div element, will include:
- A logo
- A top cart
2.1. Logo
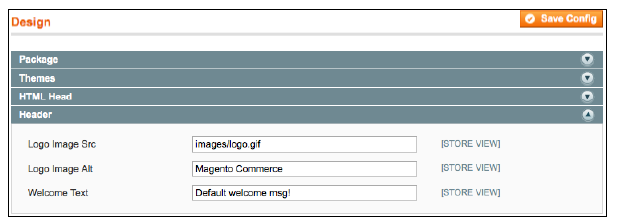
The default logo image is logo.gif and is located in the images folder at skin/ frontend/bookstore/default/images/logo.gif. The filename can be changed by navigating to System | Configuration | Design | Header, as shown in the following screenshot:
The following code generates the logo URL and the link to the home page:
<div class=”col-md-4″>
<a href=”<?php echo $this->getUrl(”) ?>” title=”<?php echo $this-
>getLogoAlt() ?>” class=”logo”>
<img src=”<?php echo $this->getLogoSrc() ?>” alt=”<?php echo $this-
>getLogoAlt() ?>” />
</a>
</div>
Note: The logo link’s title attribute and the logo image’s alt attribute will be filled in with the Logo Image Alt field of the configuration that you can set in the same section of the admin, as shown in the preceding screenshot.
2.2. The top cart
We want to put the cart to the right of the header. We can do this in the following two ways:
- By adding a class pull-right to the cart div, but in this way we lose the responsiveness of the block (that we can fix with a media query)
- By adding an empty div, col-md-4, between the logo div element and the cart div element
Therefore, we will have three boxes of four columns where the latest box, the cart div element, will be placed at the end of the row.
I will use this method because in future, we can use the intermediate div element to insert some additional information or banner in the header after the logo.
The following is the div class that contains the cart in the header.phtml file, located at app/design/frontend/bookstore/default/template/page/:
<div class=”col-md-4″>
<?php echo $this->getChildHtml(‘top_cart’) ?>
</div>
The base theme doesn’t include a top cart, but we can duplicate the sidebar mini cart and place it in the header by performing the following steps:
- Duplicate the phtml file. You can find it at app/design/frontend/ base/default/template/checkout/cart in your theme folder in the same path, and call it in the topcart.phtml file. Then change the code with the following simplified version of the file:
<?php if ($this->getIsNeedToDisplaySideBar()):?>
<div class=”block block-cart block-topcart”>
<?php $_cartQty = $this->getSummaryCount() ?>
<div class=”block-title”><span class=”glyphicon glyphicon- shopping-cart”>
</span><strong><span><?php echo $this-> (‘My Cart’) ?>
</span></strong>
<?php if ($_cartQty>0): ?>
<div class=”summary”>
<?php if ($_cartQty==1): ?>
<p class=”amount”><?php echo $this-> (‘There is <a href=”%s”>1
item</a> in your cart.’, $this->getUrl(‘checkout/cart’)) ?>
<?php echo Mage::helper(‘checkout’)->formatPrice($this->getSubtotal())
?></p>
<?php else: ?>
<p class=”amount”><?php echo $this-> (‘There are <a
href=”%s”>%s items</a> in your cart.’, $this->getUrl(‘checkout/
cart’), $_cartQty) ?> <?php echo Mage::helper(‘checkout’)-
>formatPrice($this->getSubtotal()) ?></p>
<?php endif ?>
</div>
<?php else: ?>
<p class=”empty”><?php echo $this-> (‘You have no items in your shopping cart.’) ?></p>
<?php endif ?>
</div>
<!– // block-title –>
<div class=”block-content”>
<?php if($_cartQty && $this->isPossibleOnepageCheckout()): ?>
<div class=”actions”>
<?php echo $this->getChildHtml(‘extra_actions’) ?>
<button type=”button” title=”<?php echo $this-> (‘Checkout’)
?>” class=”button” onclick=”setLocation(‘<?php echo $this-
>getCheckoutUrl() ?>’)”><span><span><?php echo $this->
(‘Checkout’) ?></span></span></button>
</div>
<?php endif ?>
<?php $_items = $this->getRecentItems() ?>
<?php if(count($_items)): ?>
<p class=”block-subtitle”><?php echo $this-> (‘Recently added item(s)’) ?></p>
<ol id=”cart-sidebar” class=”mini-products-list”>
<?php foreach($_items as $_item): ?>
<?php echo $this->getItemHtml($_item) ?>
<?php endforeach; ?>
</ol>
<script type=”text/javascript”>decorateList(‘cart-sidebar’, ‘none-
recursive’)</script> <?php endif ?>
</div>
</div>
<?php endif; ?>
- Declare the top cart in the xml file, in the reference header as follows:
<block type=”checkout/cart_sidebar” name=”top_cart”
template=”checkout/cart/topcart.phtml” before=”-“>
<action method=”addItemRender”><type>simple</type><block>checkout/ cart_item_renderer</block><template>checkout/cart/sidebar/default. phtml</template></action>
<action method=”addItemRender”><type>grouped</ type>
<block>checkout/cart_item_renderer_grouped</ block>
<template>checkout/cart/sidebar/default.phtml</template>
</ action>
<action method=”addItemRender”><type>configurable</ type>
<block>checkout/cart_item_renderer_configurable</ block>
<template>checkout/cart/sidebar/default.phtml</template>
</ action>
<block type=”core/text_list” name=”cart_sidebar.extra_actions”
as=”extra_actions” translate=”label” module=”checkout”>
<label>Shopping Cart Sidebar Extra Actions</label>
</block>
</block>
Now, you should be able to see the top cart in your theme header.
- Add a little bit of CSS code to customize Insert the following CSS code in your styles.css file in the skin folder (skin/frontend/bookstore/ default/css/):
/* Header */
#header {
padding-top:10px;
}
#header .logo {
display:block;
margin-bottom:20px;
}
#header .block-topcart {
margin-top: 5px;
padding: 14px 20px 10px;
}
#header .block-topcart .block-title {
font-size: 15px;
margin-bottom: 5px
}
#header .block-topcart p.empty {
font-size: 12px;
color: #666;
font-style: italic
}
#header .block-topcart .block-content {
display: none
}
Now the header block is complete and will look as shown in the following code:
<!– Main Header –>
<div id=”header”>
<div class=”container”>
<div class=”row”>
<div class=”logo col-md-4″>
<a href=”<?php echo $this->getUrl(”) ?>” title=”<?php echo $this-
>getLogoAlt() ?>”><img src=”<?php echo $this->getLogoSrc() ?>”
alt=”<?php echo $this->getLogoAlt() ?>” /></a>
</div>
<div class=”col-md-4″></div>
<div class=”col-md-4″>
<?php echo $this->getChildHtml(‘top_cart’) ?>
</div>
</div>
</div>
</div>
Source: Sacca Andrea (2014), Mastering Magento theme design, Packt Publishing; Illustrated edition.