SQL Server Management Studio gives you a complete authoring environment for all types of queries. You can create, save, load, and edit queries. SSMS allows you to work on queries without being connected to a particular server. This tool also gives you the option of developing your queries with different projects.
The authoring capabilities are associated with Query Editor as well as Solution Explorer, both of which are described in this section. This section also introduces the new SSMS application called Data Discovery and Classification and describes how it can be used to classify sensitive data.
1. Query Editor
To launch the Query Editor pane, click the New Query button in the toolbar of SQL Server Management Studio. By default, you get a new Database Engine query, but other queries are possible.
Once you open Query Editor, the status bar at the bottom of the pane tells you whether your query is in a connected or disconnected state. If you are not connected automatically to the server, the Connect to SQL Server dialog box appears, where you can type the name of the database server to which you want to connect and select the authentication mode.
NOTE Disconnected editing has more flexibility than connected editing. You can edit queries without having to choose a server, and you can disconnect a given Query Editor window from one server and connect it to another without having to open another window. (You can use disconnected editing by clicking the Cancel button in the Connect to SQL Server dialog box.)
Query Editor can be used by end users for the following tasks:
- Generating and executing Transact-SQL statements
- Storing the generated Transact-SQL statements in a file
- Generating and analyzing execution plans for generated queries
- Graphically illustrating the execution plan for a selected query
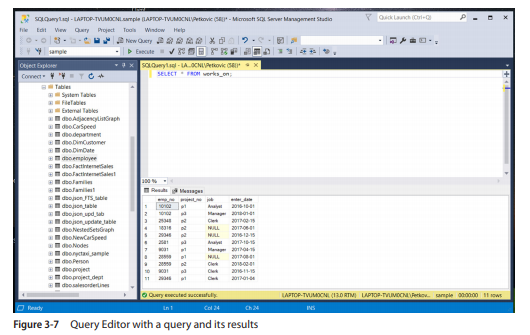
Query Editor contains an internal text editor and a selection of buttons in its toolbar. The main window is divided into a query pane (upper) and a results pane (lower). Users enter the Transact-SQL statements (queries) that they want to execute into the query pane, and after the system has processed the queries, the output is displayed in the results pane.
The example shown in Figure 3-7 demonstrates a query entered into Query Editor and the output returned. The first statement in the query pane, USE (not shown in Figure 3-7), specifies the sample database as the current database. The second statement, SELECT, retrieves all the rows of the works_on table. Select Execute or press F5 to return the results of these statements in the results pane of Query Editor.
NOTE You can open several different windows—that is, several different connections to one or more Database Engine instances. You create new connections by clicking the New Query button in the toolbar.
The following additional information concerning the execution of the statement(s) is displayed in the status bar at the bottom of the Query Editor window:
- The status of the current operation (for example, “Query executed successfully”)
- Database server name
- Current username and server process ID
- Current database name
- Elapsed time for the execution of the last query
- The number of retrieved rows
One of the main features of SQL Server Management Studio is that it’s easy to use, and that also applies to the Query Editor component. Query Editor supports a lot of features that make coding of Transact-SQL statements easier. First, Query Editor uses syntax highlighting to improve the readability of Transact-SQL statements. For example, it displays all reserved words in blue, all variables in black, strings in red, and comments in green. (For a discussion of reserved words, see the next chapter.)
There is also the context-sensitive help function called Dynamic Help that enables you to get help on a particular statement. If you do not know the syntax of a statement, just select that statement in the editor and choose Help | Dynamic Help. You can also select options of different Transact-SQL statements to get the corresponding text from Microsoft Docs.
NOTE The Database Engine supports the SQL Intellisense tool. Intellisense is a form of automated autocompletion. In other words, this add-in allows you to access descriptions of frequently used elements of Transact-SQL statements without using the keyboard.
Object Explorer can also help you edit queries. For instance, if you want to see what the corresponding Transact-SQL statement for creation of the employee table looks like, drill down to this database object, right-click the table name, select Script Table As, and choose CREATE to New Query Editor Window.
Object Explorer is very useful if you want to display the graphical execution plan for a particular query. (The execution plan is the plan selected by the optimizer to execute a given query.) If you select Query | Display Estimated Execution Plan, the system will display the graphical plan instead of the result set for the given query. This topic is discussed in detail in Chapter 19.
2. Solution Explorer
Query editing in SQL Server Management Studio is solution-based. If you start a blank query using the New Query button, it will still be based on a blank solution. You can see this by choosing View | Solution Explorer right after you open your blank query.
A solution can have zero, one, or more projects associated with it. A blank solution does not contain any project. If you want to associate a project with the solution, close your blank solution, Solution Explorer, and the Query Editor window, and start a new project by choosing File | New | Project. In the New Project window, type the name of your project and its location. A project is a method of organizing files in a selected location. You can choose a name for the project and select its location on disk. When you create a new project, by default you start a new solution. You can add a project to an existing solution using Solution Explorer.
Once the new project and solution are created, Solution Explorer shows nodes in each project for Connections, Queries, and Miscellaneous. To open a new Query Editor window, right-click the Queries node and choose New Query.
3. Data Discovery and Classification
Beginning with Version 17.5, SQL Server Management Studio supports a new application called Data Discovery and Classification, which is a set of services that is used to discover, classify, and report sensitive data in the database. Sensitive data includes business, financial, and healthcare information.
The Data Discovery and Classification tool enables you to protect your sensitive data by meeting the data privacy standards and by controlling access to the data. The following tasks are supported by the tool:
- Applying your own classification policy
- Applying recommended classification
- Summarizing the classification using a report
The following subsections describe these tasks.
3.1. Applying Your Own Classification Policy
We will use the sample database to demonstrate how to apply your own classification policy to the sensitive data of a database. For this example, we will classify values of the budget column of the project table as confidential.
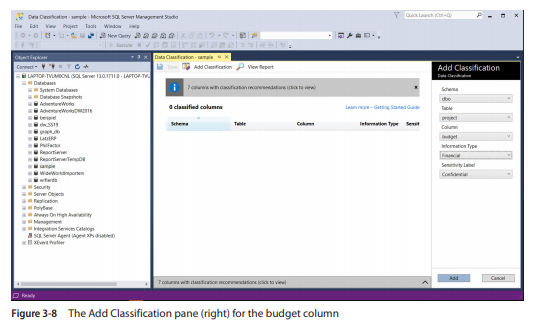
To perform the task, right-click the sample database and select Tasks | Data Discovery and Classification | Classify Data. In the Data Classification window, click the Add Classification button in the middle of the pane. The Add Classification pane on the right side of the subsequent window (see Figure 3-8) allows you to specify the column that should be classified. Therefore, open the Table drop-down list and select project from the list of all tables. Next, open the Column drop-down list and select budget from the list of all columns of the project table.
The next drop-down list, Information Type, allows you to give a more specific description of the data you want to classify. (For the budget column, I selected the Financial option.) Finally, the Sensitivity Label field specifies the classification level of the selected data. Choose Confidential, as shown in Figure 3-8.
Generally, you can choose from among the following classification levels in the Sensitivity Label drop-down list:
- Public Data whose unauthorized disclosure, alteration, or destruction would result in little or no risk to the company that owns it. Examples of public data include press releases and research publications.
- General General personal data that can be identified by reference to an identifier, such as a name or an identification number.
- Confidential Data whose access is restricted according to the data classification scheme defined by the particular organization.
- Confidential – GDPR Confidential data that additionally falls within the scope of the European Union’s General Data Protection Regulation (GDPR) rules. The GDPR is a set of rules issued by the EU that defines personal data as any information that can identify a natural person, directly or indirectly, by reference to an identifier. Any personal data that is collected from individuals in EU countries is subject to GDPR.
- Highly Confidential Data whose access in any form, including paper or electronic, is restricted to authorized individuals only. Transmitting or storing this data without encryption is prohibited.
- Highly Confidential – GDPR Highly confidential data that additionally falls within the scope of the GDPR rules.
3.2. Applying and Summarizing the Recommended Classification
Another feature of the Data Discovery and Classification tool is the capability to scan and discover the sensitive data in your database. While the scanning process of the original sample database does not lead to discovery of any sensitive data, I will use the AdventureWorks database to describe this process. (AdventureWorks 2016 is one of Microsoft’s sample databases and can be downloaded from the MS site.)
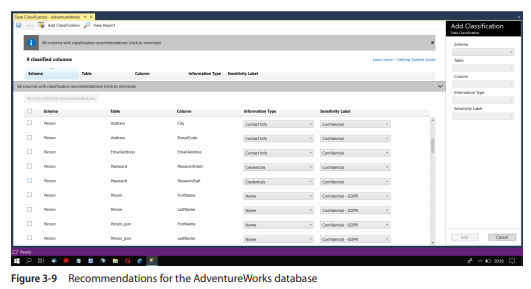
To perform the task, you use the same sequence of steps as in the previous subsection. The only difference is the selection of the AdventureWorks database instead of sample. As you can see from Figure 3-9, the tool recommends 66 columns from the AdventureWorks database to be classified.
After reviewing the recommended classifications, you can change the Information Type and the Sensitivity Label values provided by the tool with any value listed previously according to your company policies and/or standards using the drop-down boxes to the right of each column. To apply the classification you have chosen, select all recommendations or a set of recommendations on specific columns by checking the check box to the left of each column. Next, click the blue Accept Selected Recommendations button.
After you accept the recommended classification on the selected columns, a notification message informs you that the changes will not be updated until you save all changes. Therefore, click the Save button in the upper-left corner of the window.
Additionally, the Discovery and Classification tool allows you to generate a report that summarizes the classification state of the database. To do this, click the View Report button in the top menu of the window, after performing the previous classifications. The displayed SQL Data Classification Report summarizes the classification state of the selected database.
Source: Petkovic Dusan (2020), Microsoft SQL Server 2019: A Beginner’s Guide, Seventh Edition-McGraw-Hill Education.