SQL Server Management Studio has two main purposes:
- Administration of the database servers
- Management of database objects
The following sections describe these functions of SQL Server Management Studio.
1. Administering Database Servers
The administrative tasks that you can perform by using SQL Server Management Studio are, among others, the following:
- Register servers
- Connect to a server
- Create new server groups
- Manage multiple servers
- Start and stop servers
The following subsections describe these administrative tasks.
1.1. Registering Servers
SQL Server Management Studio separates the activities of registering servers and exploring databases and their objects. (Both of these activities can be done using Object Explorer.) Every server (local or remote) must be registered before you can use its databases and objects. A server can be registered during the first execution of SQL Server Management Studio or later. To register a database server, right-click the icon of your database server in Object Explorer and choose Register. (If the Object Explorer pane doesn’t appear on your screen, select View | Object Explorer.) The New Server Registration dialog box appears. Choose the name of the server that you want to register and the authentication mode. Click Save.
1.2. Connecting to a Server
SQL Server Management Studio also separates the tasks of registering a server and connecting to a server. This means that registering a server does not automatically connect you to the server at SSMS startup. To connect to a server from the Object Explorer window, right-click the server name and choose Connect.
1.3. Creating a New Server Group
To create a new server group in the Registered Servers pane, right-click Local Server Groups and choose New Server Group. In the New Server Group Properties dialog box, enter a (unique) group name and optionally describe the new group.
1.4. Managing Multiple Servers
SQL Server Management Studio allows you to administer multiple database servers (called instances) on one computer by using Object Explorer. Each instance of the Database Engine has its own set of database objects (system and user databases) that are not shared between different instances.
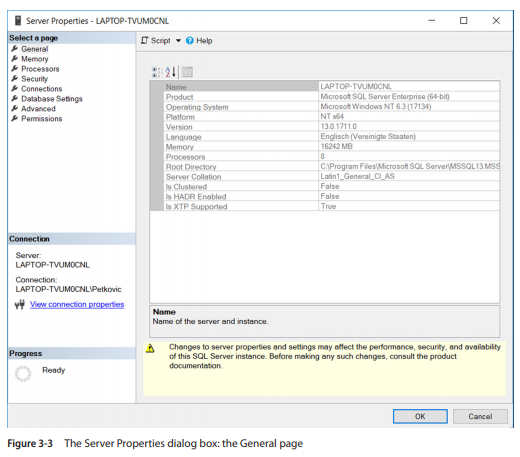
To manage a server and its configuration, right-click the server name in Object Explorer and choose Properties. The Server Properties dialog box that opens contains several different pages, such as General, Security, and Permissions.
The General page (see Figure 3-3) shows general properties of the server. The Security page contains the information concerning the authentication mode of the server and the login auditing mode. The Permissions page shows all logins and roles that can access the server. The lower part of the page shows all permissions that can be granted to the logins and roles.
You can replace the existing server name with a new name. Right-click the server name in the Object Explorer window and choose Register. Now you can rename the server and modify the existing server description in the Registered Server frame.
NOTE Do not rename servers after this point, because changing names can affect other servers that reference them.
1.5. Starting and Stopping Servers
A Database Engine server starts automatically by default each time the Windows operating system starts. To start the server using SQL Server Management Studio, right-click the selected server in the Object Explorer pane and click Start in the context menu. The menu also contains Stop and Pause functions that you can use to stop or pause the activated server, respectively. Similarly, you can resume and restart the server, using the functions with the corresponding names.
2. Managing Databases Using Object Explorer
The following are the management tasks that you can perform by using SQL Server Management Studio:
- Create databases without using Transact-SQL
- Modify databases without using Transact-SQL
- Manage tables without using Transact-SQL
- Generate and execute SQL statements (described later, in the section “Query Editor”)
2.1. Creating Databases Without Using Transact-SQL
You can create a new database by using Object Explorer or the Transact-SQL language. (Database creation using Transact-SQL is discussed in Chapter 5.) As the name suggests, you also use Object Explorer to explore the objects within a server. From the Object Explorer pane, you can inspect all the objects within a server and manage your server and databases.
The existing tree contains, among other folders, the Databases folder. This folder has several subfolders, including one for the system databases and one for each new database that is created by a user. (System and user databases are discussed in detail in Chapter 15.)
To create a database using Object Explorer, right-click Databases and select New Database. In the New Database dialog box (see Figure 3-4), type the name of the new database in the Database Name field and then click OK. Each database has several different properties, such as file type, initial size, and so on. Database properties can be selected from the left pane of the New Database dialog box. There are several different pages (property groups):
- General
- Files
- Filegroups
- Options
- Change Tracking
- Permissions
- Extended Properties
- Mirroring
- Transaction Log Shipping
- Query Store
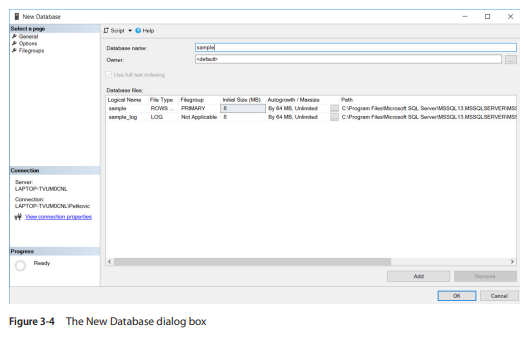
NOTE For an existing database, the system displays all property groups in the preceding list. For a new database, as shown in Figure 3-4, there are only three groups: General, Options, and Filegroups.
The General page of the Database Properties dialog box (see Figure 3-5) displays, among other things, the database name, the owner of the database, and its collation. The properties of the data files that belong to a particular database are listed in the Files page and comprise the name and initial size of the file, where the database will be stored, and the type of the file (PRIMARY, for instance). A database can be stored in multiple files.
NOTE The Database Engine has dynamic disk space management. This means that databases can be set up to automatically expand and shrink as needed. If you want to change the Autogrowth property in the Files page, click the ellipses (…) in the Autogrowth/Maxsize column and make your changes in the Change Autogrowth dialog box. The Enable Autogrowth check box should be checked to allow the database to autogrow. Each time there is insufficient space within the file when data is added to the database, the server will request the additional space from the operating system. The amount (in megabytes) of the additional space is set by the number in the File Growth frame of the same dialog box. You can also decide whether the file can grow without any restrictions (the default value) or not. If you restrict the file growth, you have to specify the maximum file size.

The Filegroups page of the Database Properties dialog box displays the name(s) of the filegroup(s) to which the database file belongs, the art of the filegroup (default or nondefault), and the allowed operation on the filegroup (read/write or read-only).
The Options page of the Database Properties dialog box enables you to display and modify all database-level options. There are, among others, the following groups of options: Automatic, Miscellaneous, Recovery and State. For instance, the following four options exist for State:
- Database Read-Only Allows read-only access to the database. This prohibits users from modifying any data. (The default value is False.)
- Database State Describes the state of the database. (The default value is Normal.)
- Restrict Access Restricts the use of the database to one user at a time. (The default value is MULTIUSER.)
- Encryption Enabled Controls the database encryption state. (The default value is False.)
If you choose the Permissions page, the system opens the corresponding dialog box and displays all users and roles along with their permissions. (For the discussion of permissions, see Chapter 12.)
The Extended Properties page displays additional properties of the current database. Existing properties can be deleted and new properties can be added from this dialog box.
The rest of the pages (Change Tracking, Mirroring, Transaction Log Shipping, and Query Store) describe the features related to data availability and are explained in Chapter 16.
2.2. Modifying Databases Without Using Transact-SQL
Object Explorer can also be used to modify an existing database. Using this component, you can modify files and filegroups that belong to the database. To add new data files, right-click the database name and choose Properties. In the Database Properties dialog box, select Files, click Add, and type the name of the new file. You can also add a (secondary) filegroup for the database by selecting Filegroups and clicking Add Filegroup.
NOTE Only the system administrator or the database owner can modify the database properties just mentioned.
To delete a database using Object Explorer, right-click the database name and choose Delete.
2.3. Managing Tables Without Using Transact-SQL
After you create a database, your next task is to create all tables belonging to it. As with database creation, you can create tables by using either Object Explorer or Transact-SQL. Again, only Object Explorer is discussed here. (The creation of a table and all other database objects using the Transact-SQL language is discussed in detail in Chapter 5.)
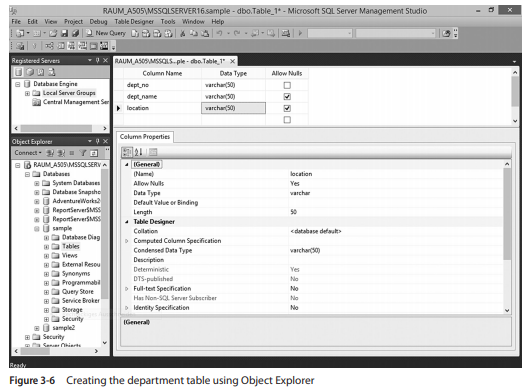
To create a table using Object Explorer, expand the Databases folder, expand the database, right-click the Tables subfolder, and then click New and after that, Table.
To demonstrate the creation of a table using Object Explorer, the department table of the sample database will be used as an example. Enter the names of all columns with their properties. Enter the column names, their data types, and the NULL property of each column in the two-dimensional matrix, as shown in the top-right pane of Figure 3-6.
All data types supported by the system can be displayed (and one of them selected) by clicking the arrow sign in the Data Type column (the arrow appears after the cell has been selected). Subsequently, you can type entries in the Length, Precision, and Scale rows for the chosen data type on the Column Properties tab (see the bottom-right pane of Figure 3-6). Some data types, such as CHARACTER (CHAR), require a value for the Length row, and some, such as DECIMAL, require a value in the Precision and Scale rows. On the other hand, data types such as INTEGER do not need any of these entries to be specified. (The valid entries for a specified data type are highlighted in the list of all possible column properties.)
The check box in the Allow Nulls column must be checked if you want a table column to permit NULL values to be inserted into that column. Similarly, if there is a default value, it should be entered in the Default Value or Binding row of the Column Properties tab. (A default value is a value that will be inserted in a table column when there is no explicit value entered for it.)
The column dept_no is the primary key of the department table. (For the discussion of primary keys of the sample database, see Chapter 1.) To specify a column as the primary key of a table, you must right-click the column and choose Set Primary Key. Finally, click the x in the right pane with the information concerning the new table. After that, the system will display the Choose Name dialog box, where you can type the table name.
To view the properties of an existing table, double-click the folder of the database to which the table belongs, double-click Tables, and then right-click the name of the table and choose Properties. To rename a table, right-click the name of the table in the Tables folder and choose Rename. To remove a table, right-click the name of the table in the Tables folder in the database to which the table belongs and select Delete.
NOTE You should now create the other three tables of the sample database: employee, project, and works_on. The structure of these tables can be found in the Introduction of the book.
Source: Petkovic Dusan (2020), Microsoft SQL Server 2019: A Beginner’s Guide, Seventh Edition-McGraw-Hill Education.