Prior to SQL Server 2017, the Database Engine was supported by only one platform—Windows. In SQL Server 2017, Microsoft added support for other operating systems, namely Linux platforms. Therefore, since SQL Server 2017, the database system can also be used with the Linux operating system and its derivatives.
Support for Linux requires another front-end tool, because SSMS runs exclusively on Windows. This tool, Azure Data Studio, is a cross-platform, desktop front-end tool for data professionals that can be used as a data platform on Linux and macOS. (Windows is supported, too.)
NOTE Microsoft releases new versions of Azure Data Studio approximately every six weeks. For this reason, the features described in this chapter may be modified by the time you read this book.
The functionality and layout of Azure Data Studio is almost identical on Windows and Linux platforms. For this reason, only the installation of this front-end tool is presented in separate subsections for Windows and Ubuntu. Configuration of the tool and introduction of its features will be discussed without distinction between different platforms. Therefore, we will discuss the following topics:
- Installation
- Configuration
- Object Explorer
- Code Editor
- Database dashboards and customization
1. Installation of Azure Data Studio
Installation of Azure Data Studio on Windows is described first, followed by the installation on Linux in general, and on Ubuntu in particular.
1.1. Windows Installation
The installation of Azure Data Studio on Windows is easy to manage. The Microsoft download page for Azure Data Studio offers three options for Windows:
- User Installer
- System Installer
- .zip
The difference between User Installer and System Installer is that the former gives you different options during the installation process than the latter. (For this reason, Microsoft generally recommends to choose User Installer.) Using the .zip option, you download the .zip file with all necessary files, including the .exe file.
After downloading the files from the chosen option, you have to execute it. After that, the whole installation is straightforward.
The functionality of Azure Data Studio on Windows is similar to the functionality of SQL Server Management Studio. The main difference is that SSMS is a mature tool, while Azure Data Studio is a new tool, which, at this moment, supports only a subset of features already implemented for SSMS. (You can expect that over time the tool will be extended with several other features.)
1.2. Linux Installation
As you already know, Azure Data Studio is a “front-end” tool for SQL Server that runs on Linux, Windows, and macOS. This section describes the installation of the tool for the Ubuntu operating system.
NOTE The installation of Azure Data Studio on Red Hat Linux and SuSe Linux is similar and is explained in Microsoft Docs (https://docs.microsoft.com).
Open the web browser on your Ubuntu system and go to www.microsoft.com. Click the magnifying-glass icon in the upper-right corner, type Download and Install Azure Data Studio in the Search box, and press enter. In the search results, click the top link to open the page with the same name. For Ubuntu, you will see three different types of installers:
- .deb Debian software repository
- .rpm Package in .rpm format
- .tar.gz Files in a compressed format
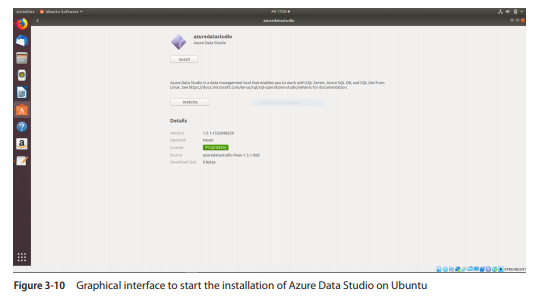
We will perform the Debian installation. Therefore, click the .deb installer. After clicking, choose Save File and click OK. The .deb file will be downloaded under the Files/Download directory of your operating system. (You can also use the default method and open the .deb file immediately using the Software installer.) When the download process is finished, double-click the file to launch the installation. The screen shown in Figure 3-10 appears. Click the Install button. To proceed with the installation process, you have to perform authentication. Enter the administrator user ID and password of your Ubuntu operating system. After that, the installation process begins.
After the installation process has completed, go to the Ubuntu applications to verify the Azure Data Studio icon is present. Double-click it to launch the Azure Data Studio initial screen.
NOTE The preceding description explains how to perform the graphical installation of Azure Data Studio. You can choose to do it manually, using the command-line interface. The description of the manual installation can be found in Microsoft Docs.
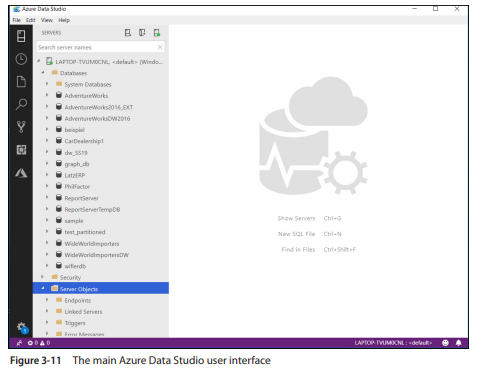
The main Azure Data Studio user interface is shown in Figure 3-11. The interface shows the following icons in the left vertical pane:
- Servers (the list of all existing servers)
- Task History (the list of all administrative and management tasks executed in the past)
- Explorer (starts Object Explorer; described later in the “Object Explorer” section)
- Search (starts the search for the specified object)
- Source Control (a version control system designed to track changes in source code)
- Extensions (described later in the “Database Dashboards and Customization” section)
- Azure (the component to explore Azure Data Studio resources)
2. Configuration
Each user can change the default settings of Azure Data Studio by using the File | Preferences | Settings menu options. Preferences are customized by a JSON file called settings.json.
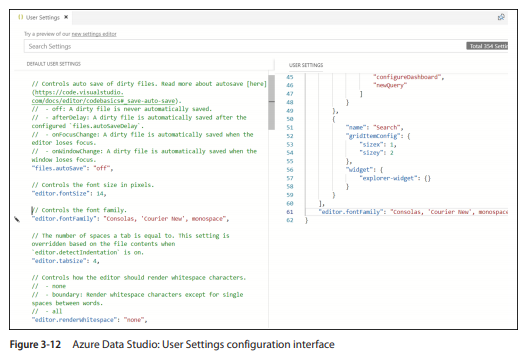
Figure 3-12 shows the configuration interface of Azure Data Studio.
The pane on the left side of Figure 3-12 shows all default user settings. The pane on the right can be used as a workspace, where you can move one or more default settings from the left pane to change them.
To demonstrate how you can change settings, I will change the default font family. Azure Data Studio provides a pencil icon that you can use to copy the default settings into the right pane and make changes to them. Go to the “Controls the font family” part of the JSON document and click Edit and Copy Settings. (Both appear subsequently when you move your cursor to the pencil icon, that appears to the left of the text.) Now, the selected settings show up in the right pane (see Figure 3-12) and you can modify them. To save updates, close the User Settings pane and click Save in the window, which appears next. The settings.json file will be modified and the new settings will be activated when you start Azure Data Studio again.
3. Object Explorer
Object Explorer in Azure Data Studio is similar to the SSMS component with the same name. In other words, Azure Data Studio’s Object Explorer allows users to view database objects associated with SQL Server. These objects can be traversed by expanding (and collapsing) a tree view of them.
NOTE Object Explorer in Azure Data Studio does not have the complete functionality available in SSMS’s Object Explorer, but Microsoft continues to enhance the functionality of the former with each new version of Azure Data Studio.
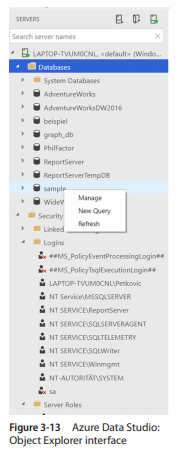
Besides the navigation functionality, you can right-click several objects to display the extended functionality of them. For instance, when you right-click the name of a database, the following extended functionality appears (see Figure 3-13):
- Manage Opens dashboards for different tasks, such as database backup and restore
- New Query Opens the new Code Editor window
- Refresh Updates the database and its objects
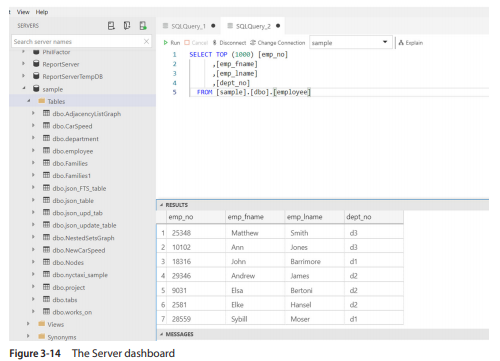
4. Code Editor
To connect to Azure Data Studio, type the name of your instance of the Database Engine in the Server dialog field. Do not forget to write the fully qualified name in the form server_name\ instance_name. Figure 3-14 shows the server dashboard after a successful connection.
To demonstrate how Code Editor works, we will modify the first name of James James in the employee table of the sample database. On the dashboard, right-click dbo.employee and select Edit. The content of the table appears. Change the first name of Mr. James to Andrew and click Run. When you close the window pane, the primary form of Azure Data Studio (see Figure 3-14) appears.
5. Database Dashboards and Customization
Azure Data Studio has two dashboards: Server and Database. These dashboards are populated by objects called widgets. When you connect to the database system, the Server dashboard is shown (see Figure 3-14). This dashboard contains several Azure Data Studio’s built-in sample widgets, which are dedicated to the following tasks:
- Find database(s)
- Perform database backups
- Perform general tasks
The Server dashboard can be viewed by right-clicking the server name and selecting Manage. Similarly, you can view the Database dashboard and a particular database by right-clicking a database in the Object Explorer tree.
The customization of functionality in Azure Data Studio can be done in two different ways. First, you can create your own widgets, which are displayed with the Server dashboard or Database dashboard.
NOTE At the time of writing, the creation of user-defined widgets is not very user-friendly. You have to generate several JSON documents and manually merge different parts of them to create such a widget. For this reason, we will not dive deeper into this topic.
Another way to customize Azure Data Studio is by using extensions. Extensions are (usually) built by the SQL Server community. The installed extensions can be displayed by selecting the Extensions icon, which is the second-to-last icon in the far-left pane in Azure Data Studio. (The other way to select extensions is by pressing ctrl-shift-x.)
Source: Petkovic Dusan (2020), Microsoft SQL Server 2019: A Beginner’s Guide, Seventh Edition-McGraw-Hill Education.