1. Introduction
HyperText Markup Language (HTML) is the standard markup language for creating Web pages. Although, the knowledge of HTML is, in theory, not necessary to create Web pages, because there are tools that allow you to do this without having to write any code, knowing HTML enables you to customize or refine outputs from these tools, where necessary. Naturally, to be a serious Web designer, the knowledge of HTML could be considered a mandatory skill.
2. The Structure of an HTML Document
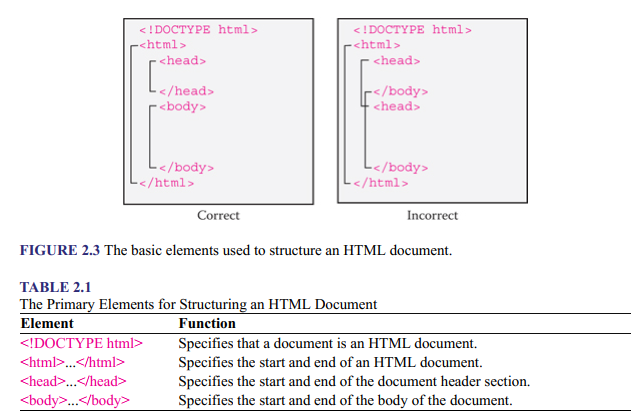
An HTML document comprises two main parts: header section and body section, and they are defined by the <head> and <body> elements, respectively. The whole HTML document is defined by the <html> element. In addition, an HTML document typically starts with a document type declaration, which specifies that the document is an HTML document. In HTML5, it is !DOCTYPE html. Figure 2.3 shows the basic structure template of an HTML document.
An element that is inside another one is known as a child element of that element and the outer element is known as the parent or containing element. This means that the <head> and <body> elements are both child elements of the <html> element. In Figure 2.3, notice the difference between the correct and incorrect nesting conventions. Correct nesting is necessary for a code to work properly, meaning that if an element starts inside another element, it must also end inside that element. Also, notice the vertical alignment of the start and end tags of each element and the indentation of child elements. Although doing these things are not necessary to make a code work correctly, they are good practice, as they make it easier to read and understand what a code does. Indentation of lines is possible because the Web browser renders only one space by default. This means that irrespective of the number of consecutive spaces put between words, this will be rendered as one space. This is known as white space collapsing. Table 2.1 describes the functions of the elements used in the illustration.
2.1.The of the Head Section
The HTML elements placed in the head section (i.e., in the <head> element) are meta-related elements, in that they provide metadata (i.e., data that provide information about other data). More specifically, they provide information about a document, including information about other documents that they need (if relevant). The information is only for the browser and is not displayed in the browser window. These elements typically include <title>, <meta>, <base>, <link>, <style>, and <script>. The <style> element is used to embed CSS rules and discussed under CSS accordingly. The <script> element is used to embed or link to an executable script, such as JavaScript, and is introduced in Chapter 22 where it is more relevant, such as under Flash video in Chapters 7 and 22. The rest of the elements are discussed here.
2.1.1. <title>…</title>
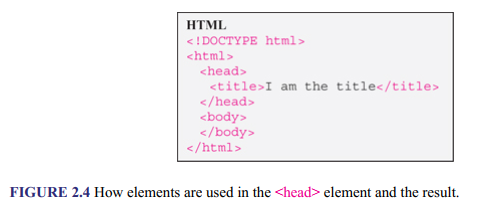
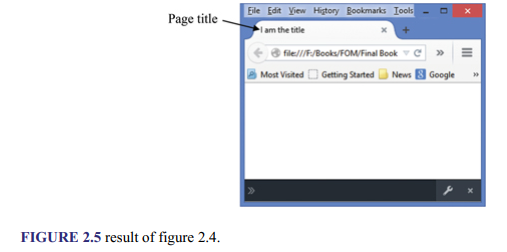
The <title> element allows you to define the title of a Web page, which is displayed in the bar at the top area of the browser. Figure 2.4 shows how to use it, and Figure 2.5 depicts the result. Title description is one of the pieces of information used by search engines to index Web pages; therefore, making it reflect closely the content of a page improves the chances of search engines ranking the page highly (i.e., placing it as near to the top as possible of their search results). This ensures that the page can be found by those looking for the type of information it provides. Ideally, it should be the same as the main heading for a page. The practice of doing things to ensure high search engine ranking for a page is known as search engine optimization (SEO), and more about it is discussed later under other page features used for realizing it, such as page description, image description, headings, and link text. It is also discussed in Chapter 21 in relation to how it is affected by how mobile-friendly a layout is and in Chapter 26 in relation to its evaluation.
2.1.2. <base>
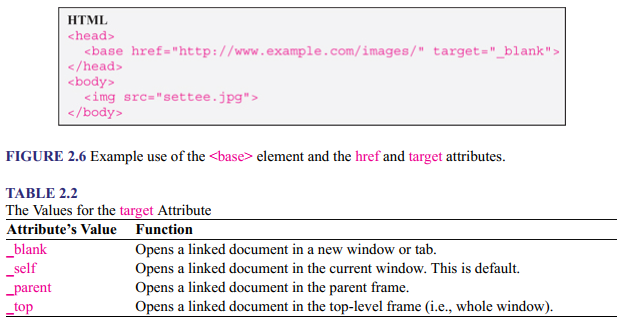
The <base> element allows you to define the base URL (Uniform Resource Locator) for relative paths specified in a document. URL, as explained in Chapter 1, is the description of the location of a resource (e.g., document or media) on the Internet. Once a base URL is defined, any relative URL specified in the body section of a document is appended to its end to describe the full URL. This saves having to specify absolute paths (i.e., full paths) for all links. Only one base element may be used in a document, and it must have either an href attribute, a target attribute, or both. In the example in Figure 2.6, the href attribute defines the base URL, which means that the value of the src attribute in the <img> element (i.e., setteejpg, which is an image filename) is appended to its end to derive the full path, “http://www.example.com/images/settee.jpg,” which is the location of setteejpg. The <img> element is used to display images and is discussed fully in Chapter 6. The value of the target attribute (i.e., _blank) specifies that the image file should be displayed in a new browser window or tab.
Other possible values for the target attribute and their functions are listed in Table 2.2. These values are sometimes called browsing context names or keywords. This is because they describe the environment in which a document object is presented.
2.1.3. <link>
The <link> element allows a document to be linked to resources external to it. Table 2.3 lists the attributes that it supports, and Figure 2.7 shows how the element is used with the commonly used ones.
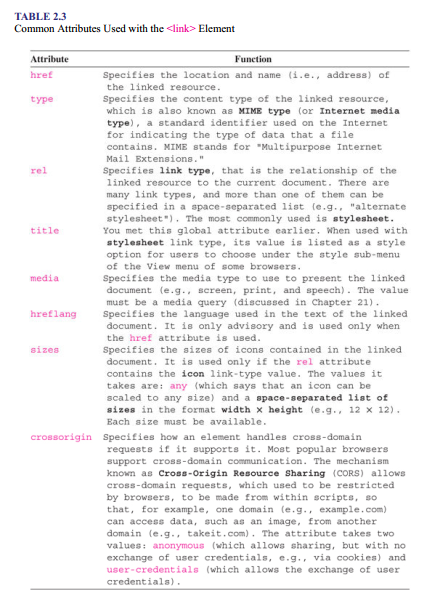
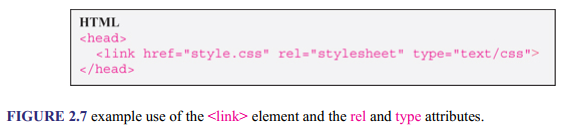
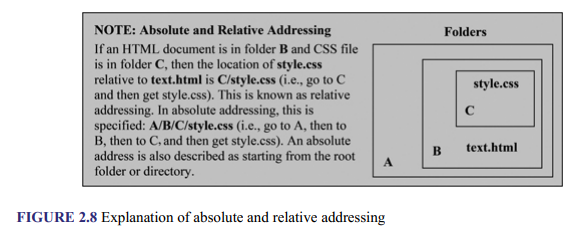
In the example, the linked resource is a document and “style.css” specifies its location and name. In this case, the location is specified implicitly as a relative address (i.e., relative to the location of the current document). It essentially says that the “style.css” file is in the same folder as the document that is linking to it. The other type of address is an absolute address, in which full path is specified. The difference between the two is explained in Figure 2.8.
Back to the example in Figure 2.7, the relationship of “style.css” to the current document is specified as “stylesheet,” and “text/css” says that its content is CSS code. More than one <link> element can be used in a document, for example, for specifying multiple stylesheets. See “Methods of specifying CSS rules” in Chapter 8.
2.1.4. <meta>
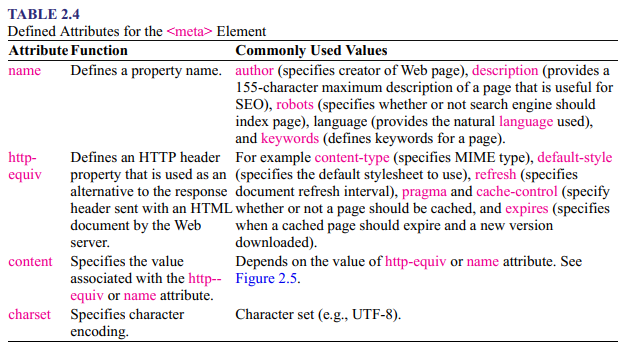
The <meta> element allows you to describe various kinds of information about a document that cannot be described using other meta-related elements, such as <title>, <link>, and <base>. The kinds of information it can be used to describe range from those used by search engines in ranking their search results to those about the creator of a document and the technologies, such as software, used to create the document. The element uses four attributes: name, http-equiv, content, and charset, which are combined in different ways to describe different kinds of metadata. Table 2.4 lists the functions of these attributes and the commonly used values.
While the charset attribute can be set alone, when either name or http- equiv is used, the content attribute must also be used in a name-value pair fashion. Essentially, the property to be defined is specified by the value of the name or http-equip attribute, and the value to give to the property is specified by the value of the content attribute. When the http-equiv attribute is used, a <meta> element is known as a pragma directive, which is an instruction to the compiler; a compiler is a computer language that interprets one computer language into another. Figure 2.9 shows examples of the various ways you can use the <meta> element and its attributes.
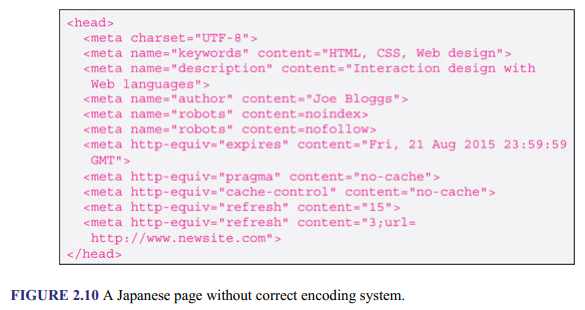
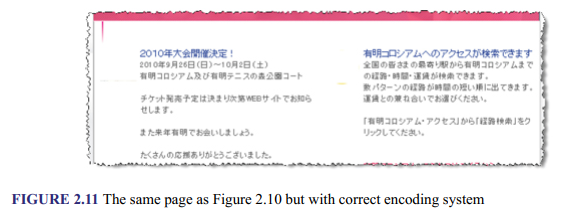
In the example, charset says that the character encoding used for the page is UTF-8. Character encoding is the allocation of a unique code to a character, using a character set. The technique predates computers, or the Internet and the Web, and goes back, for example, to the use of Morse code for telegraphing messages. The first internationally accepted characterencoding system to be used in computers was the American Standard Code for Information Interchange (ASCII) encoding standard, which is adequate for encoding all the characters in English text. Because it was unsuitable for non-English languages in its original form, various variants were later developed for different languages, leading to compatibility problems. To streamline everything, Unicode, a multilingual character set, was developed, and UTF-8 is one of the Unicode Transformation Format (UTF) standards for encoding the characters. It is also currently the most commonly used standard for the Web. Alternatives include UTF-16 and UTF-32. Knowing the character encoding used for a Web page enables the browser to correctly display the textual content of the page. Figures 2.10 and 2.11 demonstrate this. The default character encoding for HTML5 is UTF-8.
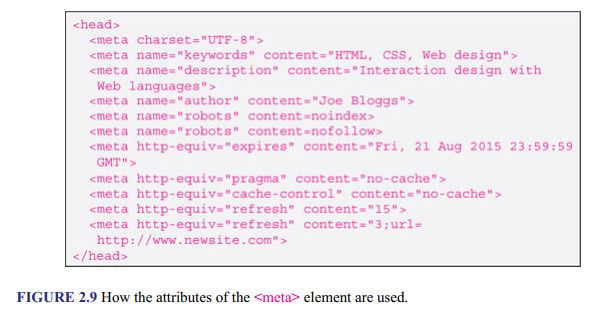
Back to the example in Figure 2.9, the value, keywords, gives the words that people might use to find the page; description says what the page is about and is used by search engines; author provides the name of the page creator; the first robots says search engines should not add page to their search results and the second robots says that it is all right to index page, but the pages to which the page is linked should not be indexed; expires says that page should be removed from the browser’s cache at the specified date, which must be in the format shown, although “0” could be used to specify now, meaning that the page will not be cached at all and a new version is downloaded every time; pragma and cache-control say not to cache page; and the first refresh says to reload the page after 15 seconds and the second refresh says to redirect user to “http://www.newsite.com” after 3 seconds.
2.2. The of the Body Section
The contents of a Web page are placed in the body section (i.e., inside the <body> element), and in order for them to be displayed in a structured manner (i.e., with headings and sections), they must be marked up with appropriate HTML elements. Therefore, for example, if a body of text is inserted in the <body> element but without markup, it will simply be displayed without structure. This means that in addition to HTML- document’s structure, there is Web page structure (i.e., how the contents placed in the <body> element are displayed in the browser window).
Although different HTML elements can be used to mark up content to achieve the desired page structure, the recommended practice is to use structural markup, which basically means to use HTML elements that describe only the purpose of their contents and leave the appearance to be decided by the browser. For example, instead of using an element to make text bold in order to give it emphasis, an element that says to give it emphasis should be used. It is then left to the relevant user agent to render the text and give it emphasis in whatever way possible. For example, a Web browser might very well display the text in bold or in a different contrasting color, and a non-visual user agent, such as a screen reader, might express the emphasis in a way that is aurally appropriate. This means that the elements used for page structuring should be able to convey both visual and semantic meaning. Semantic meaning enables user agents to recognize an element as what it is intended to represent and renders its content in the most useful way to the user. This is especially useful because it makes contents more accessible to users with disability who use assistive technologies.
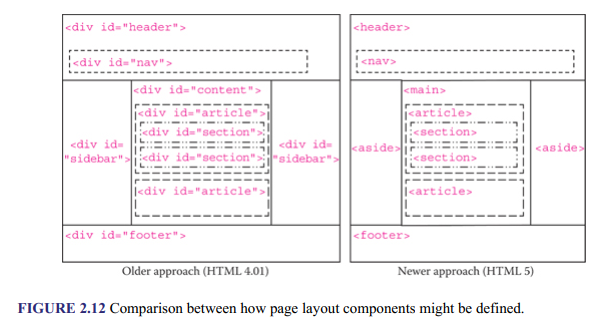
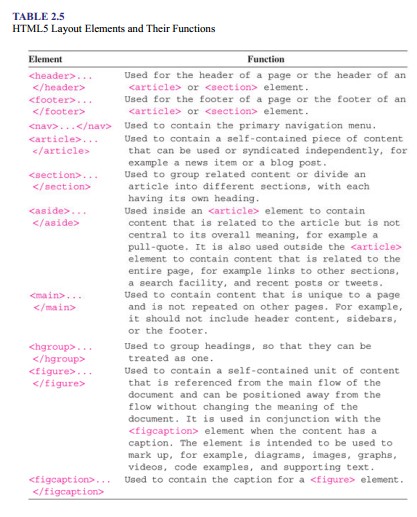
In theory, the structure of a typical Web page comprises the header, navigation menu, main content, one or more sidebars, and the footer. Whereas it was not possible in older versions of HTML to define these design components in a way that also conveyed semantic meaning, because there were no dedicated layout HTML elements to define them, HTML5 provides these elements and more. Figure 2.12 shows the difference between how layout used to be defined in older versions of HTML (typically HTML 4.01) and how HTML5 layout elements are used to do the same thing. In the HTML 4.01 example, each <div> element used to create a container and the id attribute used to give it a unique identity. The <div> element will be discussed further shortly with other generic HTML container elements.
Table 2.5 shows the applications of layout elements, and Figures 2.13 and 2.14 show them in use and the rendered result.
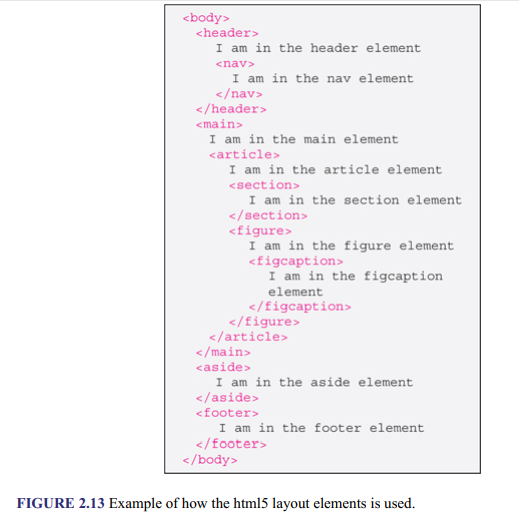
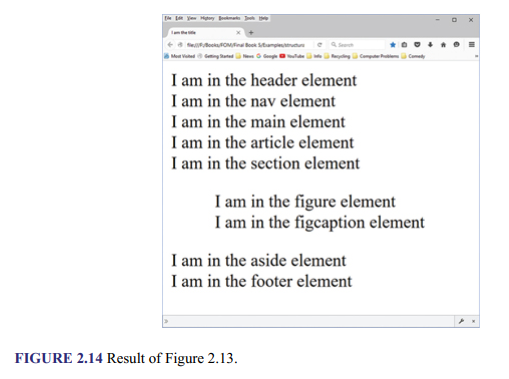
In Figure 2.14, notice how the rendered elements are not laid out. The only bit of structuring included is with the <figure> element, which, by default, is displayed with default margins (space) around it. What this shows is that in order to create a page layout, such as the one illustrated earlier in Figure 2.12, the layout elements need to be positioned and styled accordingly. They need to be given, for example, dimensions, border, and background color, all of which is done using CSS. Indeed, even though the browser might recognize the HTML layout elements for what they are, without the text descriptions in the example, it would have been impossible to know that they are there, since they are essentially containers.
2.2.1. Block-Level and Inline Elements
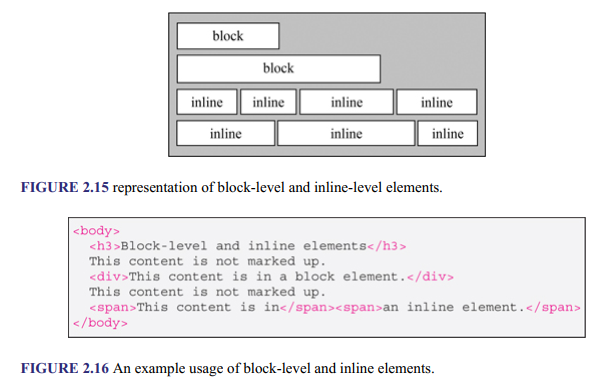
Once the general layout of a page is established with the layout elements, the contents of each element (e.g., text, lists, links, tables, and images) need to be structured in order for the desired visual page design to be achieved, and this is done using various other elements, which can be either block- level or inline elements. Block-level elements (or block elements) are elements that always start on a new line, and inline elements are those that always start on the same line. Figure 2.15 shows an illustration. Whether an element is a block-level element or an inline element will be noted when it is introduced later.
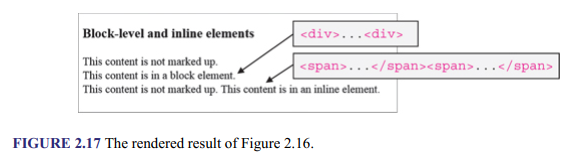
Figure 2.16 shows a block-level element and an inline element in use, and Figure 2.17 depicts the result. Notice in the rendered page that the content of the block-level element starts on a new line, while that of the inline element follows the existing text (i.e., the second “This content is not marked up”) on the same line. The element used to create the heading (i.e., <h3>) is explained shortly.
2.2.2. Grouping Elements and Content
Elements are also typically grouped within the layout elements. This is done to enable the same operation to be applied to contents or elements in unison and can be at block or inline level. For example, a number of paragraphs (block-level elements) or some words on a line (inline elements) may be grouped to enable, for example, the same color to be applied to them. Block-level grouping is typically done with the <div> element, while inline grouping is done with the <span> element. Figure 2.18 shows example of usage, and Figure 2.19 shows how the code is rendered. The <style> element is used to include CSS in an HTML document, which is discussed fully later, under CSS in this book. The element is used here to only show the effects of grouping. The <p> element is also discussed shortly. In the first <div> element, notice how the two lines in it are given the color specified for the element (i.e., blue), and how the <span> element is used to give only some of the words on a line a specific treatment. The second <div> element illustrates a block-level element being used to group together inline elements, in which all the content of the <div> element is given blue color, after which the content of <span> element is made red.

Source: Sklar David (2016), HTML: A Gentle Introduction to the Web’s Most Popular Language, O’Reilly Media; 1st edition.