In the previous sections, we have discussed how to develop network applications using stream sockets. Communication with a server using stream socket basically consists of two steps. First, create a channel with the server at the desired port. Then, send and receive data through this channel. The stream socket provides reliable communication of ordered stream of bytes, since it uses TCP as the underlying transport layer protocol.
However, TCP provides this reliability and data ordering using complicated algorithms using retransmission (probably many times). Consequently, the performance (in terms of delay) of TCP in case of data loss or network congestion is not satisfactory. Moreover, there exists certain applications (that transmit/receive real time data such as audio, video etc), that expects quick delivery of data instead of ordered and correct delivery. For example, in the case of video transmission, the frames should come continuously, failing of which results in an unpleasant experience to the viewers. However, loss of a few frames in the continuous flow of frames does not degrade the quality of the video so much. For such applications, quick delivery of data is more important than correct and ordered delivery of data. Since, TCP always try to recover an erroneous or lost data frame, it fails to deliver data quickly, in the presence of error and hence is not suitable for real-time applications.
An alternative way to develop such real-time applications is to use datagram sockets that use UDP as the underlying transport layer protocol. In the following sections, we shall discuss how programs exchange data using UDP sockets.
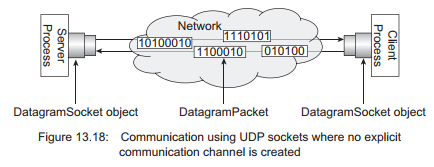
UDP socket allows data communication using a mechanism different from one used in TCP. In the UDP style of communication, no connection with the server socket is established prior to exchange of data [Figure 13.8:]. Instead, two DatagramSocket objects are created and data is sent and received using containers called datagrams. The receiver program first creates a datagram socket and waits for the incoming datagrams. A sender program, on the other hand, creates a datagram packet, specifies the IP address and the port number of the server, and puts it on the network. The datagram packet is then forwarded by possibly many intermediate hosts and eventually reaches the server.

Note that the packet may be lost on its way or some error may occur in the packet data (payload). Since, recovering the packet may take significant time, UDP does not even try to recover the packet. Instead it concentrates on delivering other packets. It means, UDP does not guarantee that a datagram will arrive at the receiver. It does not also assure that a process will really be there to accept the datagram. Since, datagrams may traverse different paths [Figure 13.19:], there is no guarantee they will reach in the order in which they were sent. Even then, as explained earlier, this style of communication is desired in some situations such as real-time applications.
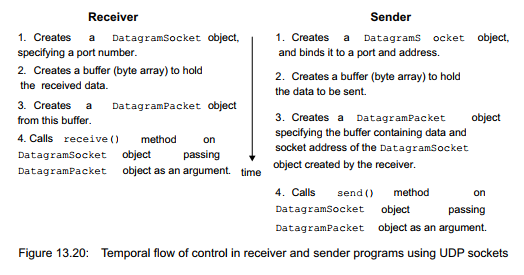
Let us now understand, how to develop network applications using UDP socket. Java provides two primary classes to develop UDP-based network applications: i) DatagramSocket and ii) DatagramPacket. A DatagramPacket object is a container (called packet) of data to be sent and/ or received, whereas DatagramSocket is used to send and/or receive those packets. The basic idea [Figure 13.20:] of data communication using UDP socket is as follows:
Both of the communicating parties first create a DatagramSocket object. Like TCP socket, this socket is also bound to a port number. Usually, in the receiver program, an unused port number is assigned to the socket by the programmer. In the sender program, the responsibility is usually imposed on the system. A process (call it sender) willing to send data to another process (call it receiver) creates a DatagramPacket object specifying the following information:
- A byte array containing the data (payload) to be sent and
- the socket address (IP address and port number) of the DatagramSocket object created by the receiver.
The packet is actually sent using send() method of DatagramSocket object.
On the other hand, the receiver of the packet also creates a DatagramPacket object specifying an array where the received data is stored. The packet is received by calling the receive() method of DatagramSocket object and passing the packet object as an argument. A summary of basic steps to be followed by the sender and receiver is shown in Figure 13.20:
1. Datagram Packets
Note that data is sent and/or received in terms of packets (also called datagrams). A datagram is represented in Java by a DatagramPacket object and can be created using one of the following constructors:
DatagramPacket(byte[] data, int size);
DatagramPacket(byte[] data, int size, InetAddress address, int port);
DatagramPacket(byte[] data, int size, int offset);
DatagramPacket(byte[] data, int size, int offset, InetAddress address,
int port);
DatagramPacket(byte[] data, int size, SocketAddress socket);
DatagramPacket(byte[] data, int size, int offset, SocketAddress socket)
In our application, to receive data, we shall use the first constructor. It takes two arguments:
- data-an array of bytes where the data bytes received are stored and
- size-number of bytes to be taken from the packet.
To send data, we shall use the second constructor. It takes four arguments.
- Data-an array of bytes containing data to be sent
- Size-number of bytes to be sent
- Address-IP address assigned to the DatagramSocket created by the receiver and
- Port-port number assigned to the DatagramSocket created by the receiver
There are many other useful methods available on DatagramPacket object to get and set the internal properties of the packet. A detailed description of constructors and methods of DatagramPacket can be found in Appendix D.
2. Datagram Server
Let us now develop our factorial application using UDP socket. Note that our server first receives an integer. So, the server first creates a DatagramSocket at a port (say 5000) as follows:
DatagramSocket socket = new DatagramSocket(5000);
The port must be an unused one otherwise it throws a BindException. The port must belong to the range from 0 to 65535. This port 5000 should be specified by our client in the packet to be sent.
Suppose the machine running this server process has one network interface card having IP address 192.168.1.2. Then the socket address of the DatagramSocket object is [192.168.1.2, 5000].
A pictorial description is shown in Figure 13.21:
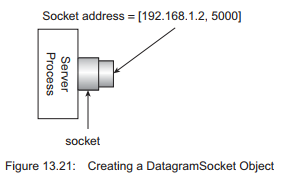
If the host has multiple network interface cards (hence multiple IP addresses), then this DatagramSocket is identifiable by all these interfaces, So, any one of the IP addresses may be specified in the DatagramPacket by a sender for delivery of packet. However, if required, a specific IP address may also be bound to the datagram socket using a different constructor [See appendix C for details].
To hold the data sent to this socket, the server program then creates a DatagramPacket object where incoming data will be stored.
byte[] rbuf = new byte[10];
DatagramPacket rpkt = new DatagramPacket(rbuf, rbuf.length);
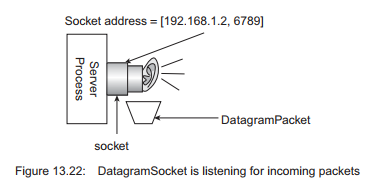
To receive a DatagramPacket, it uses the receive() method on the DatagramSocket object created.
socket.receive(rpkt);
After receiving a packet destined to it, the server program extracts the data from this packet and puts them on the array specified during creation of the packet. As mentioned earlier, DatagramPacket object has many useful methods to explore the packet. The following code creates a string from the data received.
String data = new String(rpkt.getData(), 0, rpkt.getLength());
Since, in our application, this string is actually an integer, it is converted to an integer using the following piece of code:
int n = Integer.parselnt(data);
The factorial of this integer is then calculated. To send the result back to the client, the server needs to extract socket information (IP address and port) of DatagramSocket object created by the client. This is done using the following piece of code:
InetAddress addr = rpkt.getAddress();
int port = rpkt.getPort();
The server then creates another DatagramPacket object specifying the factorial of the number and the socket information just extracted.
String sbuf = String.valueOf(fact).getBytes();
DatagramPacket spkt = new DatagramPacket(sbuf, sbuf.length, addr, port);
Finally the packet is forwarded towards the client as follows:
socket.send(spkt);
Here is the complete source code for our UDP server UDPFactServer.java.
//UDPFactServer.java import java.net.*;
import java.io.*;
public class UDPFactServer {
public static void main(String args[]) throws Exception { byte[] rbuf = new byte[10], sbuf = new byte[10];
//create a server socket at port 5000
DatagramSocket socket = new DatagramSocket(5000);
System.out.println(”Server ready”);
DatagramPacket rpkt = new DatagramPacket(rbuf, rbuf.length);
//receive a packet from client socket.receive(rpkt);
//extract data and client information from this packet String data = new
String(rpkt.getData(), 0, rpkt.getLength());
InetAddress addr = rpkt.getAddress(); int port = rpkt.getPort();
int fact = 1, n = Integer.parselnt(data);
System.out.println(”Received: ” + n + ” from ” + addr + + port);
for (int i = 2; i <= n; i++) fact *= i;
sbuf = String.valueOf(fact).getBytes();
DatagramPacket spkt = new DatagramPacket(sbuf, sbuf.length, addr, por
//send result to the client
socket.send(spkt);
System.out.println(”Sent: ” + fact);
}
}
3. Datagram Client
Remember that our client first sends an integer to the server to get the factorial of the integer. So, it creates a DatagramSocket object.
DatagramSocket socket = new DatagramSocket();
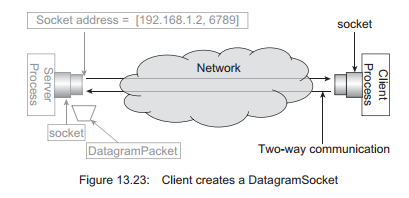
Note that no port number or IP address of the server is specified here. The above line of code does not create a channel to the server, it simply creates a socket that will be used to send and receive packets. The DatagramSocket object is also assigned a locally unique port number by the system. This port number together with the IP address of the client will be encapsulated in the packet sent to the server. The server extracts this information to send the result (if any) back to the client [Figure 13.23:].
It then accepts an integer from the user and creates a DatagramPacket with this data. It also specifies the address and port number of the server in the packet.
String data = fromUser.readLine();
sbuf = data.getBytes();
DatagramPacket spkt = new DatagramPacket(sbuf, sbuf.length, addr, 5000);
The client then sends the packet using the send() method on the DatagramSocket object. Whenever a reply comes back, it extracts the data and prints it. Here is the complete source code for UDP client
UDPFactClient.java.
//UDPFactClient.java import java.net.*; import java.io.*; public class UDPFactClient {
public static void main(String args[]) throws Exception {
byte[] rbuf = new byte[1024], sbuf = new byte[1024];
BufferedReader fromUser =
new BufferedReader(new InputStreamReader(System.in));
DatagramSocket socket = new DatagramSocket();
InetAddress addr = InetAddress.getByName(args[0]);
//get an integer from user System.out.print(”Enter an integer: ”);
String data = fromUser.readLine(); sbuf = data.getBytes();
DatagramPacket spkt = new DatagramPacket(sbuf, sbuf.length, addr, 5000);
//send it to server socket.send(spkt);
System.out.println(”Sent to server: ” + data);
DatagramPacket rpkt = new DatagramPacket(rbuf, rbuf.length);
//retrieve result socket.receive(rpkt);
data = new String(rpkt.getData(), 0, rpkt.getLength()); System.out.println(”Received from server: ” + data);
//close the socket socket.close();
}
}
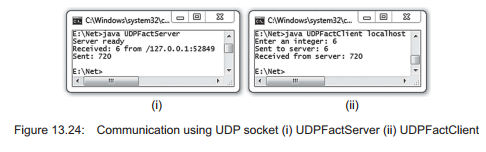
Compile and run the programs as before. A sample output is shown in Figure 13.24: Note that we started sender and receiver in the same computer to test the correctness of the code. However, if they run on two different computers connected by a network, the sender should specify the socket address (IP and port) of the DatagramSocket object created by the receiver program, in the DatagramPacket. Also note that the receiver of a datagram should be started first.
4. Receiving Multiple Datagrams
We can extend our UDP server so that it can handle multiple requests simultaneously. Here is the complete source code for our multithread UDP server stored in the file UDPMTFactServer. java.
import java.net.*;
import java.io.*;
public class UDPMTFactServer {
public static void main(String args[]) throws Exception {
//create a server socket at port 5000 DatagramSocket socket = new DatagramSocket(5000); System.out.println(“Server ready”); while (true) {
byte[] rbuf = new byte[10];
DatagramPacket rpkt = new DatagramPacket(rbuf, rbuf.length);
//receive a packet from client socket.receive(rpkt);
System.out.println(“Receiver a packet”);
//hand over this packet to Handler new Handler(rpkt, socket);
}
}
}
class Handler implements Runnable {
DatagramSocket socket;
DatagramPacket pkt;
Handler(DatagramPacket pkt, DatagramSocket socket) {
this.pkt = pkt;
this.socket = socket;
new Thread(this).start();
System.out.println(“A thread created”);
}
public void run() { try {
byte[] sbuf = new byte[10];
//extract data and client information from this packet String data = new String(pkt.getData(), 0, pkt.getLength());
InetAddress addr = pkt.getAddress();
int port = pkt.getPort();
int fact = 1, n = Integer.parseInt(data);
System.out.println(“Received: ” + n + ” from ” + addr + “:” + port);
for (int i = 2; i <= n; i++) fact *= i;
sbuf = String.valueOf(fact).getBytes();
DatagramPacket spkt = new DatagramPacket(sbuf, sbuf.length, addr, port);
//send result to the client socket.send(spkt);
System.out.println(“Sent: ” + fact);
} catch (IOException e) { }
}
}
To test our multithreaded server, we can write a UDP client as follows:
import java.net.*;
import java.io.*;
public class UDPMTFactClient {
public static void main(String args[]) throws Exception {
byte[] rbuf = new byte[1024], sbuf = new byte[1024];
BufferedReader fromUser =
new BufferedReader(new InputStreamReader(System.in));
DatagramSocket socket = new DatagramSocket();
InetAddress addr = InetAddress.getByName(args[0]); while(true) {
//get an integer from user System.out.print(“Enter an integer: “);
String data = fromUser.readLine(); sbuf = data.getBytes();
DatagramPacket spkt = new DatagramPacket(sbuf, sbuf.length,
addr, 5000);
//send it to server socket.send(spkt);
System.out.println(“Sent to server: ” + data); if(data.equals(“-1”)) break;
DatagramPacket rpkt = new DatagramPacket(rbuf, rbuf.length);
//retrieve result
socket.receive(rpkt);
data = new String(rpkt.getData(), 0, rpkt.getLength());
System.out.println(“Received from server: ” + data);
}
//close the socket socket.close();
}
}
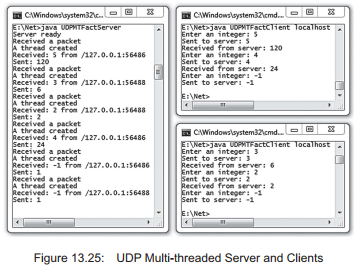
A sample output with two clients is shown in Figure 13.25:
5. Sending and Receiving Objects Using UDP
We explained earlier that sending and/or receiving data as objects is more convenient than sending them as a raw stream of bytes. We also developed a simple application where a Message object is sent by one program and received by another program using the TCP socket. In this section, we shall discuss how to develop similar applications using UDP sockets.
Note that UDP uses datagram as the container of data to be exchanged. So, whatever data we want to send, is first stored in a byte array which is then encapsulated in a datagram which is finally sent through the network. At the receiver end, the data bytes are extracted from the datagram and converted to the desired format. To send and receive an object, similar steps may be followed.
The object to be sent is first serialized and the resultant data bytes are placed in a byte array. This byte array is used to create a datagram. Finally, this datagram is sent over the network. Upon receiving the datagram, the receiver extracts the byte array from the datagram. These arrays of bytes (which is a linear representation of an object), is used to reconstruct the object using the deserialization procedure. Since we have already discussed how to exchange datagrams using DatagramSocket and DatagramPacket class, the only remaining task that we should know in this case is to create a datagram from a given object and to get the object back from the datagram.
6. Sending an Object
Let us first discuss the procedure of constructing a datagram containing serialized bytes of an object. Let us create a Message object to be sent.
Message msg = new Message(”Remainder”,”Return my book on Monday”);
This is the object to be serialized to get the equivalent array of bytes. To serialize this object, we need an ObjectOutputStream object. Since, we want to store the serialized data in a byte array,
ObjectOutputStream object is created using a ByteArrayOutputStream object.
ByteArrayOutputStream baos = new ByteArrayOutputStream();
ObjectOutputStream oos = new ObjectOutputStream(baos);
When the ObjectOutputStream serializes an object, it sends the resultant data to the ByteArrayOutputStream object from which the raw byte array may be extracted using toByteArray() method. Our Message object is serialized as shown in the following:
oos.writeObject(msg);
Finally, we obtain the array containing serialized data bytes of the msg object as follows:
byte[] out = baos.toByteArray();
So, at last we have an array of bytes. This is used to create a DatagramPacket which is sent over the network using the usual way. Here is the complete source code (stored in the file UDPObjectSender. java) of the program that sends a message object:
//UDPObjectSender.java import java.net.*; import java.io.*; public class UDPObjectSender {
public static void main(String[] args) {
try {
//Create a DatagramSocket
DatagramSocket socket = new DatagramSocket();
//Create a Message object to be sent
Message msg = new Message(”Remainder”,”Return my book on Monday”);
ByteArrayOutputStream baos = new ByteArrayOutputStream();
ObjectOutputStream oos = new ObjectOutputStream(baos);
oos.writeObject(msg);
oos.writeObject(msg);
byte[] out = baos.toByteArray();
//Muticast group where packet has to sent InetAddress group = InetAddress.getByName(args[0]);
//Port the receiver listens on int port = 8379;
//Create a DatagramPacket with buffer, address and port
DatagramPacket packet = new DatagramPacket(out, out.length,group, port);
//Send the packet now
socket.send(packet);
System.out.println(”Sent an object”);
} catch (Exception e) { e.printStackTrace();
}
}
}
7. Reconstructing the Object
At the receiver end, the object is reconstructed from the data contained in the datagram. We already know that to receive a datagram, the following piece of code may be used.
DatagramSocket socket = new DatagramSocket(8379);
byte[] in = new byte[256];
DatagramPacket packet = new DatagramPacket(in, in.length);
socket.receive(packet);
So, the packet contains the serialized data (stored in the byte array in) of the object. Let us now reconstruct the object using a reverse procedure as follows:
ByteArrayInputStream bais = new ByteArraylnputStream(in);
ObjectInputStream ois = new ObjectInputStream(bais);
Message msg = (Message)ois.readObject();
So, finally, we have object msg which is an exact copy of the object that was sent. Here is the complete source code (stored in the file UDPObjectReceiver.java) of the program that reconstructs the message object.
//UDPObjectReceiver.java import java.net.*; import java.io.*;
public class UDPObjectReceiver {
public static void main(String[] args) {
try {
//Create a MulticastSocket and bind it to port 8379 DatagramSocket socket = new DatagramSocket(8379);
//Construct a DatagramPacket to receive packet byte[] in = new byte[256];
DatagramPacket packet = new DatagramPacket(in, in.length);
System.out.println(”Waiting to receive a Message object…”);
//Receive the packet now and display socket.receive(packet);
ByteArrayInputStream bais = new ByteArraylnputStream(in);
ObjectInputStream ois = new ObjectlnputStream(bais);
Message msg = (Message)ois.readObject();
System.out.println(”Received a message:”);
System.out.println(”subject : ” + msg.getSubject()+”\nbody : ”+msg.getText());
}
catch (Exception ioe) {
System.out.println(ioe);
}
}
}
8. Running the Application
Compile and run the programs as before. A sample output is shown in Figure 13.26:
Source: Uttam Kumar Roy (2015), Advanced Java programming, Oxford University Press.