As mentioned earlier, Java TCP socket API supports Transmission Control Protocol (TCP). The java.net package provides ServerSocket and Socket classes to support TCP. To understand the functionality of these classes, let us first recapitulate TCP style of communication quickly. In this style of communication, a logical channel is created (using a three-way handshaking procedure) prior to the exchange of data between two communicating parties. Once a channel is created, data may be transferred as a continuous stream of bytes in both ways simultaneously (full-duplex communication). Since all data go through the channel, data is received in the same order as they were sent. This in-order delivery of data is known as connection-oriented communication. For guaranteed delivery of data, TCP also uses complex acknowledgement and retransmission strategy. At the end of the communication, the connection is destroyed (using a 4-way handshaking procedure).
To make use of this style of communications using Java stream socket, a program (usually called server) first creates a ServerSocket object (call it server socket) and binds it to an unused port number [Figure 13.5:]. This server socket then obtains a socket address which is used by the clients to establish connection later. The server socket then starts listening for connection requests from clients. This implies that the server program must be started first. Note that when the server socket listens (waits) for incoming connection requests, the server program gets blocked. To accept many connections simultaneously, the server program is usually implemented in a multi-threaded manner and is discussed in Section 13.4.6.

Figure 13.5: Communication using TCP socket
A client is another program started usually on a different computer after the server. The client must somehow know the socket address (IP address/name of the computer where the server program runs and port number of the server socket given by the server program) of the server socket to communicate. It first sends a request for connection establishment to the server socket by creating a Socket object and specifying the socket address of the server socket. During the connection establishment, the client should provide its own socket address to the server, so that the server can communicate back (if desired) to the client. The client’s port number is usually assigned by the system.
On receiving a request from a client, if everything goes fine, the server establishes a (bidirectional) channel to the client. Once this channel is established, both processes can now communicate in both ways simultaneously [Figure 13.5:].
The heart of the TCP socket API consists of basically two classes: ServerSocket and Socket. Communication using TCP sockets consists of the following basic steps:
- The server creates a ServerSocket object, specifying the port number it listens on.
- The server invokes the accept() method on this object. This method makes the server waiting until a request comes from a client.
- The client creates a Socket object, specifying the server’s name/IP address and port number to connect to.
- The constructor of the Socket class attempts to establish a connection to the server socket having specified socket address (i.e. IP address and port number). If the connection is established, it returns a Socket object that represents the client end of the logical connection created. The client uses this Socket object to communicate with the server.
- The accept() method on the ServerSocket object also returns a Socket object that represents server end of the channel that is connected to the client’s socket. The server uses this Socket object to communicate with the client.
The temporal flow of control in server and client program is given in Figure 13.6:
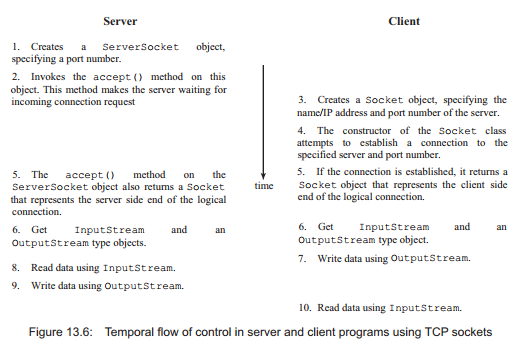
Each Socket object has an Inputstream and an Outputstream associated with it. The client’s Inputstream is connected to the server’s Outputstream, and the client’s Outputstream is connected to the server’s Inputstream. Now, both the client and the server can communicate using I/O streams. Let us now understand, how these socket classes are used to develop applications.
1. The ServerSocket Class
A TCP server socket object is first created using serversocket class to accept incoming connection requests from clients. The class has four overloaded constructors [See appendix A for details]. The most frequently used one creates a server socket at the specified port.
serversocket(int port)
The port must be an unused one otherwise it throws an exception BindException. The port must belong to the range from 0 to 65535. The following statement creates a server socket at port 6789.
ServerSocket serverSocket = new ServerSocket(6789);
Suppose the machine running this server process has one network interface card having IP address 192.168.1.2. Then the socket address of the process (actually serversocket object) is [192.168.1.2, 678 9]. The meaning of this statement is shown in Figure 13.7:
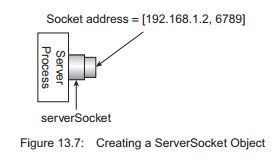
If the machine has multiple network interface cards (hence multiple IP addresses), then the socket created using the above constructor is capable of listening through all these interfaces. So, any one of the IP addresses may be specified in the socket address to connect to this socket object. However, a specific IP address may also be bound to the server socket using a different constructor [See appendix A for details].
Each serversocket object created has a finite FIFO queue associated with it. This queue stores outstanding connection requests made by the clients. These connection requests are handled by the subsequent call of accept() method of the serversocket object (discussed later in this section). When the queue is full, further connection requests are rejected. The length of this queue may be specified explicitly in the constructor. If nothing is specified (as we have done in our constructor), a queue length of 50 is used.
As mentioned earlier, a process may essentially create many serversocket objects associated with locally unique port numbers. So, a socket addresses is actually assigned to those serversocket objects not to the process. Usually, a process creates a single serversocket object and hence the socket address refers to the serversocket object as well as the process.
The procedure of assigning a port number to a serversocket object is sometimes known as binding (or association). This binding between a socket and a port may be done by a separate function call bind(). Actually, a socket is assigned a port number so that other processes can refer to this socket by this port for further usage.
We have stated that socket address of the ServerSocket object can be used by clients to establish connections. However, to accept incoming connections, the server must start listening. This is done by calling the accept() method on the server socket as follows [Figure 13.8:]:
Socket serverEnd = serverSocket.accept();

This results in the server capable of accepting incoming connections. Note that, connection requests are initially stored in the FIFO queue associated with the server socket object. So, it is possible to send connection requests by clients even if the server has not yet invoked the accept() method. If there is already a request (that means it came before a call of accept() method), the accept() method processes the request. If there is no outstanding connection requests in this queue, the method accept() blocks the caller (i.e. server process). The process wakes up as soon as a connection request is received. If everything goes well, a logical channel between the server process and the client process is created and a Socket object is returned which represents the server end of this channel and is used subsequently to communicate with the client.
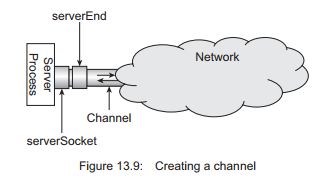
Note that Figure 13.9: merely shows a pictorial view of connection establishment. It appears that server socket becomes used and no channel cannot be attached to it further. However, these sockets are not physical sockets. The pictorial view has been used only for demonstration purpose. Consequently, concepts that exist for physical socket are not applicable here. This implies, programmatically, many logical channels may be attached to our server socket object simultaneously.
Anyway, if further client requests come when the server program is busy serving the current client and no call of accept() method is encountered, client requests are initially stored in the FIFO queue associated with this ServerSocket object. To establish connections with these clients, the server must process those requests. This is done by calling the accept() method on the ServerSocket object subsequently. A call of accept() method results in processing the request which is at the head of the queue at that instant. Further calls of accept() method process client requests (if any) from the queue in First-Come-First-Served (FCFS) basis.
To send data to or receive data from the client, stream objects are created. The Socket object provides two useful methods, getinputstream() and getOutputstream(), which can be used to obtain InputStream and OutputStream objects, respectively. The InputStream object is used to receive data from the socket, whereas the OutputStream object is used to send data to the socket. They are usually wrapped by other suitable stream classes to send and receive data conveniently. The following example creates a BufferedReader object and a PrintWriter object to read from and write to the socket:
BufferedReader fromClient = new BufferedReader(new
InputStreamReader(serverEnd.getInputStream ()));
PrintWriter toClient = new PrintWriter(serverEnd.getOutputStream(), true);
The BufferedReader object fromClient may now be used to extract data from the channel using available methods such as readLine() whereas PrintWriter object toClient may be used to push the data to the channel using method such as println(). Note that the readLine() method of BufferedReader object also blocks the caller until an entire line of characters is received.
A summary of constructors and methods of ServerSocket class is provided in Appendix A.
2. The Socket Class
In this section, we shall discuss how to develop a client application. It was mentioned several times that a client process, prior to exchange of data, makes a request to establish a logical connection to the server socket object. This is done using Socket class. It has several overloaded constructors which can be used depending upon the requirement. The commonly used one makes a request to establish a socket connection with the specified host and the port.
Socket(String host, int port)
The host can be an IP address or a Fully Qualified Domain Name (FQDN). It can be any loop-back address (e.g. 127.0.0.1) or the name “localhost” if the server process runs on the computer where the client program also runs. The following statement makes a request to establish a socket connection to the process running at localhost (local computer) on port 6789:
Socket clientEnd = new Socket(”localhost”, 6789);
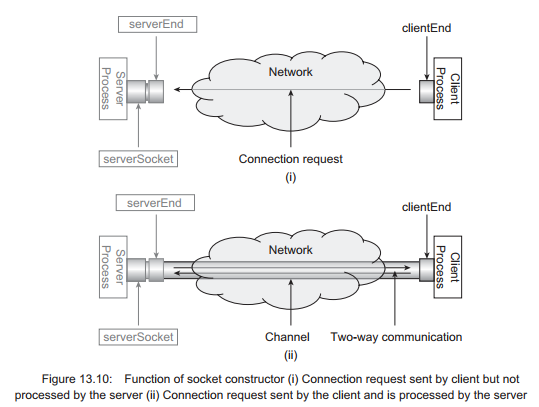
The above constructor does not block the caller. It simply sends a request and returns a Socket object. If the request is processed by an accept() method call at the server side, a logical channel [Figure 13.10: (ii)] between the client process and the server process is created. The object clientEnd represents the client end of this channel and is used to communicate with the server process subsequently. In case the server process does not process the request immediately as it is busy in doing some other job, no channel is created at that time [Figure 13.10: (i)]. However, the Socket object may be used to get streams for subsequent communications. But, for successful exchange of data, server must process the request and create a channel.
The constructor that we have used basically performs the following tasks:
- Creates a raw socket
- Binds it to an ephemeral port number
- Makes a connection request
If needed, these steps may be done separately. For example, to create a raw (not yet bound) socket, the following code may be used.
Socket clientEnd = new Socket();
This socket may be bound to some specified port or a port suggested by the system. The following code binds our socket to an ephemeral port.
clientEnd.bind(null);
The argument null indicates that the port should be chosen by the system. Finally, a connection request is made as follows:
clientEnd.connect(new InetSocketAddress(”localhost”,6789));
The Socket has other overloaded constructors also. A summary of constructors and methods of Socket class is provided in Appendix B:
Once a Socket object is created, the client process, like the server process, obtains InputStream and OutputStream objects to send data to or receive data from the socket.
BufferedReader fromServer = new BufferedReader(new
InputStreamReader(clientEnd.getInputStream ()));
PrintWriter toServer = new PrintWriter(clientEnd.getOutputStream(), true);
The above code creates a BufferedReader object and a PrintWriter object to read from and write to the socket. At this point both the client and the server are ready to communicate with each other.
3. An Application
In this section, we shall develop a simple but elegant application using the TCP socket. We shall first write a client program (namely TCPFactClient.java) that wants to find the factorial of an integer. We shall also develop a server program (namely TCPFactServer.java) that can calculate the factorial of a given integer. We assume that the client has somehow obtained this news that there exists a server program which is capable of calculating the factorial of a specified integer. Consequently, client has decided to make use of this server to have the result. However, to communicate with the server, client needs to know the address and port number of server socket created by the server program. We assume that, client has also collected this information somehow. Let us now see how this client calculates the factorial of a number with the help of server.
The summary of the application is as follows:
The client establishes a connection to the server using TCP sockets and sends an integer obtained from the user. The server, in turn, calculates the factorial of the integer and sends the result back. The client finally displays the result.
Note that the server and client programs for the above application are straightforward and simple as they implement a simple protocol. They are written only to demonstrate how two parties can communicate using TCP sockets. In practice, clients and servers perform complicated tasks. However, they use the same basic steps as follows:
- Server creates a server socket and waits for incoming connection request.
- Client makes a request to this socket to establish a connection.
- On success, a logical connection is established.
- Both obtain input and output streams on the socket.
- They send and receive data using these streams.
- Close streams.
- Close socket.
To accept an integer from the user, the client program uses the following piece of code:
BufferedReader fromUser = new BufferedReader(new InputStreamReader(System.in));
String n = fromUser.readLine();
Client then sends it to the server.
toServer.println(n);
The server program retrieves the data using the following piece of code.
int n = Integer.parseInt(fromClient.readLine());
Since the readLine() method of BufferedReader class returns a string value, it is necessary to convert the string value to the corresponding integer value. This is accomplished using the parseint() method on the wrapper class integer. Once the number is obtained, the server then calculates the factorial of that number and stores it in a variable fact using the following piece of code.
int fact = 1;
for(int i=2;i<=n;i++)
fact*=i;
The calculated factorial is then sent back to the client.
toClient.println(fact);
Finally, the client reads the result from the socket and prints it using the following code:
fact = fromServer.readLine();
System.out.println(”Received from server: ” + fact);
4. Complete Example
Here is the complete source code of the server stored in the file TCPFactServer.java.
//TCPFactServer.java
import java.io.*; import java.net.*;
public class TCPFactServer
{
public static void main(String argv[]) throws Exception
{
//create a server
socket at port 6789 ServerSocket serverSocket = new ServerSocket(6789);
//wait for incoming connection
System.out.println(”Server is listening on port 6789”);
Socket serverEnd = serverSocket.accept();
System.out.println(”Request accepted”);
//get streams
BufferedReader fromClient = new BufferedReader(new
InputStreamReader(serverEnd.getInputStream()));
PrintWriter toClient = new PrintWriter(serverEnd.getOutputStream(), true); //receive data from client
int n = Integer.parseInt(fromClient.readLine()); System.out.println(”Received from client: ” + n); int fact = 1;
for (int i = 2; i <= n; i++) fact *= i;
//send result to the client toClient.println(fact);
System.out.println(”Sent to client: ” + fact);
}
}
Here is the complete source code of the client stored in the file TCPFactClient.java.
//TCPFactClient.java import java.io.*; import java.net.*;
public class TCPFactClient {
public static void main(String argv[]) throws Exception {
String fact;
//create a socket to the server
Socket clientEnd = new Socket(”localhost”, 6789);
System.out.println(”Connected to localhost at port 6789”);
//get streams
PrintWriter toServer = new PrintWriter(clientEnd.getOutputStream(), true);
BufferedReader fromServer = new BufferedReader(new
InputStreamReader(clientEnd.getInputStream()));
BufferedReader fromUser = new BufferedReader (new InputStreamReader(System.in));
//get an integer from user System.out.print(”Enter an integer: ”);
String n = fromUser.readLine();
//send it to server toServer.println(n);
System.out.println(”Sent to server: ” + n);
//retrieve result
fact = fromServer.readLine();
System.out.println(”Received from server: ” + fact);
//close the socket
clientEnd.close();
}
}
5. Running Example Program
We have assumed that both the client and the server programs run on the same computer. If they run on different computers, the client program must specify the address of the computer where the server process is running. For example, if the server program runs on the port 8765 on a computer having IP address 192.168.1.2, the following line of code should be used by the client to establish a socket connection with the server.
Socket clientEnd = new Socket(“192.168.1.2”, 8765);
Now, open a terminal and go to the directory containing the source file TCPFactServer.java. To compile the server program use the following command:
javac TCPFactServer.java
Start the server as follows:
java TCPFactServer
Now, open another terminal and go to the directory containing the source file TCPFactclient.java. Compile the client program using the following command:
javac TCPFactClient.java
Now, start the client as follows:
java TCPFactClient
A sample output is shown in Figure 13.11:
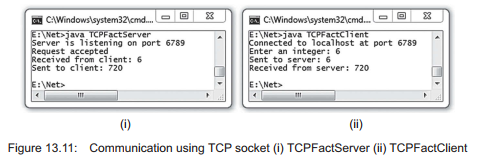
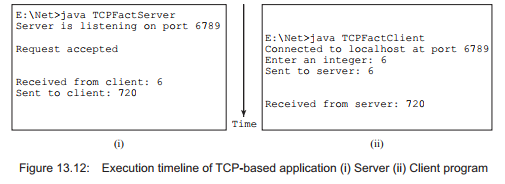
The execution timeline is also shown in Figure 13.12:
6. Handling Multiple Client Requests
Remember that in the server program (TCPFactserver.java), call of accept() method occurs only once. This means, our server can handle only one request. It quits after serving one client request. Ideally, a server process should be designed in such a way so that it can handle multiple requests (probably coming from many clients). In the following sections, we shall discuss possible implementations of the server to handle multiple requests using i) iterative way and ii) concurrent way.
6.1. Iterative Solution
One of the possible solutions to handle multiple clients is to implement the server that serves clients one after another. The idea is as follows:
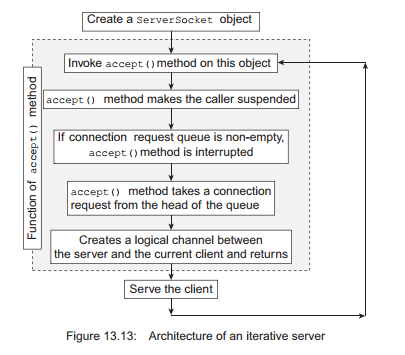
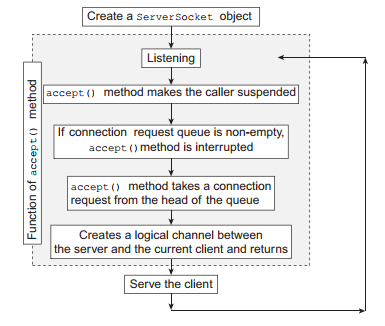
The server program creates a serversocket object and invokes accept() method on it that results in the server program waiting for incoming connections. When a connection request from a client comes, accept method creates a logical connection between the server and the client and returns a Socket object that represents the server end of the logical channel. This Socket object is then used to handle all the communication with the client. If any more connection requests come during the communication, they initially wait in the First Come First Served (FIFO) queue associated with the server socket object. When the communication with the current client is over, the server again invokes the accept() method that takes a request from the head of the queue and repeats the procedure all over again [Figure 13.13:].
The following is the source code for our modified server stored in the file TCPSeriaiFactServer. java:
//TCPSerialFactServer.java import java.io.*;
import java.net.*;
public class TCPSerialFactServer
{
public static void main(String argv[]) throws Exception
{
//create a server socket at port 6789 ServerSocket serverSocket = new
ServerSocket(6789);
while(true) {
//wait for incoming connection
System.out.println(”Server is listening on port 6789”);
Socket serverEnd = serverSocket.accept();
System.out.println(”Request accepted”);
//get streams
BufferedReader fromClient = new BufferedReader(new
InputStreamReader(serverEnd.getInputStream()));
PrintWriter toClient = new PrintWriter(serverEnd.getOutputStream(),
true);
//receive data from client
int n = Integer.parseInt(fromClient.readLine());
System.out.println(”Received from client: ” + n); int fact = 1;
for (int i = 2; i <= n; i++)
fact *= i;
//send result to the client
toClient.println(fact);
System.out.println(“Sent to client: ” + fact);
}
}
}
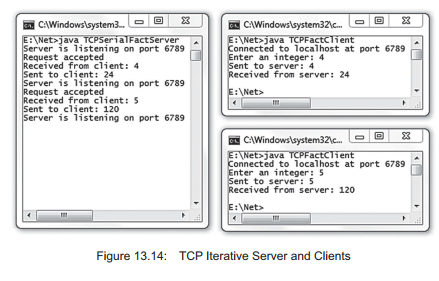
Compile and start the server program as described before. We can now start as many clients as you wish. The server can serve all of them one after another. Note that the same client program may be used to communicate with the iterative server. A sample output using two clients is shown in Figure 13.14:
7. Concurrently Solution
The iterative server we have designed in the previous section can handle many clients but one at a time. In this design, during communication between the server and a client if a further connection request comes, they wait until the server completes the current communication. These requests are also handled on a First-Come-First-Served basis later. However, this design has some inherent problem. Firstly, a client having longer processing time blocks another client that has relatively smaller processing time and has made a connection request just after the former client. This is because the client that makes a request later has to wait until the server serves the client that made the connection request earlier. Secondly, during a communication session, the server does not usually always use all of its available resources to serve the client. Hence, overall resource utilization at the server end is not optimal. To have a better server-resource utilization and better response time for all the clients, the server may be designed in such a way that it can serve multiple requests concurrently. The following arrangements can be made in the server to implement this:
- Listen for incoming connection.
- Accept a new connection request and create a channel.
- Create a new thread; hand over the channel to this thread
- Go to the listening mode again to accept further connections immediately.
- The thread handles the client request independently using the channel and finally terminates.
The idea behind the concurrent server is very simple. In this design, the server (main thread) initially listens for incoming client requests. When a request comes, it establishes a socket connection. However, instead of handling the request by itself, it spawns a new thread and handovers this connection to the thread which can handle the client request. The server then immediately goes to the listening mode again so that it can take actions (creating another thread and so on.). The thread runs in parallel and serves the client through the socket connection assigned. So, main thread is solely responsible to accept incoming requests, whereas client requests are explicitly handled by the respective threads. Since, threads run concurrently (OS schedules them), clients are served concurrently. Even if a thread takes a long time to serve a client, other threads (hence other clients) need not wait.
To implement the above idea, we first write a class Handler extending java.iang.Thread class. So, a Handier object represents a thread. The Handier objects will be created exclusively to handle client requests. So, a Handier object needs something using which it can continue to communicate with a client. Note that, a Socket object (that represents one end of the communication channel) may be used to exchange data through the channel. So, we write a constructor in the Handier class that takes a Socket object as an argument. For our factorial application, this Socket object is used to receive an integer from the client and send the factorial of that integer. Since, Handier class extends, java.iang.Thread, it is necessary to implement the run() method. When the thread is started, this method is executed concurrently with other threads. So, we need to write the necessary code in this method to handle a client. The thread is started by the constructor itself so that as soon as the thread object is created, is starts handling the client assigned to it.
The following is the source code for our modified server stored in the file TCPMTFactServer. java:
//TCPMTFactServer.java
import java.io.*;
import java.net.*;
class TCPMTFactServer
{
public static void main(String argv[]) throws Exception
{
//create a server socket at port 6789
ServerSocket welcomeSocket = new ServerSocket(6789);
System.out.println(”Server ready”); while (true) {
//wait for incoming connection
Socket serverEnd = welcomeSocket.accept();
System.out.println(”Request accepted”);
//hand over this connection request to Handler new Handler(serverEnd);
}
}
}
class Handler implements Runnable
{
Socket serverEnd;
Handler(Socket s) {
this.serverEnd = s; new Thread(this).start();
System.out.println(”A thread created”);
}
public void run() {
try {
//get streams
BufferedReader fromClient = new BufferedReader(new
InputStreamReader(serverEnd.getInputStream()));
PrintWriter toClient = new PrintWriter(serverEnd.getOutputStream(), true);
while (true) {
//receive data from client
int n = Integer.parseInt(fromClient.readLine()); System.out.println(”Received ” + n); if (n == -1) {
serverEnd.close();
break;
}
int fact = 1;
for (int i = 2; i <= n; i++) fact *= i;
//send result to the client toClient.println(fact);
System.out.println(”Sent: ” + fact);
}
} catch (IOException e) { }
}
}
Originally, our server program calculates factorial of one integer given by the client and terminates closing the socket connection. So, each time a client wants to calculate factorial of an integer, it needs to establish a new connection. Note that, establishing a (TCP) connection is done through a 3-way handshaking procedure. Moreover, terminating a connection is even costlier. It uses a 4-way handshaking procedure. Needless to say that this complex procedures of connection establishment and termination impose a significant overhead. To improve the performance in terms of response time, the following idea may be adopted:
After calculating factorial of a given integer, the connection is not closed immediately; rather it is kept open. If the client wants, it may use the same connection to find factorial of more integers. The connection is finally disconnected if both of the communicating parties decide that the connection is no longer needed. This way, the overall response time may be reduced significantly. Keeping this idea in our mind, the run() (which actually serves a client) method is modified so that a client can get multiple results though the same connection. Accordingly, we also need to modify out client program
slightly so that it can send many integers one by one. To terminate, it sends a -1. The source code for the client stored in TCPMTFactclient.java is as follows:
//TCPMTFactClient.java import java.io.*;
import java.net.*;
public class TCPMTFactClient
{
public static void main(String argv[]) throws Exception
{
String fact;
//create a socket to the server
Socket clientEnd = new Socket(“localhost”, 6789);
System.out.println(“connected to localhost at port 6789”);
//get streams
PrintWriter toServer = new PrintWriter(clientEnd.getOutputStream(), true);
BufferedReader fromServer = new BufferedReader(new
InputStreamReader(clientEnd.getInputStream()));
BufferedReader fromUser = new BufferedReader(new InputStreamReader(System.in));
while (true)
{
//get an integer from user
System.out.print(“Enter an integer: “);
String n = fromUser.readLine();
//send it to server toServer.println(n);
System.out.println(“Sent to server: ” + n);
if (n.equals(“-1”)) break;
//retrieve result
fact = fromServer.readLine();
System.out.println(“Received from server: ” + fact);
}
//close the socket clientEnd.close();
}
}
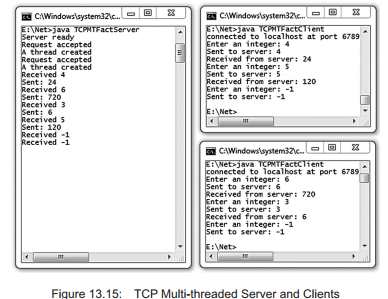
Compile and start the server program as described previously. You can now start as many clients as you wish. The server can serve them simultaneously. A sample output using two clients is shown in Figure 13.15:
If the computer where the server program runs is situated in a different network, the client’s network must be configured properly. In particular, the IP address of the gateway must be specified. If the client’s network is connected to the server’s network through a proxy that supports sockets, use the following lines of code:
System.setProperty(“socksProxyHost”, “192.168.1.1”);
System.setProperty(“socksProxyPort”, “1080”);
Here, 1080 is the port number of the proxy process and 192.168.1.1 is the IP address of the host where the proxy runs. Alternatively, you can pass this information to the Java Runtime Environment during execution as follows:
java -DsocksProxyHost=192.168.1.1 -DsocksProxyPort=1080 TCPMTFactClient
8. Sending and Receiving Objects Using TCP
The applications that we have developed so far exchange data as a stream of bytes. It will be more convenient if applications can send and receive objects instead of raw byte stream. Java provides a powerful concept known as serialization that can be used to send an object through a socket. The idea behind the object serialization is very simple. The object to be sent is first converted to an equivalent linear stream of bytes. This byte stream is then sent through the socket in the usual way. The object can be restored at the receiving side using deserialization process. The serialized data may also be manipulated or even be stored in a persistent storage such as file for further use.
Note that an object to be serialized may have references to other objects, which, in turn, may have references to still more objects. There may be circular references. Objects may also refer to themselves. So, a set of related objects essentially form probably a complex directed graph. Serializing an object, in this case, means serializing all other referenced objects on the graph rooted by the context object also. This is sometimes called deep serialization. Similarly, during the deserialization process, all these objects must be restored (deep deserialization) correctly. However, there is nothing to worry. Java provides the serialization and deserialization facilities implementing all those issues correctly. Programmers need not even know the underlying serialization and deserialization algorithms. These algorithms have been implemented in two high-level stream classes ObjectOutputStream and ObjectInputStream. To serialize an object, writeObject() method is called on an ObjectOutputStream object. Similarly, during deserialization, readObject() method is called on an ObjectInputStream object.
8.1. Serializing an Object
As mentioned in the previous section, serialization is a process of converting an object (or a graph of objects) to linear stream of bytes. However, an object is said to be serializable provided that its underlying class implements java.io.Serializable interface. This interface has no methods or fields. It only indicates that objects of the class implementing this interface are semantically serializable.
During the serialization process, JVM traverses the entire object graph. If it encounters an object whose class does not implement Serializable interface, a NotSerializableException is thrown identifying the class of the non-serializable object.
Note that transient and static variables are not stored in the serialized data. Also note that some classes (whether implemented Serializable interface or not) are inherently non-serializable. For example thread, stream and database connection-related classes are not serializable. Let us now write a simple class whose object will be sent through the socket.
class Message implements java.io.Serializable {
String subject, text;
Message(String s, String t) {
this.subject = s;
this.text = t;
}
String getSubject() {
return subject;
}
String getText() {
return text;
}
}
This simple class represents a message having a subject and body text. A Message object contains only two String member variables subject and text that will contain the subject and body of the message. The class implements Serializable interface. The java.iang.string class also implements serializable interface. So, Message objects are indeed serializable.
Let us now understand the procedure of serializing an object. To serialize an object, we have to create an ObjectOutputstream object first. This is a stream that implements serialization part. The actual conversion of our object to the byte array is then done using writeObject() method on ObjectOutputStream object. This class also defines a set of other useful methods for serializing variables of built-in type. As we have mentioned earlier, the resultant byte array may be used in primarily three ways:
- Store the serialized data in a persistent storage such as file using class FileOutputStream
- Store the serialized data in simple byte array using class ByteArrayOutputStream
- Send the serialized data through the socket directly without storing them for further usage
The last mechanism is useful to send the data over a TCP socket, whereas the second one may be used to send data as a datagram packet. In this section we shall use the last mechanism. So, an ObjectOutputStream object is created using the following way:
ObjectOutputstream oos = new ObjectOutputStream(socket.getOutputStream());
Since we want to send serialized data over the socket, the ObjectOutputStream object is created from socket’s OutputStream. This oos object has now a reference to the socket’s OutputStream. Let us now create an object to be serialized:
Message msg = new Message(”Remainder”,”Return my book on Monday”);
This is a simple Message object that represents a remainder. The ObjectOutputStream class contains many methods for serializing various data types. But we are interested in the following method.
public final void writeObject(Object x) throws IOException
This method serializes the specified object. So, to serialize our Message object, the following code may be used.
oos.writeObject(msg);
Since, oos has a reference to the socket’s OutputStream, writeObject() method serializes msg and directly sends the serialized byte array through the socket. At the receiving end, the Message object is restored back from the serialized data using a procedure called deserialization. Here is the complete source code of a program (namely TCPObjectSender.java) that sends an object over TCP connection.
//TCPObjectSender.java
import java.io.*;
import java.net.*;
public class TCPObjectSender
{
public static void main(String argv[]) throws Exception
{
String fact;
//create a socket to the server
Socket socket = new Socket(”172.16.5.81”, 6789);
System.out.Erintln(”Connected to localhost at port 6789”);
//Create a Message object to be sent
Message msg = new Message(”Remainder”,”Return my book on Monday”);
//Create an Ob/ectOutEutStream
object Ob/ectOutEutStream oos = new Ob/ectOutEutStream(socket.getOutputStream());
//Serialize and send over TCP oos.writeObject(msg);
System.out.Erintln(”Sent an object”);
socket.close();
}
}
8.2. Reconstructing Objects
The counterpart of ObjectOutputstream is the java.io.Objectinputstream class that implements deserialization part. Like ObjectOutputstream, it also defines a set of useful methods to read the serialized data.
To restore the object back, we first create an Objectinputstream object from an inputstream that contains the serialized data. Since serialized data comes through the socket, inputstream of the socket is used to create Objectinputstream object as follows:
ObjectInputStream in = new ObjectInputStream(socket.getInputStream());
Like, ObjectOutputstream, the Objectinputstream class also contains the following method for deserializing an object:
public final Object readObject() throws IOException, ClassNotFoundException
This method retrieves data for the next Object from the input stream. It then deserializes the data to form the object. Since, the return value is Object (the top level Java class) we should cast it to the appropriate data type. So, the following code may be used to get out Message object back:
Message msg = (Message) in.readObject();
Here is the complete source code of the program (namely TCPObjectReceiver.java) that receives an object over TCP connection.
//TCPObjectReceiver.java
import java.io.*;
import java.net.*;
public class TCPObjectReceiver
{
public static void main(String argv[]) throws Exception
{
//create a server socket at port 6789
ServerSocket serverSocket = new ServerSocket(6789);
//wait for incoming connection
System.out.println(”Server is listening on port 6789”);
Socket socket = serverSocket.accept();
System.out.println(”Request accepted”);
//Create an ObjectInputStream Object
ObjectInputStream in = new ObjectInputStream(socket.getInputStream());
//Restore the object
Message msg = (Message) in.readObject();
//Print the mesaage
System.out.println(”Received a message:”);
System.out.println(”subject : ” + msg.getSubject()+”\nbody :
”+msg.getText());
}
}
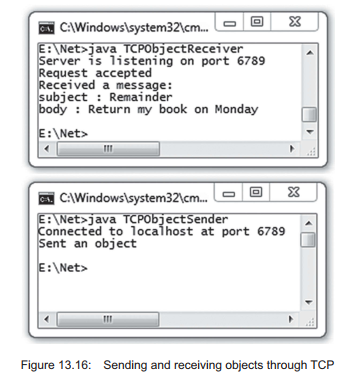
Compile the sender program TCPObjectSender.java, the receiver program TCPObjectReceiver. java and Message.java. Note that to reconstruct a Message object, its class definition is required. So, before starting the receiver program, make sure that the directory contains Message.class file. Start the application now. A sample output is shown in Figure 13.16:
9. An Example
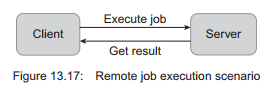
In this section, we shall develop a simple but elegant distributed application using TCP socket. In this application [Figure 13.17:], the server accepts jobs from the clients, executes these jobs locally, calculates the execution time, and finally returns the output as well as completion time. This way, clients can execute their jobs remotely on a powerful computer, or a computer having specialized hardware or one that has special permission.
The interesting part of the application is that the server does not have to define the jobs that it executes. Clients can create their custom jobs as and when required and submit them to the server for execution. The only restriction imposed on a job is that its class must implement an interface defined by the server. The class definition of a job is also sent by the client that submits the job through socket. Once the class file is available, the server can execute the job locally using its own resource.
How can a server return the result to the client? If the result’s class is a built-in class, the client already has the class definition and can use it easily. However, if the result’s class is a server-defined custom class, how can the client get it? Again there is no problem, since the client can download the class definition from the server side and get the result. The only requirement of a result object is that its class implements an interface known to the client.
This way, the server can execute arbitrary jobs without any prior knowledge of the job’s class definition. Clients can also get the result without any prior knowledge of result’s class definition. The socket may be used to send and receive necessary class definitions. This way, we may change the behaviour of an object and install it in a remote machine dynamically.
10. Writing the Server
The server application consists of three parts: Result interface, an implementation of that interface, Executable interface and main file that accepts and executes the jobs submitted by the client.
10.1. Writing Interfaces
In this section, we shall describe the interface Executable that defines the client’s view of job. It provides a description of what methods a job should implement. Client creates a job implementing this interface and submits (using object serialization) for execution. The server restores the job object and invokes a method defined in the Executable interface.
Here is the source code (Executabie.java) for Executable interface.
//Executable.java
public interface Executable {
public String execute();
}
The interface has a single method executed .The server will invoke this method on jobs submitted by the clients. This method should return all the output as a single string. The server also calculates the execution time and creates a Result object and sends back to the client.
The Result interface describes the structure of the result returned after executing the job. Here is the source code (Result.java) for Result interface.
public interface Result {
String output();
double completionTime();
}
It defines two methods, output() and completionTime(). The methods output() and completionTime() return string output and execution time of the job, respectively. The Result object’s class must implement this interface. The client must download this Result object’s class definition to get the result.
Since, Executable and Result objects are exchanged using Java’s object serialization procedure, classes that implement Executable and Result must implement the java.io.Serializable interface.
10.2. Implementing Interfaces
The server only defines one class ResultImpl which implements Result interface. Here is the source code (ResultImpl.java.) for ResultImpl class.
import java.io.Serializable;
public class Resultlmpl implements Result, Serializable {
String output; double completionTime;
public ResultImpl(String o, double c) {
output = o;
completionTime = c;
}
public String output() { return output; }
public double completionTime() { return completionTime; }
}
An object of this class represents the result of a job in terms of its output and completion time. This result object, generated by a job at the server end, will be transferred to the client side and hence must be serializable. This object is indeed serializable as its class implements the Serializable interface. The definition of Resultlmpl must be downloaded to the client side to reconstruct the result object.
The client only defines one class Job which implements Executable interface. Here is the source code (job.java.) for Job class.
//Job.java
import java.io.Serializable;
public class Job implements Executable, Serializable {
public String execute() {
int n = 5,
prod = 1;
for(int i = 2; i <= n; i++) prod *= i;
return (new Integer(prod)).toString();
}
}
A Job object submitted by the client is transferred to the server side and hence must be serializable. This object is indeed serializable as its class implements the Serializable interface. The definition of Job must be downloaded to the server side to reconstruct the job object.
10.3. Implementing Server
//TCPServer.java import java.io.*; import java.net.*;
public class TCPServer {
public static void main(String argv[]) throws Exception {
//create a server socket at port 6789
ServerSocket serverSocket = new ServerSocket(6789);
//wait for incoming connection
System.out.println(”Server is listening on port 6789”);
Socket socket = serverSocket.accept();
System.out.println(”Request accepted”);
ObjectInputStream in = new ObjectInputStream(socket.getInputStream());
String classFile = (String)in.readObject(); byte[] b = (byte[])in.readObject();
FileOutputStream fos = new FileOutputStream(classFile); fos.write(b);
Executable ex = (Executable)in.readObject();
System.out.print(”Starting execution…”);
double startTime = System.nanoTime();
String output = ex.execute(); double endTime = System.nanoTime();
double completionTime = endTime-startTime;
System.out.println(”[ DONE ]”);
ResultImpl r = new ResultImpl(output, completionTime);
ObjectOutputStream out = new ObjectOutputStream(socket. getOutputStream());
classFile = ”ResultImpl.class”;
out.writeObject(classFile);
FileInputStream fis = new FileInputStream(classFile);
byte[] bo = new byte[fis.available()];
fis.read(bo);
out.writeObject(bo);
out.writeObject(r);
System.out.print(”Result sent”);
socket.close();
}
}
10.4. Implementing Client
//TCPClient.java import java.io.*; import java.net.*;
public class TCPClient {
public static void main(String args[]) throws Exception {
//create a socket to the server
Socket socket = new Socket(args[0], 6789);
System.out.println(”Connected to localhost at port 6789”);
ObjectOutputStream out = new ObjectOutputStream(socket.getOutputStream());
String classFile = ”Job.class”;
out.writeObject(classFile);
FileInputStream fis = new FilelnputStream(classFile);
byte[] b = new byte[fis.available()];
fis.read(b);
out.writeObject(b);
Job aJob = new Job();
out.writeObject(aJob);
System.out.println(”Submitted a job for execution”);
ObjectInputStream in = new ObjectInputStream(socket.getInputStream());
classFile = (String)in.readObject();
b = (byte[])in.readObject();
FileOutputStream fos = new FileOutputStream(classFile);
fos.write(b);
Result r = (Result)in.readObject();
System.out.println(”result = ”+r.output()+”, time taken = ”+r.completionTime()+” ns”);
socket.close();
}
}
Source: Uttam Kumar Roy (2015), Advanced Java programming, Oxford University Press.