Changes in WordPress, combined with new HTML5 capabilities, mean that adding video and audio to your website is now as simple as adding images. That’s good news because the popularity and importance of video continue to grow. And the potential for audio to enhance your site becomes truly practical. So the question now is not whether you can use video or audio in WordPress, but where to store and serve these sometimes numerous and large files.
1. Video
This section shows you how to insert video that you host on another server, as well as video you upload to WordPress, and how to decide between each method. You also see how to resize videos to fit a specific location on your site.
1.1. Inserting Video Hosted with a Third Party
As a rule of thumb, you don’t want to put video files on your (very likely, shared) hosting account. They’ll slow down your site and potentially overload your server if you get any kind of traffic to them. So what do you do?
For most of us, the obvious answer is YouTube:
- Accounts are free.
- You can store and serve hundreds, even thousands, of videos.
- Public videos get exposure through the YouTube search engine.
There are other scenarios and other solutions (some are mentioned later) but let’s use YouTube as an example so that you can see how simple the process of embedding external video is.
I’ve created a YouTube account and uploaded a video. (I won’t go into details here because it’s well-documented online.)
I copied the URL for the video from my browser address bar (Figure 1 A). I started a new line in my Content Editor and pasted in the URL (Figure 1 B). After updating my Post, I achieved the result in Figure 1 C.
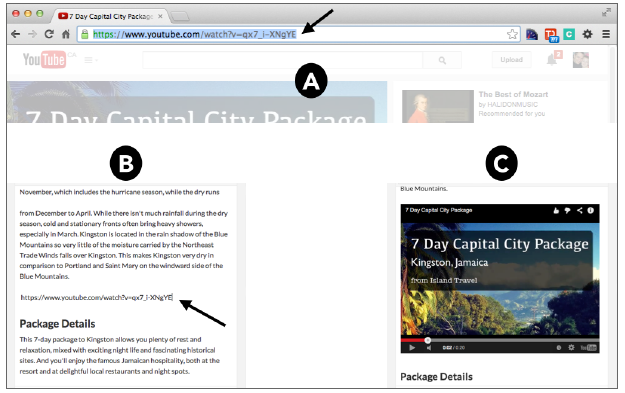
FIGURE 1
That’s all there is to it. The same will work for videos on Vimeo, Blip, Animoto, and several other sites. You can find the most up-to-date list at http://codex.wordpress.org/Embeds.
Be sure to copy the full URL of the video, including the http://, or WordPress won’t recognize it properly. And again, it must be on a line by itself in the Content Editor.
Of course, you can do this with any publicly available video on any sharing site, so the video content you can include on your site is not limited to ones you create yourself.
What about sites that don’t support this special embed protocol? Say, for example, you host your videos in a cloud account, such as Amazon S3, which is inexpensive to do. Fortunately, adding such videos to WordPress is almost as straightforward.
Remember the Insert from the URL screen of the Media Uploader? If you paste the URL of a video file into that screen, WordPress can tell you if it’s going to work by displaying the video in a player there in the uploader window, as shown in Figure 2.
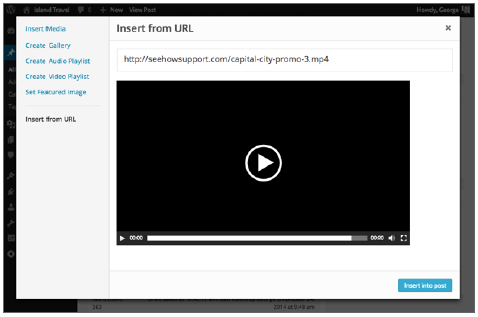
FIGURE 2
Then it’s just a matter of clicking Insert into Post and the video player will show to your visitors.
1.2. Inserting Video Hosted on Your Account
Not every situation or even every video is best suited to using a service such as YouTube or Vimeo or any third party. If the video file is short enough and small enough, it’s certainly feasible to upload it to WordPress and run it from your server.
For example, a 30-second introduction for your homepage, if formatted and saved efficiently at the production stage, may be no more than 2 or 3 MB. Many PDFs for download are that big. And a site introduction may not be great YouTube material anyway, because it’s so specific in nature, but it is a good candidate for uploading to WordPress.
Inserting videos you’ve uploaded to WordPress can be done one of two ways:
- The first is to get the complete file URL from the Media Library and paste it onto its own line in the Content Editor, just like I did with the YouTube Make sure you’re in Visual Mode, of course. Like a YouTube video, a player will appear, and visitors can watch your video in the body of the content.
- The second way is to use the Add Media button and either upload the video or choose it from the Media Library; then click Insert Into Post. Again, you get a video player in your content.
Although the result appears to be the same, there is an important advantage to adding the video through the Add Media button. You can edit the playing parameters of the video through the Video Details window shown in Figure 3.

FIGURE 3
In a sense you can think of this as the Video Player Details window because the settings control how visitors will see and interact with the file:
- Put in a lower resolution video for mobile users.
- Remove existing or select a new Poster Image. (This is just another name for the Featured
- Image, and it changes for all instances of the file, not just this player.)
- Choose whether to preload video, featured image, or none.
- Choose whether the file should Auto Play.
- Choose whether the file should Loop.
Add subtitles, chapters, or other meta data (by uploading a special text file in webvtt format). You can see now why using the Add Media button for video makes the most sense. It gives you a lot of additional control. If you drop in the URL of an uploaded video, the edit icon just takes you to the Insert URL window, and the only option there is to change the URL.
If you edit the video file through the Media Library, you never get the Video Details window because in that case, the file is not played in a specific Post or Page; you’re working with the file itself. What you can do on the Edit Media screen is add a caption and description for use on the file’s Attachment Page, and you can also assign the video a Featured Image.
Featured Images for Videos
For video files you upload to WordPress, you can set a Featured Image. It’s used in two key ways:
- The Featured Image displays in the video player that visitors see (Figure 4 A).
- In the Media Library Grid view, the Featured Image is shown instead of a generic video icon. (The video filename displays over the top, so it isn’t confused with actual image files, as shown in Figure 4 B).
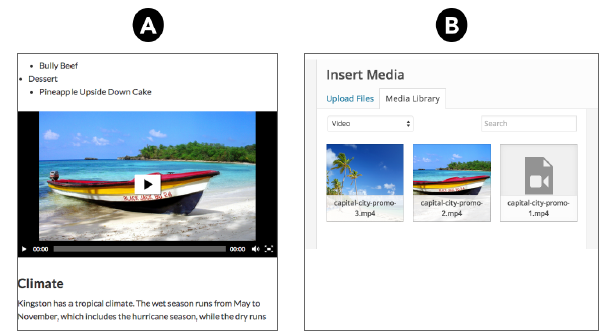
FIGURE 4
It also is used in Video Playlists, as you’ll see shortly.
You can set a Featured Image only after you’ve uploaded the video file. Go into the Media Library and edit the video file. At the bottom of Edit Media, you see a Featured Image box, just like for Posts and Pages.
1.3. Video Playlists
Video Playlists are groups of videos and can be created from the Media Uploader by clicking the Create a Video Playlist link on the left menu. Don’t see the link? That means you haven’t uploaded any video files to the Media Library.
After you upload some video, creating a playlist is almost exactly like making an Image Gallery: You click the videos you want to show on the list and then click the blue Create a Video Playlist button. Like a Gallery, you’re then taken to an Edit screen where you can order the videos, change the titles, or delete files, as shown in Figure 5.

FIGURE 5
The big difference is in the settings. There are no columns to choose and no Link To function. Instead, you choose between showing the list of videos, showing an image for each video, or both.
By default, the title displayed in the video list is the filename, but you can change it to whatever you want in the Create or Edit Gallery screens. They look like the caption settings for Image Galleries.
But what are these images that you can show or not show? No explanation is given in this window, but the answer is: the Featured Image for each video. As you saw earlier, this image can be set when you edit a video file in the Media Library.
2. Audio
Audio files are handled in almost exactly the same way as video files. You can drop the URL for an mp3 file directly into the Content Editor, and it will produce an audio player, as shown in Figure 6.
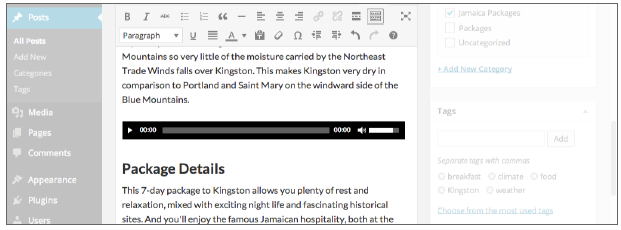 FIGURE 6
You can create Audio Playlists (but only if there are any audio files in the Media Library).
Auto-embedding from some third-party music and audio sites also works. And you can use Featured Images with audio files.
There are some differences, however. The Featured Image shows up for visitors only on an Audio Playlist, not on an individual player. Typically, the Featured Image for music would be the album cover, but for other types of audio, you could have a photo of the speaker or create an image representative of the content and the topic of the audio.
The colors of buttons on the default audio player (or video player) may get picked up from your theme, so they’ll match your site colors automatically. You could do more with CSS styling, or there are plugins to provide fancier player interfaces.
Audio tends to be overshadowed by video these days, but keep in mind that visitors can con- tinue to listen to your audio even if they’re doing something else. So, for example, recording a reading of your blog Post and putting the audio player near the top is a great way of engaging your audience.