You’ve seen how WordPress makes it easy to upload and insert images into your posts, but what if you have a lot of images for a single Post? It would be nice to just show thumbnails of each picture and then have people click them to see the larger version. WordPress makes that easy, with the Create Gallery function in the Media Uploader window.
To be clear, this is a function built in to WordPress. Don’t confuse this type of Gallery with the many photo gallery plugins or photo gallery functions built in to some themes. You don’t need any extras to do what you see in this lesson.
1. Creating An Image Gallery In A Post
Start by clicking the Add Media button. By default you get the Insert Media screen. Although you’ll insert a Gallery, you first need to make one, which is why you need to click the Create Gallery link on the left menu (Figure 1 A) or from the drop-down menu in mobile mode (Figure 1 B).

FIGURE 1
What you see is all the images you have in your Media Library. Other file types are automatically excluded because they can’t be used for a Gallery. And, of course, there’s a tab for uploading new images.
As you click images and they display check marks, those are the images that will be included in your Gallery, as shown in Figure 2.
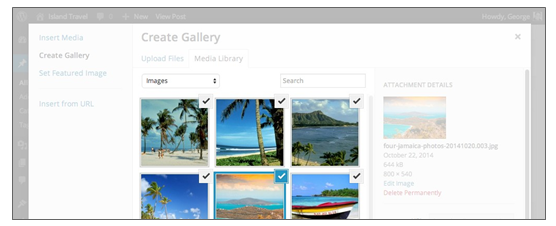
FIGURE 2
To remove an image from the Gallery, you have to click the check box. If you click only on the image, the check mark remains.
If you want to delete all items and start again, there’s a Clear link below the tiny thumbnails on the Selected list at the bottom of the screen (Figure 3).

FIGURE 3
These tiny thumbnails can help keep track of what you’ve chosen because as you scroll through the Media Library, you can’t see all the checked images at one time.
However, for mobile users, there are no tiny thumbnails—only the number of images selected and the Clear link. For desktop users, the number of images shown depends on the width of the browser window, and you cannot scroll through the thumbnails to see ones that are hidden.
If you click one of the tiny thumbnails, you can see all its details on the right side.
After you have all your images selected, you can click the Create Gallery button at the bottom right, resulting in the Edit Gallery screen in Figure 4.
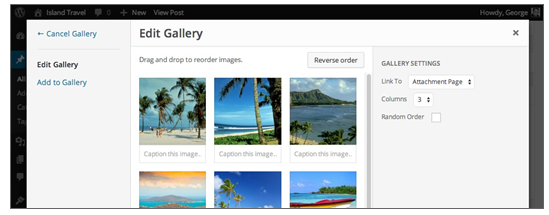
FIGURE 4
Here’s where you can make all kinds of adjustments to the Gallery before inserting it in your Post. This is also the screen you’d come back to for editing after inserting the Gallery.
Order the images by dragging and dropping them, or simply reverse the current order using the Reverse Order button at the top right. As mentioned earlier, if you use the Random Order check box at the right side in Gallery Settings, any ordering you’ve done will no longer apply.
You can get rid of images at this stage as well with the tiny X at the top right of an image when you mouseover it (Figure 5).
In Figure 5 you can also see the Caption This Image box below each image. Clicking in there allows you to add wording that will appear, most commonly, below the image.
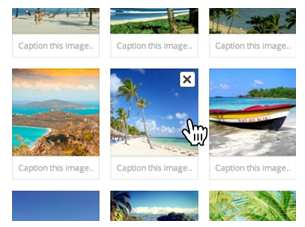
FIGURE 5
1.1. Gallery Settings
When all your images are ready, it’s time to check your Gallery Settings on the right (Figure 6).
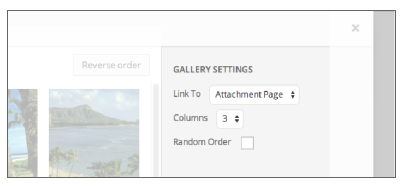
FIGURE 6
These provide some control over display of the Gallery, so let me walk you through each of them.
LinkTo
The Link To setting determines where visitors are taken when they click an image in the Gallery. If you choose Attachment Page, the image links to a web page which is determined by your theme—often, this will be the default single post template. What displays depends on the theme template, but typically, this includes the image Title and Description fields.
Choosing Media File displays the full-size version of the image in an empty browser tab or window.
There are plugins for WordPress that will automatically create the nice lightbox pop-ups that have become so popular. Some of these are discussed at the end of this lesson. Often these plugins require that you set the Link To function as Media File, but you need to check with each plugin’s documentation.
Your final choice for linking images is to have no link at all. If you use the Gallery in full-size mode (you see how to do that shortly), the None setting could be useful.
Columns
This sets the number of columns across the page—the default is 3. That’s quite safe for most sites based on the default thumbnail size of 150 pixels. However, it depends on the thumbnail size and the width of your theme’s content area—it’s just a matter of experimenting, which is easy because you can switch the column quantity anytime.
Random Order
If you want the order of images in the Gallery to be randomized every time the page is loaded, check this box. Obviously, this overrides any order of images you made by dragging and dropping.
1.2. Inserting a Gallery
After you finish with settings, you can click the Insert Gallery button at the lower right of the Media Uploader window. You should now see the Gallery images in the Content Editor, as shown in Figure 7.

FIGURE 7
While it looks like a lot of individual images, you can confirm it’s a Gallery by clicking any image. The entire group is enclosed in a gray box with an edit and delete icon at the top left (Figure 8).
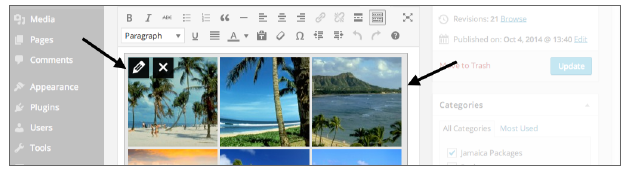
FIGURE 8
You can drag this Gallery around the Content Editor as if it were a single image, although it will always be on its own line. In other words, you can’t have text flowing around a Gallery.
1.3. Editing an Existing Gallery
Just as you can edit an image that’s been inserted into content, you can do the same with a Gallery. Just click the pencil icon that appears at the top right when you click the Gallery in the Content Editor.
You’ll get the Edit Gallery screen of the Media Uploader window but with a slightly different menu on the left, as shown in Figure 9 A.
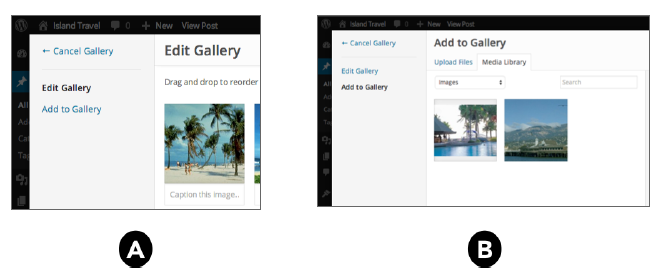
FIGURE 9
If you want to add images, just click the Add to Gallery link. A special screen called Add to Gallery (Figure 9 B) is displayed, which shows the Media Library and has an Upload Files tab.
If the Media Library looks a bit sparse in Add to Gallery, it’s because none of the existing Gallery images are shown—only ones available to add to the Gallery display. You can choose as many as you like; then click the Add to Gallery button.
The new images are added to the end of the existing Gallery images. You can then play with the order as usual. And, of course, add captions, remove images, change the number of columns, and so on. When you finish, click the Update Gallery button.
Remember, even though you updated the Gallery, always click the Update button for the Post or Page.
2. More Gallery Options
In Visual mode of the Content Editor, you’ve seen how a Gallery displays as a series of images, but in Text mode, it’s actually just a bit of code—what’s called shortcode—as you can see in Figure 10.
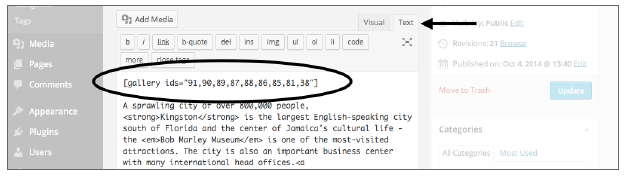
FIGURE 10
Using this shortcode, you can customize your Gallery in a number of ways unavailable in the Media Uploader. Now learn about a couple of them here.
2.1. Image Size
By default, Galleries display the Thumbnail version of an image, and unfortunately the Media Uploader does not provide a way of choosing a different size. However, by altering the Gallery shortcode in Text Mode, you can tell WordPress to use a different size:
You must be careful not to change anything else in the shortcode or it could break. If you put your cursor just before the final square bracket and start typing, everything should be fine.
The other setting you need to change is the number of columns the Gallery will use. For Medium size images, you’ll probably fit only two columns. It depends on your Settings ➪ Media settings and your Theme.
Now you could edit your Gallery through the Media Uploader and change the columns, but it can also be done through the shortcode as well:
You can see in Figure 11 what the Gallery looks like using this new sizing and just two columns.
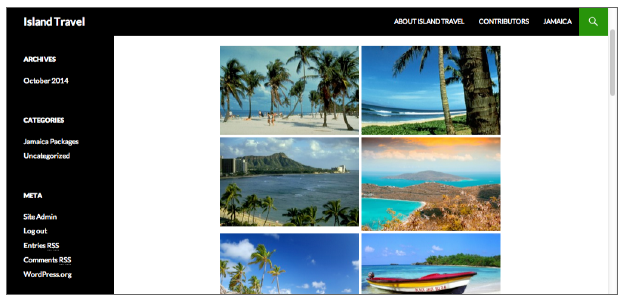
FIGURE 11
You are seeing this at the front end of the site because the change of size is not reflected in the Content Editor—you’ll still see thumbnail images. That’s because in the Content Editor you’re see- ing placeholders for the Gallery, not the finished version.
Notice that the first image in the second row of the Gallery in Figure 11 is not quite as tall as the others. That’s an example of why, in Galleries that are not using cropped thumbnails, you must make each image exactly the same size.
If your original images are sized according to the width of your theme’s content area (usually between 600 and 800 pixels wide), you could use the full setting and only 1 column to produce a nice effect, as shown in Figure 12.
In this case, differences in height are not a problem because all the images are wide enough to fill this content area. That won’t always be the case, so it’s still best to make all images in a gallery the same width at least, and hopefully height as well.
You can find a lot of advice on the Internet about changing the size of thumbnail images in Settings ➪ Media to get larger thumbnails in Galleries. Although this does work (and you have to regenerate all existing thumbnails using a special plugin), remember that it’s changing all thumb- nails everywhere on the site, and that’s likely not what you want. The method used here is on a Gallery by Gallery basis.

FIGURE 12
2.2. Image Order
In the Gallery screens of the Media Uploader window, you saw how to order images by dragging and dropping them, but you can also order them through the shortcode method using the orderby= attribute.
In this example, the Gallery would be ordered alphabetically according to the Title of each image. Another option would be to order by the date the image was uploaded:
Keep in mind that this is just an example. The numbers in the ids attribute are random numbers I’ve picked for illustration. The Media Uploader generates those ids for you; I’m simply showing you where to add to the shortcode.