The following sections describe installation of SQL Server on two different operating systems: Windows and Ubuntu.
1. Planning the Installation on Windows
To start the SQL Server installation, mount the ISO image of the SQL Server software.
After that, click the Setup.exe file. SQL Server contains a tool called Installation Center (see Figure 2-2). This tool supports you during the planning, installation, and maintenance phases of your database system.
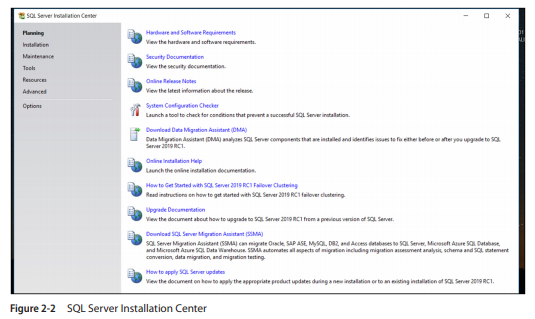
The first phase of Installation Center leads you through the process of planning the installation. As shown in Figure 2-2, when you click Planning, the following tasks, among others, can be executed:
- Hardware and Software Requirements
- Security Documentation
- Online Release Notes
- System Configuration Checker
The following subsections describe these tasks.
1.1. Hardware and Software Requirements
Microsoft recommends running SQL Server on computers with the NTFS or ReFS file system. Installing SQL Server on a computer with the FAT32 file system is supported by Microsoft but is not recommended, as it is less secure than the other two file systems.
Officially, the minimum requirement for main memory is 1MB. (The Express Edition needs only 512KB.) However, such a minimal configuration will not perform very well, and as a general guideline, main memory of your computer should be at least 2GB or more.
SQL Server requires a minimum of 6GB of available hard-disk space. Disk space requirements will vary depending on the SQL Server components that you install.
1.2. Security Documentation
When you click Security Documentation on the Planning page, the system takes you to the Microsoft page that discusses general security considerations. One of the most important security measures is to isolate services from each other. To isolate services, run separate SQL Server services under separate Windows accounts. (Chapter 12 discusses Windows accounts and other security aspects.) Information about all other security aspects can be found in Microsoft Docs.
1.3. Online Release Notes
There are two main sources to get information concerning all the features of the SQL Server system: Microsoft Docs and Online Release Notes. Microsoft Docs is the official online documentation delivered by Microsoft, whereas Online Release Notes contain only the newest information, which is not necessarily provided in the Microsoft Docs documentation. (The reason is that bugs and specific behavior issues affecting the system sometimes are detected after the official documentation is written and published.) It is strongly recommended that you read the Online Release Notes carefully to get a picture of features that were modified shortly before the delivery of the final release.
1.4. System Configuration Checker
One of the most important planning tasks is to check whether all conditions are fulfilled for a successful installation of the database system. When you click System Configuration Checker, the component called Setup Global Rules is automatically started. (The same tool is launched at the beginning of the installation phase, described next.) Setup Global Rules identifies problems that might occur when you install SQL Server support files. After finishing this task, the system shows you how many operations were checked and how many of them failed. All failures have to be corrected before the installation can continue.
2. Installing SQL Server on Windows
If you have ever installed a complex software product, you probably recognize that feeling of uncertainty that accompanies starting the installation. This feeling comes from the complexity of the product to be installed and the diversity of questions to be answered during the installation process. Because you may not completely understand the product, you (or the person who installs the software) may be less than confident that you can give accurate answers for all the questions that the Setup program asks to complete its tasks. This section will help you to find your way through the Windows SQL Server installation by giving you answers to most of the questions that you are likely to encounter.
As its name suggests, besides planning, Installation Center supports the installation of the software on Windows, too. Installation Center shows you several options related to the installation of the database system and its components. After clicking Installation, choose New SQL Server Stand-Alone Installation or Add Features to an Existing Installation (refer to Figure 2-2), which launches a wizard to install SQL Server.
What appears for the next step depends on whether you install SQL Server 2019 as a first installation or on top of an existing one. In the former case, the Product Key and License Terms pages appear at the top of the navigation pane, before the Global Rules page. In the latter case, the Global Rules page appears at the top, and the Product Key and License Terms pages appear later in the wizard. If you are doing a first installation, complete the Product Key and License Terms steps at this point.
The Global Rules page is identical to what you see when you start System Configuration Checker in the planning phase (refer to the previous section), so you can skip to the next page, Product Updates. On this page, you can decide whether to use the Product Updates service of Microsoft to keep the installation up to date. (I strongly recommend that you activate Microsoft’s Update service.) When you click Next, the Install Setup Files page appears and the installation program installs all setup files.
Click Next, and the Install Rules page appears (see Figure 2-3). This page shows the status of some installation rules that were run. The status of rules marked “Passed” are acceptable. You can accept warnings in this step, because they are merely information for the user who installs the product. Click Next.


NOTE If you install SQL Server 2019 from scratch, the following page, Installation Type, will not appear as an installation step. In that case, skip the following paragraph.
On the next page, Installation Type (see Figure 2-4), you can choose either to perform a new installation of SQL Server or to add features to an existing instance of SQL Server. Choose the option to perform a new installation of SQL Server and click Next.
On the Product Key page, enter the 25-character key from the product packaging. (The alternative is to specify a free edition of the software, SQL Server Express, for instance.) Click Next to continue. On the License Terms page, click I Accept the License Terms. Click Next.
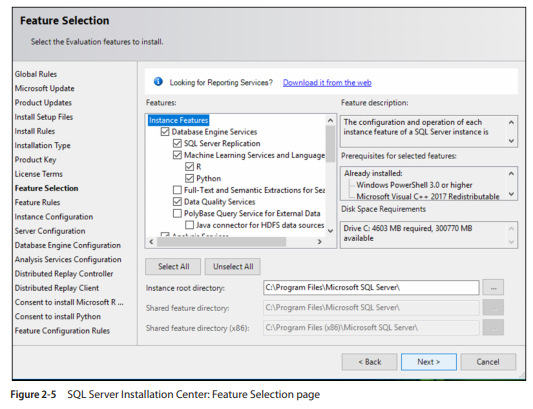
On the Feature Selection page (see Figure 2-5), select the components to install by checking the corresponding check boxes. (Recall that the instance features were introduced earlier in this chapter, in the “Which SQL Server Components Should Be Installed?” section.) Also, toward the bottom of the page, you can specify the directory in which to store the shared components. (You should not check the box for Analysis Services; save its installation for Chapter 23.) After that, click Next to continue.
At the next page, Feature Rules, the Setup program runs rules to determine if the installation process will be blocked. If all checks are passed (or marked “Not applicable”), click Next to continue.
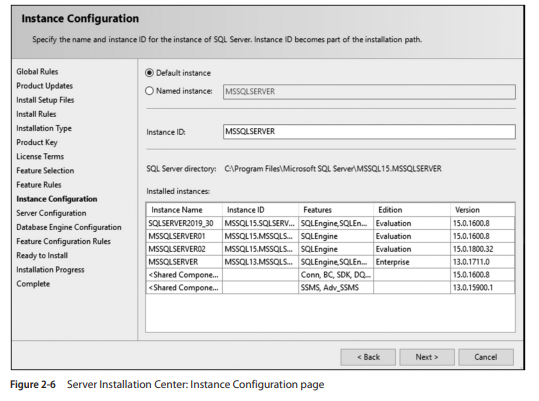
On the Instance Configuration page (see Figure 2-6), you can choose between the installation of a default instance or a named instance. (See “Should Multiple Instances of the Database Engine Be Used?” earlier in this chapter for a refresher on these instance types.) To install the default instance, click Default Instance. If a default instance is already installed and you select Default Instance, the Setup program upgrades it and gives you the option to install additional components. Therefore, you have another opportunity to install components that you skipped in the previous installation processes.
To install a new named instance, click Named Instance and type a new name in the text box. In the lower part of the page, you can see the list of instances already installed on your system. (MSSQLSERVER is the name of the default instance for the Database Engine.) Click Next to continue.
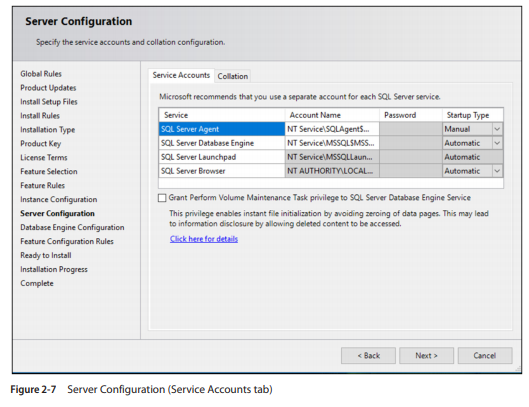
The next page, Server Configuration, contains two tabs. The first one, Service Accounts (see Figure 2-7), allows you to specify usernames and corresponding passwords for services of all components that will be installed during the installation process. (You can apply one account for all services, but this is not recommended, for security reasons.)
To choose the collation of your instance, click the Collation tab. (Collation defines the sorting behavior for your instance.) You can either choose the default collations for the components that will be installed, or click Customize to select some other collations that are supported by the system. Click Next to continue.
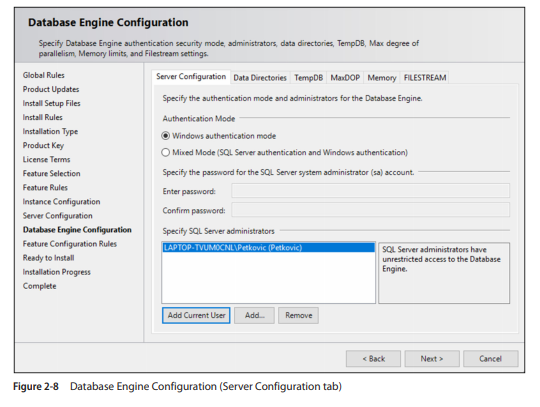
The Database Engine Configuration page has several different tabs (see Figure 2-8). The first tab, Server Configuration, allows you to choose the authentication mode for your Database Engine system. As you already know, the Database Engine supports Windows authentication mode and Mixed mode. If you select the Windows Authentication Mode radio button, SQL Server validates the account name and password using the Windows principal token in the operating system. This means that the user identity is confirmed by Windows. SQL Server does not ask for the password, and does not perform the identity validation.
If you choose the Mixed Mode radio button, you must enter and confirm the system administrator login. Click Add Current User if you want to add one or more users that will have unrestricted access to the instance of the Database Engine. (As you can see from Figure 2-8, I added my own account for unrestricted access.)
The second tab of the Database Engine Configuration page, Data Directories, allows you to specify the locations for the directories in which Database Engine-related files are stored. In other words, the installation process lists default directories where the installation process will store different SQL Server components and which you can modify.
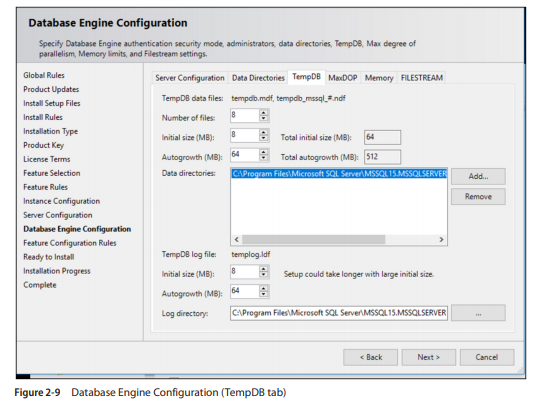
As its name indicates, the third tab relates to the tempdb system database. (This database provides storage space for temporary objects that are needed.) On this tab you can configure the number of data files assigned to tempdb (see Figure 2-9). By default, the installation process sets the default to the number of cores on your machine. If your machine has more than eight cores, this initial number of tempdb data files will be set to 8.
Additionally, this tab allows you to set the initial size and autogrowth settings for the tempdb data and log files. Click Next.
NOTE Use the default values for MaxDOP, Memory, and FILESTRAM. These values do not have the same significance as the parameters of the tempdb database, and can be easily modified later.
NOTE The tempdb system database is often the cause of serious performance problems. For this reason, the possibility to assign a variable number of files to this database during the installation process is a good idea of the SQL Server team. (Chapter 15 provides a detailed description of the tempdb database.)
What appears for the next step depends on whether or not you chose to install Analysis Services. (A Configuration page appears for each SQL Server component that you chose to install.) If you did choose to install it, a page will appear separately for Analysis Services. (You can later easily install this component. For this reason, its installation is discussed in Chapter 23.)
The next page, Feature Configuration Rules, is similar to the earlier page called Feature Rules. During the Feature Rules step, the setup is running rules to determine if the installation process will be blocked by any of the selected features in the Feature Selection step. On the other hand, during the Feature Configuration Rules step, the setup is testing whether the process will be blocked by any rules in relation to the configuration of your system. At the end of this step, the summary of all configuration rules will be displayed. Click Next.
The last page, before the installation process actually starts, is the Ready to Install page. This page allows you to review the summary of all SQL Server components that will be installed. To start the installation process, click Install. Setup shows you the progress of your installation process. At the end, the Complete page appears, with the location of the file in which the summary log is stored. Click Close to complete the installation process.
3. Installing SQL Server Directly on Ubuntu
You can install and configure SQL Server 2019 on Linux derivatives either directly or by using a Docker container. This section shows you how to install SQL Server directly on Ubuntu. You can find the instructions for installing SQL Server 2019 on Ubuntu using a Docker container in Microsoft Docs.
NOTE The configuration of a virtual machine and installation of Ubuntu on it are not discussed in this book. For the description of both steps, see, for example, https://www.sqlshack.com/ sql-server-2019-on-linux-with-ubuntu/.
Before SQL Server can be installed directly on Ubuntu, you have to perform two introductory steps:
- Import the public repository GNU Privacy Guard (abbreviated either GPG or GnuPG) keys.
- Register the SQL Server Ubuntu repository for SQL Server 2019 preview.
To import GnuPG keys, execute this statement:
wget -qO- https://packages.microsoft.com/keys/microsoft.asclsudo apt-key add –
Generally, GnuPG keys are hybrid encryption keys used to share sensitive information between two or more parties that can be used to maintain a link. “Hybrid” means that they are a combination of symmetric and public keys. (For definitions of these keys, see Chapter 12.) In our case, the keys are used between Microsoft, on one side, and the user, on the other. In other words, the Microsoft public GPG keys, stored under https://packages.microsoft.com/keys, are imported with the first (wget) command and added with the second one (apt-key) to maintain a private information link.
The next step is to register the SQL Server Ubuntu repository. Before I discuss the corresponding command, if you’re not familiar with Linux, you should be aware that installing software on Linux is different from installing it on Windows in that it is done using repositories. A repository is a location from which your system retrieves applications. Each repository is a collection of software hosted on a remote server and intended to be used for installing and updating software packages on Linux systems. Each such repository is managed by package managers. (You can think of package managers as an equivalent of an advanced version of Add/ Remove Programs in Control Panel in Windows.)
The following command registers the SQL Server Ubuntu repository for SQL Server 2019. Change the version number of Ubuntu (16.04), if it is necessary. (The sudo command allows you to run programs as another user; by default, the root user.)
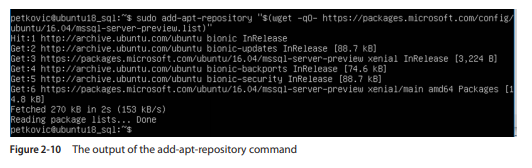
sudo add-apt-repository “$(wget -qO-
https://packages.microsoft.com/config/ubuntu/16.04/mssql-server-preview.
list)”
As you can see from Figure 2-10, after I executed the add-apt-repository command, several software packages were found and added for the installation process. Some of them belong to the archive of the Ubuntu system, and some belong to the packages delivered by Microsoft.
Now, execute the following two commands to install SQL Server:
sudo apt-get update
sudo apt-get install -y mssql-server
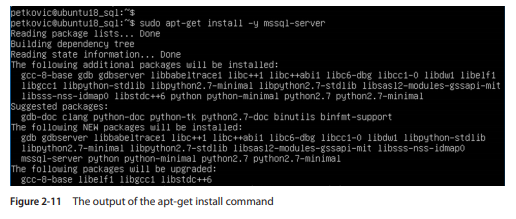
The first command, apt-get update, updates the package lists for upgrades of software packages and inserts the names of new software packages. The second command installs the system.
Figure 2-11 shows the beginning part of the output of the apt-get install command. You can see that first the dependency tree of all software packages was built and that the dependent packages, together with upgrades, will be installed.
When the package installation finishes, you get the image of the SQL Server instance on the Ubuntu operating system. To use this instance, you need to configure it.
NOTE In a Windows environment, when you install SQL Server using Installation Center, you need to specify, among other things, the software edition, the instance name, accept the license agreement, and the system administrator password. In an environment such as Ubuntu, the installation process first installs the base version and, in a second step, allows you to configure that instance.
Start the configuration process with the following command:
sudo /opt/mssql/bin/mssql-conf setup
As you can see from Figure 2-12, in the first step you have to choose the SQL Server edition you will use by entering the corresponding number. After you choose the edition, you have to accept the license terms, as shown in the middle of Figure 2-13. Provide the input as Yes (or No if you don’t want to proceed with the installation).
In the third step you need to specify the system administrator password. As you can see from Figure 2-13, the password I provided during the first try did not meet SQL Server password policy requirements, and I had to specify a stronger one.

After that, the configuration starts the SQL Server instance with all specified parameters, and the successful configuration is shown with the message at the end: “Setup has completed successfully. SQL Server is now starting”
The installation described installs an instance of the database server—a SQL Server “back end” You still do not know whether you can use the system or not because a front-end tool, such us Azure Data Studio, is still not installed. Regardless, you can check the SQL Service status from the command line by using the systemctl command as follows:
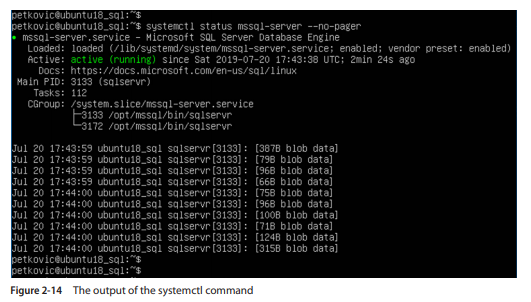
systemctl status mssql-server –no-pager
Figure 2-14 shows the output of the systemctl command. The most important part of the output is the line with the information that the system is active and running.
Additionally, the systemctl command starts two processes (see Figure 2-14). The parent process (#3133) handles basic configuration activities and then forks the child process (#3172). The parent process becomes a lightweight monitor and the child process runs the sqlservr.exe process.
Source: Petkovic Dusan (2020), Microsoft SQL Server 2019: A Beginner’s Guide, Seventh Edition-McGraw-Hill Education.