Before you begin creating a web site, here is a quick introduction to the Article, Category, and Menu Item Managers:
- Article Manager: Articles contain the actual information or content that you want your web site visitors to An article comprises text and may also include images and other multimedia content.
- Category Manager: To manage articles and to handle them with ease, they are categorized into A category is a title that groups related articles. By accessing a category, you access all the articles within it.
- Menu Manager: This manager enables you to create and manage menus and menu By selecting the respective menu item, the web site visitor can access the desired content in your site.
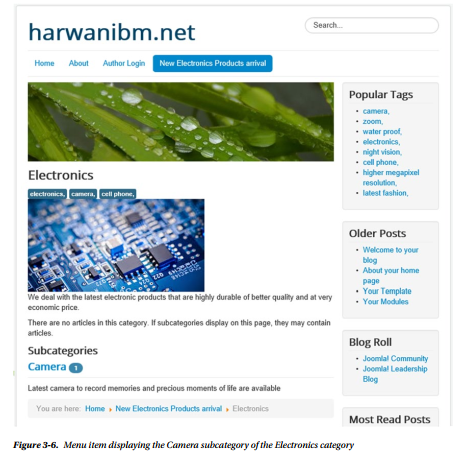
Let’s make a web site that looks something like the one shown in Figure 3-6. As shown in the figure, you’ll add a new menu item, New Electronics Products arrival. When selected, this menu item will display the Camera subcategory of the Electronics category.
Note Joomla provides several default categories and articles in your web site to give you an idea of how they are You can unpublish any of them to remove them from the web site and create your own contents instead.
1. Let’s Make This
Before you get started, here is a brief overview of what your example web site will look like and how it will function. Though you can create several categories in your web site, for this exercise you’ll keep it simple and just create one of each: a Camera subcategory inside an Electronics category. When your visitors select the Camera category, they will see the list of articles in that category, as shown in Figure 3-7.

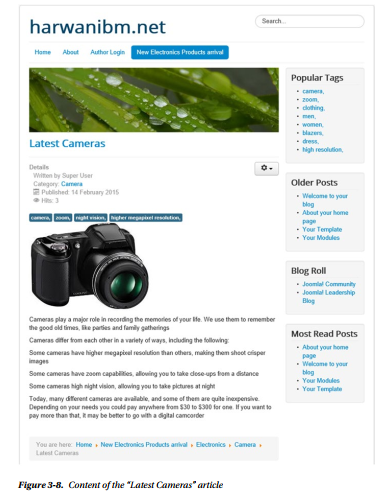
Again, to keep the example simple, you’ll also just display a single article when the Camera category is selected: “Latest Cameras.” When the article title is selected, it will display the content of that article, as shown in Figure 3-8.
To create some simple content for your example web site, you can use two managers found in the Control Panel: the Category Manager and the Article Manager. To create this simple content, follow these steps:
- Create the Electronics category using the Category
- Create the Camera subcategory in the Electronics category using the Category The Electronics category will be the parent category of the Camera category.
- Create an article (“Latest Cameras”) in the Camera category using the Article
- Create a menu item (New Electronics Products arrival) using the Menu Manager and linking it to the Electronics
2. Creating a Category with the Category Manager
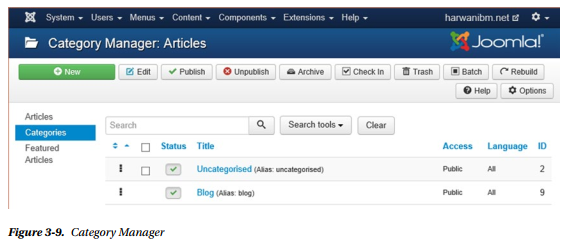
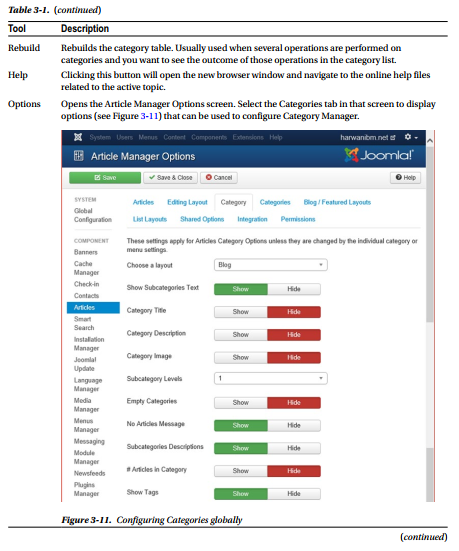
To build the Electronics category for your web site using the Category Manager, click the Category Manager button in the Control Panel. The Category Manager will open, as shown in Figure 3-9. Notice that each manager window has a title in a consistent location to help you locate your position in the Joomla environment. Most managers also have a similar toolbar button layout and behavior. The Category Manager, as the name suggests, is used to manage categories, which entails the following:
- Creating new
- Editing or deleting existing categories. A category cannot be deleted unless it is empty (i.e., before deleting any category, you have to first erase all its categories along with their contents so that you don’t delete a category by mistake).
- Copying a category, along with its articles from one category to another. When copying a category, you’ll be prompted to specify the category to which the selected category’s contents are to be
- Publishing or unpublishing a selected category. If you unpublish a category, its articles will no longer be visible on your web
- Setting the order (sequence) that the category will be displayed on the home
- Setting the Access level of the category (i.e., deciding whether the articles of the category can be viewed publicly or are meant to be viewed by only a specific group of users).
- Displaying the number of subcategories in each category.
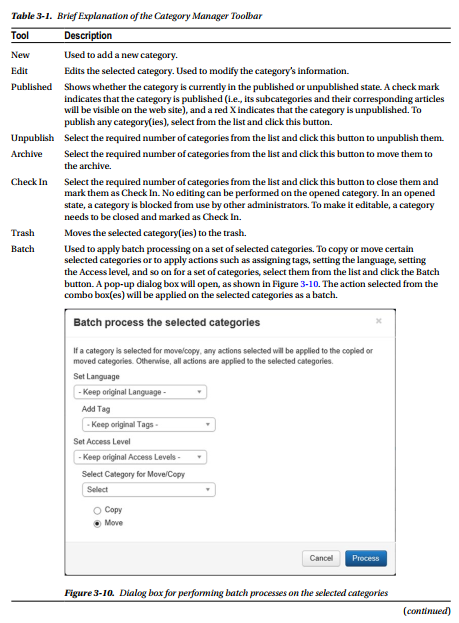
The Category Manager toolbar contains several buttons that provide quick access to several functions.
Table 3-1 gives a brief description of Category Manager toolbox tools.
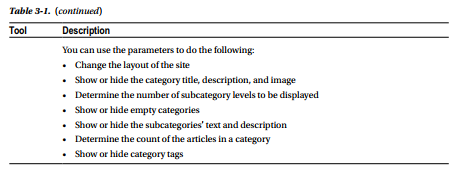
Below the toolbar, the Category Manager shows a Search box that can be used for searching categories. You can type a word or phrase into the Search box and then click the magnifying glass icon to display the list of categories that match the entered phrase. To clear the screen and display the full list of categories, click the Clear button. The Search tools button applies more filters (see Figure 3-12) to display the desired categories precisely. The filters are as follows:
- Select Max Levels: Determines the number of levels of categories to
- Select Status: Displays the categories that match the selected status —whether they are published, unpublished, archived, or trashed. It is also very useful for searching inactive
- Select Access: Displays the categories that match the selected Access level. The Access level can be Guest, Public, Super Users, Registered, or The Access level represents a group that is authorized to view and access the given category (you will learn about Access levels later in this chapter).
- Select Language: Displays the categories that match the language chosen from this combo
- Select Tag: Displays the categories that match the selected Tags are the keywords that define and distinguish the categories from the rest.
The Sort Table By button helps to display the categories sorted in ascending or descending order of the selected column of the category. For example, if you select the Title ascending option from the combo box, the categories will be sorted in the ascending order of the titles. Also, you can sort any column by clicking the column header. The last combo box determines the number of categories to display in the table. The default value displayed in the combo box is 20 and has values in multiples of 5. You can use it to display 5, 10, or 15 categories in the table. You can alter the default value of the categories to be displayed by changing the List Length parameter in the Global Configuration Manager.
■ Note To reset any of the preceding filters, change the combo box back to its default setting.
The main content area of the screen displays a table that shows all the categories in a Joomla site. The usage of each column is the following:
- Vertical double arrows: Shows the order in which the category items are displayed on the page of the web site and enables you to change their order. You can click the arrows to change the sort order. You can also click and hold the three squares (to the left of the checkbox column) and drag the category to change its order location in the Category Manager.
- Check boxes: Click a check box to select a category. Check boxes are used to apply batch action on several categories collectively. Simply click the check boxes of the desired categories and select the required tool from the toolbar.
- Status: A green check mark indicates that a category is published. Click this check box to toggle the state of the category between published and unpublished.
- Title: Displays the full name of the category. Click the category title to open it in edit mode.
- Access: Displays the Access level set for the category (i.e., which level of users can access the category). The Access levels are as follows:
- Guest: Content with this Access level is for users who are not logged in.
- Public: Content with this Access level can be seen by all people, whether logged in or not. This is the default Access level for all Menu Items, Articles, Categories and Modules.
- Registered: Content with this Access level can be seen by only those users who are logged in.
- Special: Content with this Access level can be seen only by users with author status or higher (you will learn more about Access levels later).
- Super User: Content with this Access level is meant only for super users, who are the only users who can access or edit the content.
- Language: Displays the languages in which the category is available.
- ID: Displays the system–generated ID number of the category as defined in the database.
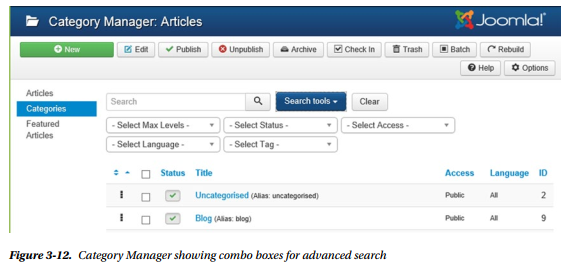
To create a new category, click the New button in the toolbar at the top left of the Category Manager to create a new category. A screen displays, in which you specify information for the new category, as shown in Figure 3-13. On this screen, you can specify a variety of information for the category, including the Title, Access level, Image, and Description.
■ Note Categories are generally used to categorize articles into groups so that you can easily search and manage desired articles.
For the Title, enter the name for your new category: Electronics. Alias is a sort of secondary name for the category that is used internally by Joomla. You can leave it blank here (and anywhere else); Joomla will fill it in automatically, or you can give it your own meaningful name. If you specify it, it must be lowercase, and it cannot contain any spaces (hyphens are the only allowed symbol and should be substituted for spaces). The alias is used in search engine–friendly (SEF) URLs (which help search engines display your web site content and also help you control the text that you want to appear in the URL). For this exercise, enter Electronics for the alias.
In the Description text box, you can enter a few lines to describe the category. You can also insert an image into the description using the Image button at the bottom. Click the Image button, and you’ll be presented with the images available in the Media Manager. Joomla provides some images by default, but you can also upload your own images into the Media Manager.
Note The Media Manager is used to maintain web site All the images are stored and maintained in joomla_root/images (extensions, plug-ins, and templates keep their images in their own image directories). The Images directory already contains some default subdirectories containing images. Using the Media Manager, you can upload images from other directories into the joomla_root/images folder and you can also delete any undesired images.
It is very easy to upload new images into the Media Manager. Just click the Browse button in the Upload area, as shown in Figure 3-14, to locate the folder that contains the image file to upload (preferably in PNG or JPG format). Assuming that you have an electronics.jpg file on your local drive, select the image file.
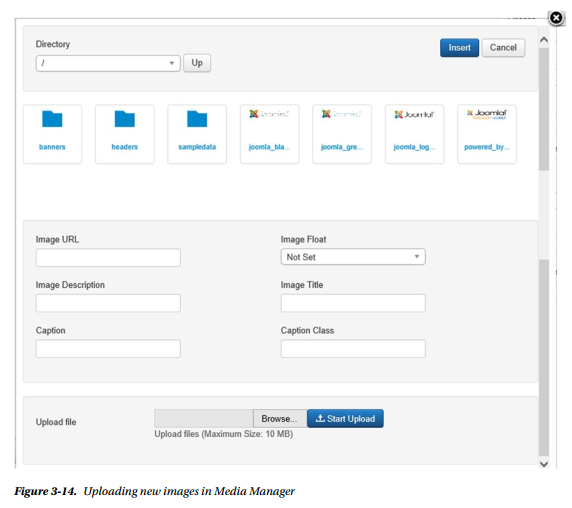
■ Note Images can be uploaded and added to the site through FTP. But in case you don’t have FTP access to the web server, Media Manager is preferred. It is usually best to upload all the images, videos, documents, and other files that you will use on your web site to the Media Manager before creating the web site contents because all the content can be accessed from the Media Manager while developing the site.
When you select an image thumbnail, the URL of the image will be displayed in the Image URL field. In the Image Description field, you can enter a short description of the image. In the Image Title field, enter the title of the image, which will be displayed when a visitor hovers the mouse over the image. After entering information for the image, when you click the Start Upload button, the image will be uploaded to the Joomla images/stories folder, and a Completed message will appear to show that the uploading is done. You want the Electronics category to be represented by an image, so (assuming that you have an image called electronics1.jpg in your local drive), upload it into the Media Manager. Also, enter the information of the Electronics category, as shown in Figure 3-15.
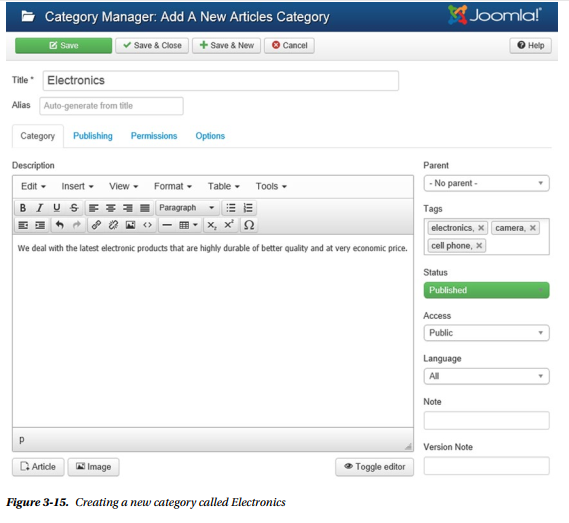
From the Parent drop-down list, select the category to which you want the current category (Electronics) to belong. Select the No Parent option because you want the Electronics category to be at the top of the hierarchy. In the Tags box, type in the unique tags to represent the electronics category. Let’s assign the tags electronics, camera, and cell phone.
Set the Status to Published to make the category visible on the web site (unpublished categories don’t appear), and set the Access level to Public to make the category accessible to anyone. Set Access level to Public to make the category visible to all users of the web site.
In the Language combo box, select the language to be assigned to this category: leave it at the default language (All/English (UK)). In the Note box, you can assign a small text note related to the new category. In the Version Note box, enter an optional note for this version of the category. For example, you can assign the 1.0 version to this category. When modified, assign version 1.1 to this category to show that it is the enhanced version of 1.0.
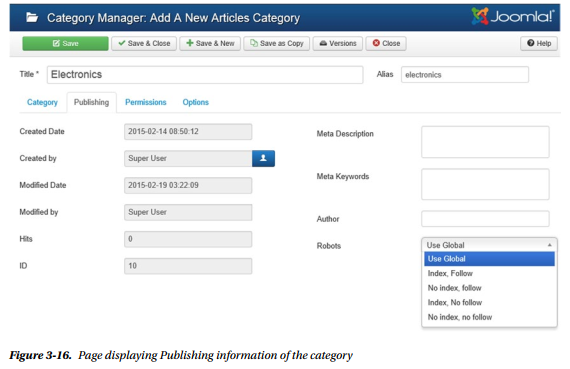
Below the Title box is the Publishing link. When clicked, it will display the information related to creating and modifying the category. The page (see Figure 3-16) will also prompt for other information as listed here:
- Created Date: Displays the date and time the category was first created. The date and time are generated and entered by the system automatically.
- Created by: Displays the user who created this category.
- Modified Date: Displays the date and time when this category was last modified. Again, they are generated and entered by the system automatically.
- Modified by: Displays the user who made the last modification.
- Hits: Displays the number of hits for this category.
- ID: Displays the unique ID of the category.
- Meta Description (Optional): Enter a small description of the category that usually appears in the results of search engines.
- Meta Keywords (Optional): Enter a comma-separated list of keywords to describe the category. Previously, search engines used meta keywords while searching content on the web, but now search engines have become more intelligent, so meta keywords are not useful.
- Author: Enter the author of this category.
- Robots: Choose the option that helps make your site visible to search engines. The available options are Use Global/Index, Follow/No index, Follow/Index, and No follow/No index, No follow. Here are the meanings of Index and Follow:
- Index: Determines whether you want a search engine to index the contents of this page.
- Follow: Determines whether you want a search engine to follow and crawl the links on this page.
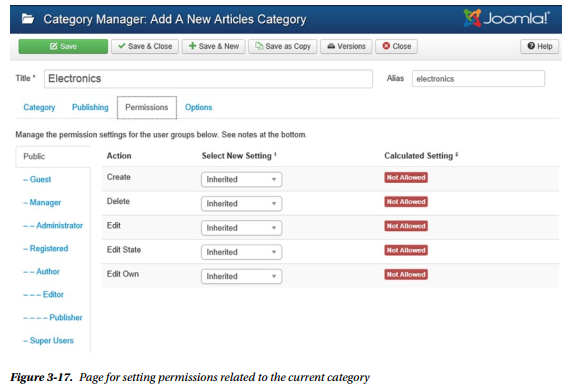
To modify permissions related to the current Electronics category, click the Permissions link. Permissions are usually inherited from the Global Configuration settings, but you can override them through the Permissions link. Short descriptions of the combo boxes shown on the page (see Figure 3-17) follow:
- Create (Inherited/Allowed/Denied): Determines whether to allow or deny Create permission for users in the Public group
- Delete (Inherited/Allowed/Denied): Determines whether to allow or deny Delete permission for users in the Public group
- Edit (Inherited/Allowed/Denied): Determines whether to allow or deny Edit permission for users in the Public group
- Edit State (Inherited/Allowed/Denied): Determines whether to allow or deny Edit State permission for users in the Public group
- Edit Own (Inherited/Allowed/Denied): Determines whether to allow or deny Edit Own permission for users in the Public group
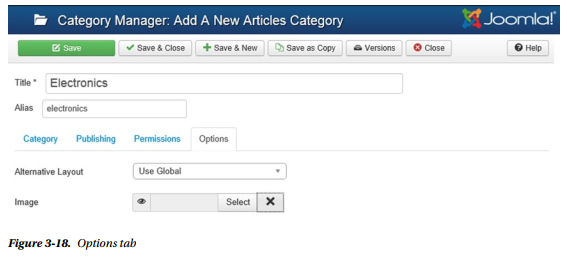
To represent the Electronics category with an image, select the Options link in the Category Manager.
A dialog box to select the image displays (see Figure 3-18).
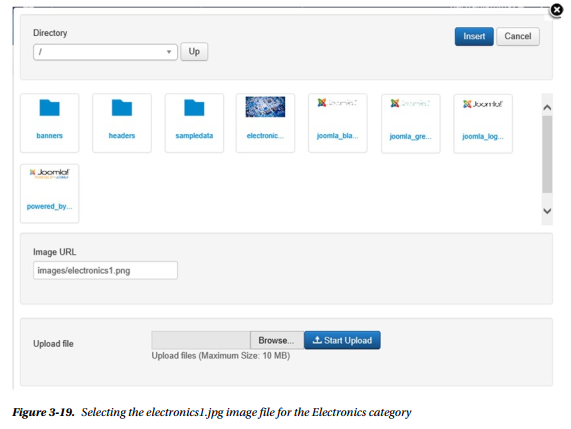
When the Select button of the Image field is selected, Media Manager will open, and you can find the electronics1.jpg image that you just uploaded in it. Select the electronics1.jpg image and click the Insert button to assign the image to the Electronics category (see Figure 3-19).
In the Category Manager, the toolbar at the top shows the tool buttons as listed here:
- Save: Saves the category without exiting from the Usually used to save the work.
- Save & Close: Saves the new category and exits the
- Save & New: Saves the new category, closes the current workspace, and opens another New Category workspace to add another
- Cancel: Cancels the current task and exits the
- Help: Opens the browser and displays online help files related to the active
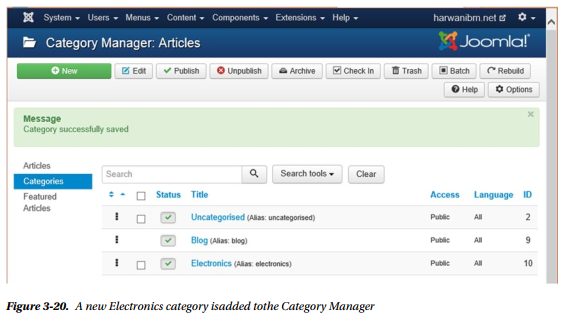
After inserting the necessary information for the new category, click the Save & Close button in the toolbar to save it. The newly created Electronics category will be displayed in the Category Manager, as shown in Figure 3-20.
3. Creating a Camera Subcategory
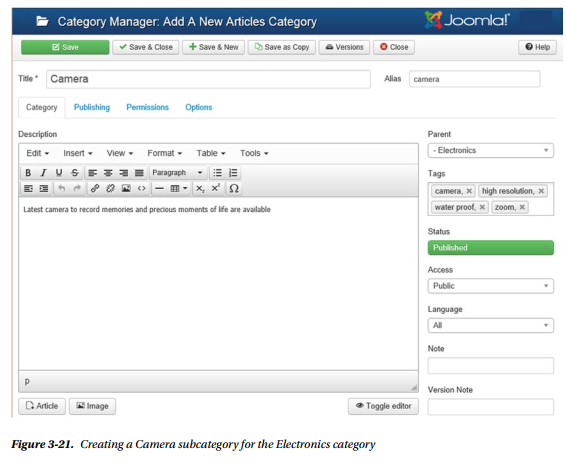
Now that you’ve created a category, repeat the procedure to create a subcategory called Camera for the Electronics category. While creating a subcategory of any category, just mention the category name in the Parent combo box. To declare the Camera category as a subcategory of the Electronics category, its Parent combo box should be set to point at the Electronics category, as shown in Figure 3-21.
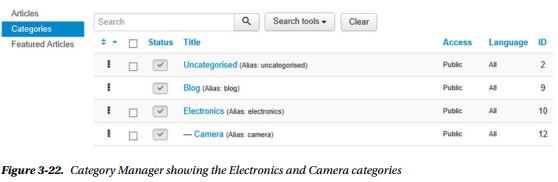
Enter the details of the Camera subcategory (refer to Figure 3-18). Assuming that you have the camera1.jpg file in your local drive and you have uploaded it into the Media Manager, assign that image (camera1.jpg) to the Camera subcategory by clicking the Options link, as you did for the Electronics category. Click the Save & Close button to save the Camera subcategory. The Category Manager will display the newly created Camera subcategory (see Figure 3-22).
Now that you have created a category and a subcategory, it is time to create an article.
4. Creating an Article with Article Manager and Publishing It in a Category
Articles contain the actual information or content that you want your web site visitors to see. Besides text, articles can contain images and other multimedia content. The information in your articles may appear on the home page of the web site so that visitors can view the article directly on opening the web site or it may appear when a visitor selects a particular menu item or link on the web site.
Note Joomla extensions extend the functionality of Joomla web There are five types of extensions: Components, Modules, Plugins, Templates, and Languages. Each of these extensions handles a specific function. A plug-in is used to add small functions to an existing component or module. For example, a search plug-in can be used to search a desired product from a shopping cart component, and a bookmark plug-in can be used to place bookmarks on the desired content. A component is an independent application (having its own functionality, database, and presentation). Adding a component to your web site is like adding an application. Examples of components are shopping carts and guest books. Modules are meant for adding new features to an existing component (application) of your web site (e.g., you might add a login module or a digital counter module to your shopping cart component).
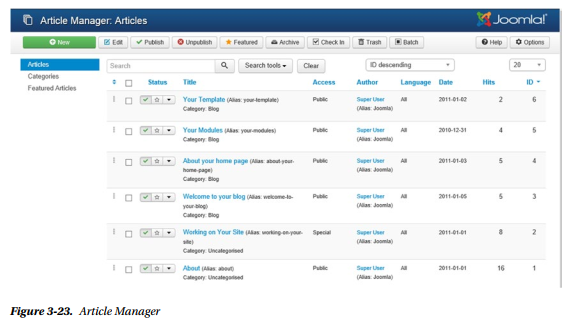
Because you’ll be displaying some content that provides information about new cameras, you’ll write an article and attach it to the Camera category. To do so, you need to open the Article Manager, so either select the Content ➤ Article Manager menu option or click the Article Manager button in the Control Panel. The Article Manager will open and display a list of articles under different categories (provided by Joomla in the default web site), as shown in Figure 3-23.
As its name suggests, the Article Manager is used to manage articles. It contains tools with which users of certain groups (e.g., administrators) can add new articles, edit existing articles, unpublish the article(s) (making them disappear from the web site), move or copy the articles from one category to another, and so on.
The Article Manager table contains some important information about each article, such as the author of the article, the Access level (which sets whether the article is for public view or only for users belonging to certain groups), whether the article should be displayed on the home page (the first page of the web site), the date the article was created, and the number of times it has been accessed by visitors.
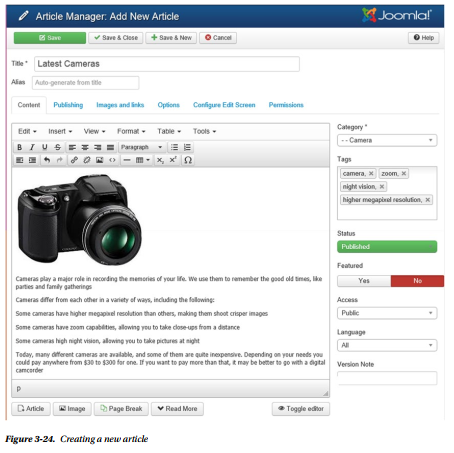
To add a new article, you can either click the New button from the toolbar or click the Add New Article button in the Control Panel. An editor box will appear, which allows you to type the content for the article, as shown in Figure 3-24. In the Title box, specify Latest Cameras as the name of the article. For the Alias, specify latest-cameras. Set the Published option to Yes to make the article visible on the web site. Set the Home page option to No because you don’t want the article to appear directly on the opening screen of your web site, but only when a menu item is selected on the web site. From the category drop-down list, choose Camera.
Note While adding an article, you must specify a category in which the article will be
The editor provides formatting tools for formatting your text and a variety of buttons that allow you to perform various tasks. If you’re used to using a word processing application, you’ll find the buttons here fairly straightforward. However, I’ll quickly run through a few of the ones that may be unfamiliar to you: the buttons for inserting images, page breaks, and read-more links.
There are two buttons for inserting images into articles: the Image button in the TinyMCE editor toolbar (see Figure 3-25) and the Image button at the bottom left of the editor (refer to Figure 3-24).
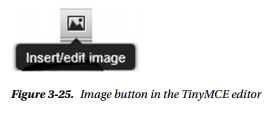
The button in the editor toolbar is bit difficult to use because it requires the URL of the image to insert and it doesn’t allow you to add new images in the Media Manager. When you click the Image button in the toolbar, the Insert/Edit Image dialog box displays, as shown in Figure 3-26.

In the Source field, you can specify the URL of an image available on the Internet, and you can also specify the URL of an image already uploaded to the Media Manager. Assuming that an image called cam1.jpg already exists in the Media Manager, you can insert it by specifying its URL here as c:\xampp\ htdocs\joomlasite\images/stories/cam1.jpg and then clicking OK.
On the other hand, if you select the Image button at the bottom of the editor, you’ll see a screen like the one shown in Figure 3-14. This dialog box allows you to upload new images to the Media Manager and insert selected images into the article.
This dialog box provides a list of predefined images (the images that are provided by Joomla as well as those that you have uploaded). It also provides an Upload interface to upload the images from other
directories into the Media Manager’s Images directory (the directory in which all the images for the web site are kept, except for templates and third-party modules, which will be discussed later). The uploaded images can be inserted into the article.
The Page break button at the bottom left of the editor (refer to Figure 3-24) places a dotted line in the article as you are editing it. When viewing your web site, the visitor is shown only the part of the article up to the page break line, and a Next Page link is shown at the end of the page. The portion of the article after the page break is displayed when the Next Page link is clicked, and it runs until the next page break or the end of the article.
The Read More button is used when you have a large article and you want to display a brief summary or introduction of the article first and then include a link for the reader to read more. If interested, the reader can click the Read More link to see the whole article.
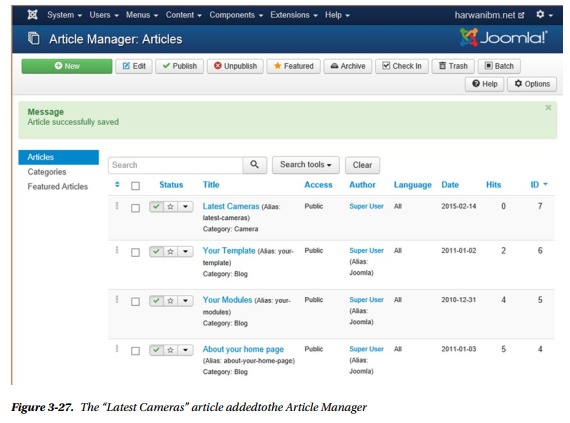
After entering the information for your article, click Save & Close to save it. The message Successfully Saved Article will appear, and the article name will be listed in the Article Manager, as shown in Figure 3-27.
5. Creating a Menu Item to Access the Category
A menu item is a link that appears on the web site that users can select to see the desired information. There are two steps to create a menu:
- Create the
- Create a module for the
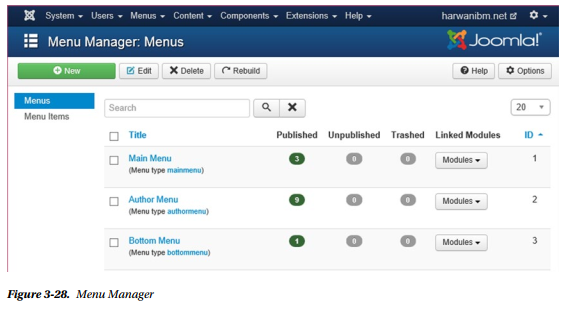
To create a menu, open the Menu Manager by clicking its button in the Control Panel. A range of menus is provided by Joomla by default (see Figure 3-28), and each menu is a collection of certain menu items. Every menu item is defined as a specific menu item type, and it is the menu item type that decides what kind of information the menu item is supposed to display (explained in detail in Chapter 7).
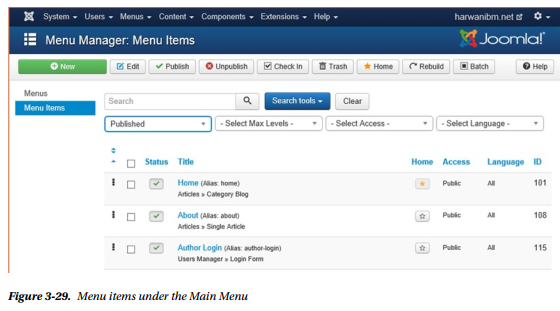
You can create a menu item in any of the menus in the Menu Manager. Let’s create a menu item in the Main Menu. Just click the Main Menu title and you’ll see all the menu items under the Main Menu that are provided by Joomla (see Figure 3-29).
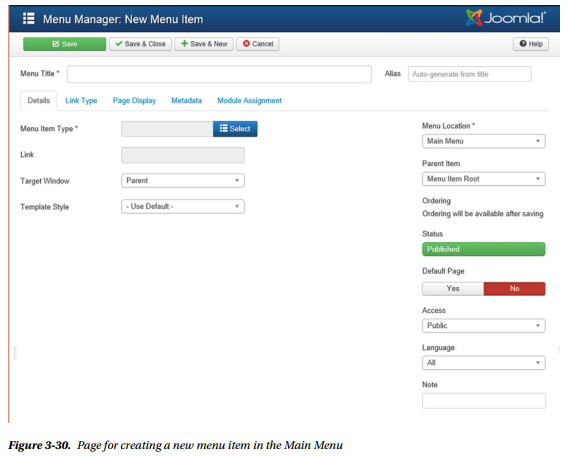
To add a new menu item, click the New button. You’ll see a screen for specifying the menu type, as shown in Figure 3-30. The menu type plays a major role in deciding how to display the information (i.e., when the menu item is selected, whether to display the article directly, to display all the article titles of a particular category, or to display all the categories of the site or subcategories of a particular category).
If the user selects the menu type that displays all the article titles of a particular category, the article contents will be displayed when the user selects the article title. If the user selects the menu type that displays all the subcategories of a particular category, the user must select the category title to see the list of articles under any category.
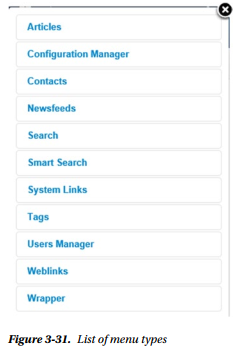
The list in Figure 3-31 shows that menu items can point to a variety of contents, including articles, contacts, news feeds, and so on.
Let’s see the available options in the Article node. Select the Articles node, and you’ll be presented with the options shown in Figure 3-32.
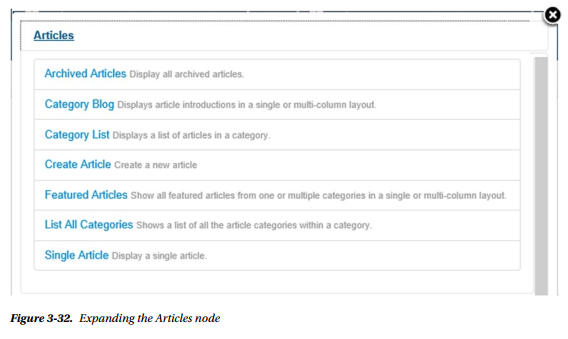
Select the Category Blog menu type, which will display all the subcategories of the selected category. When a subcategory is selected, it will display the list of articles in that subcategory; when the title of an article is selected, it will display the information stored in that article. After selecting Category Blog, you’ll be presented with a screen for specifying the rest of information of the menu item (see Figure 3-33).
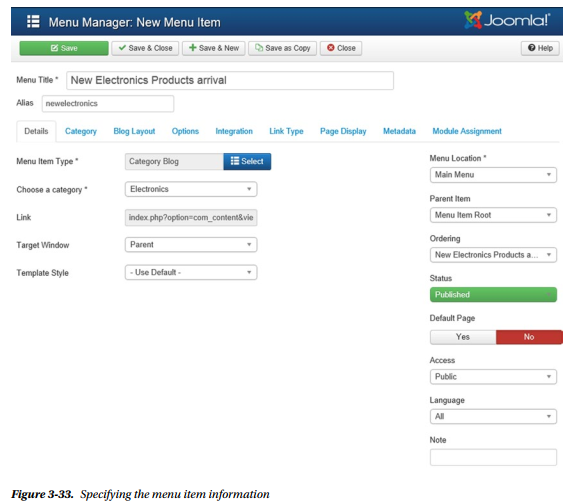
In the Title field, enter the menu item that you want to appear in the Main Menu: in this case, New Electronics Products arrival. The alias is optional. The text in the Link field appears automatically and is dependent on the menu type selected. This text lets the menu item know which object it is linked to; it cannot be edited. From the Display In drop-down list, select the menu in which this menu item is supposed to appear. In this case, select Main Menu.
In the Parent Item list box, select the menu item that will act as a parent of the menu item that you are creating (used when creating submenu items). In this case, select Top because you want to create an independent menu item. Set the Published option to Yes to make it visible on the web site. Order is for setting the sequence of the menu item in the Main Menu. Leave it at the default so that the menu item will appear as the last position in the Main Menu. Set the Access level to Public to make the menu item publicly accessible.
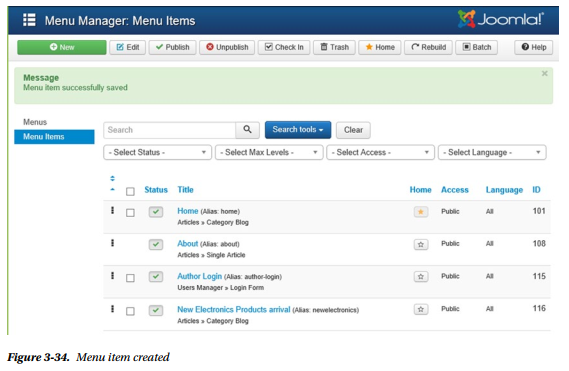
After you enter the information as described (refer to Figure 3-33), click Save & Close to save the menu item. The menu item will be saved and added to the menu item list, as shown in Figure 3-34. Notice that it displays Articles ➤ Category Blog below the title, which means that the menu item will display all the subcategories of the specified category.
Source: Harwani B M (2015), Foundations of Joomla!, Apress; 2nd ed edition