As discussed, to develop any web sites with Joomla, you need a web server, a database, and the PHP language installed on your computer XAMPP, which is an Apache distribution developed by Kai “Oswald” Seidler and Kay Vogelgesang, contains Apache, MySQL, and PHP In fact, that’s what the AMP in XAMPP stands for: Apache, MySQL, and PHP The final P is for Perl, another scripting language. The first letter in the acronym, X, means cross-platform; it implies that XAMPP is available for the Windows, Mac, and Linux operating systems XAMPP is very easy to install and automatically configures the Apache web server along with MySQL, PHP, and Perl.
Installing XAMPP doesn’t make any changes to the Windows registry, which makes removing it from the system an easy task: you can just delete its folder from the disk drive (although removing it using Control Panel is considered a better option) XAMPP is a compilation of free software and is free to copy under the terms of the GNU General Public License (GPL). To make XAMPP convenient for developers, it is configured with all features turned on.
1. Installing XAMPP
XAMPP is very easy to install Just navigate to wwwapachefriendsorg, click the XAMPP link on the web site, and then click the correct version for your operating system Scroll down to the Download section and click the Installer file download under the Basic Package heading I downloaded the Windows version, XAMPP 563; at the time of this writing, it is the latest available Windows version. The downloaded file is named xampp-win32-563-0-VCl1-installer.exe Just double-click this EXE file to install it It is a better option to install it at the root of the local disk drive (I used disk drive C:).
The first screen you’ll see is a welcome screen, as shown in Figure 2-2
Click Next and you’ll see a dialog box allowing you to specify which components you want to install.
A component is an executable file that performs specific functions without the need of any user intervention. The components are usually auto-starts, meaning that they automatically start when the operating system is booted and run in the background as long as the system is running. Some components don’t start automatically; they require manual startup.
Apache and MySQL are essential requirements for Joomla, so you must select the check boxes Apache and MySQL You can also select the FileZilla FTP Server, as shown in Figure 2-3, but it is optional.
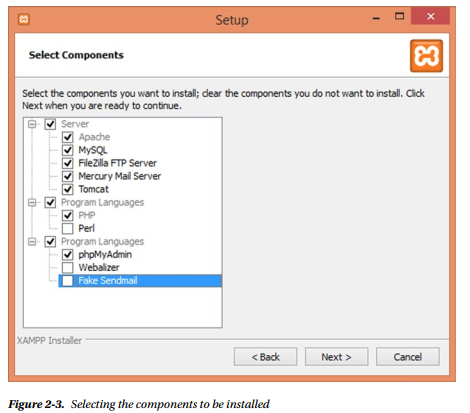
■ Note FileZilla is an FTP server used for remote administration It is used if you need to transfer files to your web server from a remote computer. If you already have an ftp server installed on your machine, you can skip it You just have to carefully handle the server address and FTP username and password to avoid any unauthorized access.
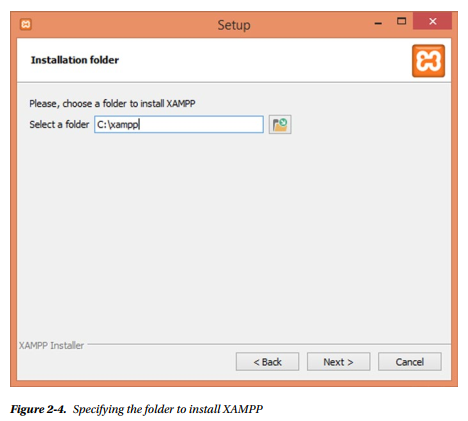
Click the Next button You will be prompted to specify the location to install XAMPP Specify the C:\xampp folder, as shown in Figure 2-4 (note that you can install it in any folder you choose).
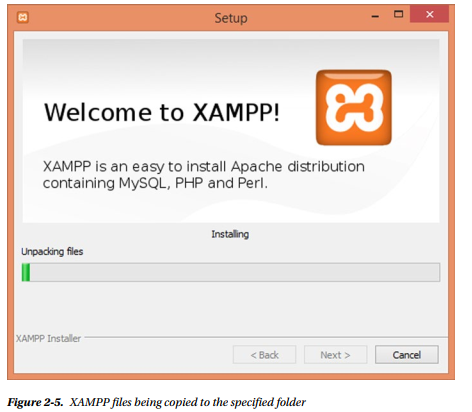
Click Next to continue in the Setup Wizard The following dialog box introduces Bitnami for XAMPP and provides a link to know more about Bitnami Click Next to continue The next dialog box informs you that XAMPP is ready to be installed Click Next; XAMPP will start extracting the files, as shown in Figure 2-5.
XAMPP requires port 80 to work If you already have a server occupying port 80 (eg, ColdFusion Server, IIS Server, Skype, etc), you can’t launch XAMPP after installing it due to a port-binding conflict For example, if you have Skype installed on your machine, you may get an error saying that port 80 is already in use To avoid a port-binding conflict with any server running on the machine, it is a better option to stop the services of other servers (if any) from the Control Panel.
■ Note To understand how port-binding conflicts can be avoided, visit the following web sites: http://complete-concrete-concise.com/web-tools/how-to-change-the-apache-port-in-xampp and https://communityapachefriends.org/f/viewtopic.php?p=206035&sid=9e3fc2dc9f59d8293a5dba3ff5 ab982b
Finally, you’ll see a dialog box showing the completion of the XAMPP Setup Wizard The dialog box shows a checkbox that determines whether you want to start the XAMPP Control Panel, as shown in Figure 2-6 The checkbox is checked by default.

2. Using XAMPP Control Panel
The XAMPP Control Panel is the main steering panel from which you can control the workings of Apache as well as MySQL You can also work with phpMyAdmin through this panel (phpMyAdmin is software for creating and maintaining MySQL databases) You can access your MySQL account using phpMyAdmin XAMPP comes packed with phpMyAdmin and an FTP server Click Finish to complete the installation The installation of XAMPP is simple if there are no port conflicts — just double-click its installer file You may see a number of informational messages and dialog boxes during the installation Just accept the default options After a successful installation, the XAMPP Control Panel will be displayed, as shown in Figure 2-7.
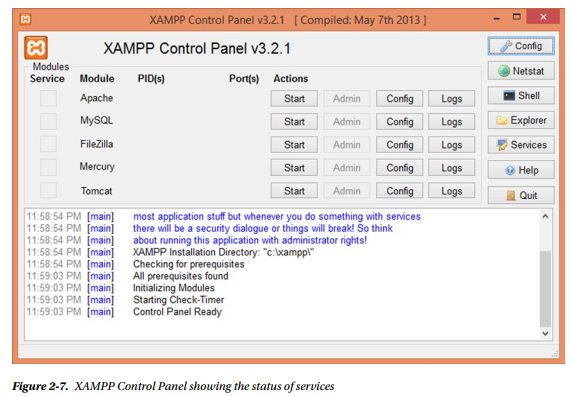
On the XAMPP Control Panel, you should see that Apache, MySQL, and FileZilla are running (assuming that this is what you selected while installing XAMPP) With the successful installation of XAMPP, you are assured that your PC now contains Apache, PHP, and MySQL, which are necessary for Joomla installation.
Mercury bundled with XAMPP is a mail transport mechanism that provides your web site users with message boxes so that they can communicate with each other and/or receive auto generated messages It is very straightforward to use To get started, just click the Start button in the Mercury section of the Control Panel and then click the Admin button to add users After managing user accounts, a couple of steps configure this package and make it ready for use Your web site visitors can send/receive e-mail, but because you will be using the PHP mailer function for managing e-mail on your web site, you need not worry about this package at this stage.
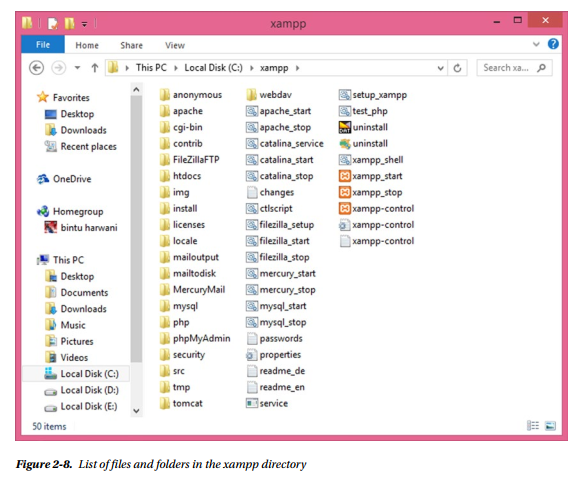
From the XAMPP Control Panel, if you click Explorer, you’ll get a list of all the subfolders under the xampp installation folder, as well as the files required to start and stop XAMPP (see Figure 2-8).
3. Administering XAMPP
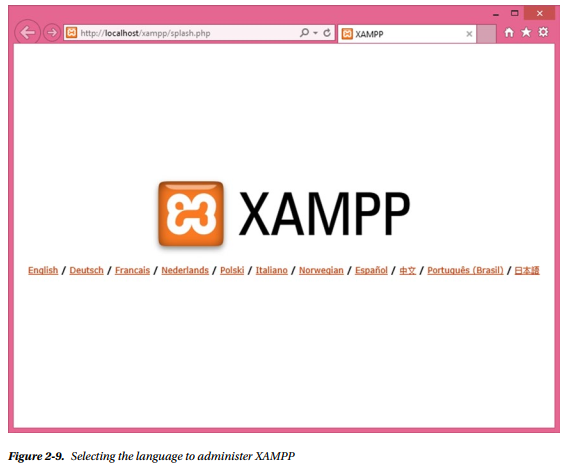
In the XAMPP Control Panel, if you click the Admin button in the MySQL section, you get a screen displaying the environment, server, client, host, and other information about MySQL You can administer MySQL and set its environment from that page, but because you don’t have to do any administration in MySQL, just click the Admin button next to the Apache service in the XAMPP Control Panel Your default browser will open up, showing a screen that asks you to select the language in which you want to administer XAMPP (see Figure 2-9).
■ Note Visit https://docs.joomla.org/XAMPP to see the XAMPP documentation.
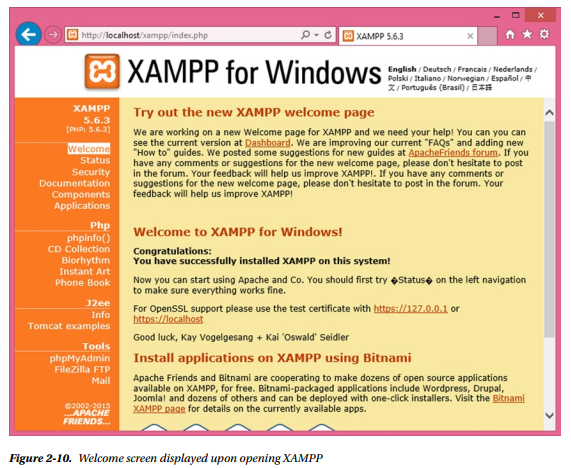
Click the appropriate link to display the administration options in the language of your choice The first page that opens up is a welcome page On the left side is a navigation bar, as shown in Figure 2-10.
Click the Status link on the navigation bar to display the status of the service(s) running on your computer, as shown in Figure 2-11.
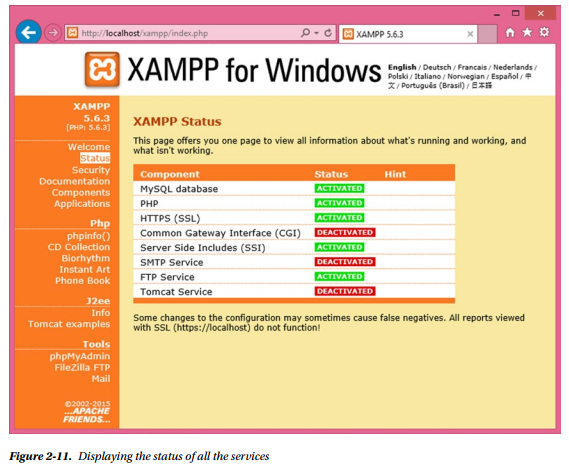
You can see that MySQL, PHP, HTTPS, Common Gateway Interface (CGI), Server Side Includes (SSI), and FTP Service are all activated Only SMTP Service (required for sending/receiving e-mail) is not working Currently, you shouldn’t be worried about any other services except PHP and MySQL (required for installing Joomla), so your job is done If you click the phpMyAdmin button from the navigation bar on the left side, it will open phpMyAdmin, a software package used for creating and maintaining MySQL databases Let’s take a look at it now.
4. Using phpMyAdmin
As previously stated, phpMyAdmin is used to create and maintain MySQL databases The initial database management interface screen (shown in Figure 2-12) can look a little bewildering, but you don’t need to worry about a lot of that information for now.
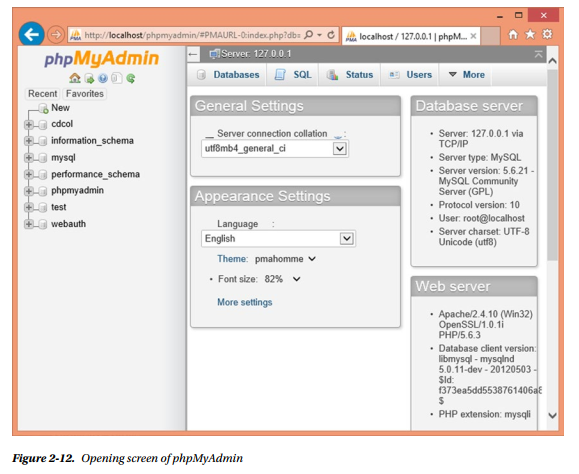
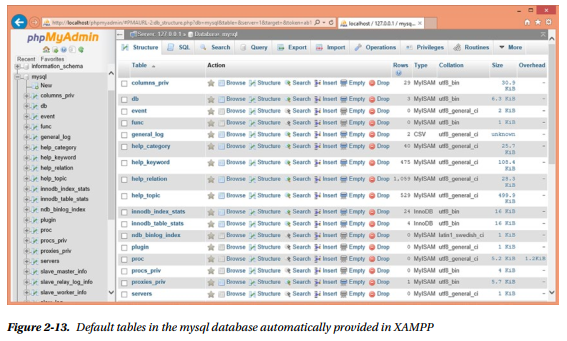
The left frame in phpMyAdmin is used for navigation The databases that you create are displayed in this area, along with the tables (if any) under their respective database names You can click any database or table to work with it By default, seven databases are provided: cdcol, information_schema, mysql, performance:schema, phpmyadmin, test, and webauth When selecting any database, you see the list of tables in it For example, if you select the mysql database from the navigation bar, you see the list of tables in it (see Figure 2-13).
■ Note MySQL requires port 3306 to work If there is a MySQL running, the 3306 port must be already occupied; to avoid port conflict, you have to update the port information or you will get a MysQL error message For solutions to similar questions, see www.apachefriends.org/faq_windows.html.
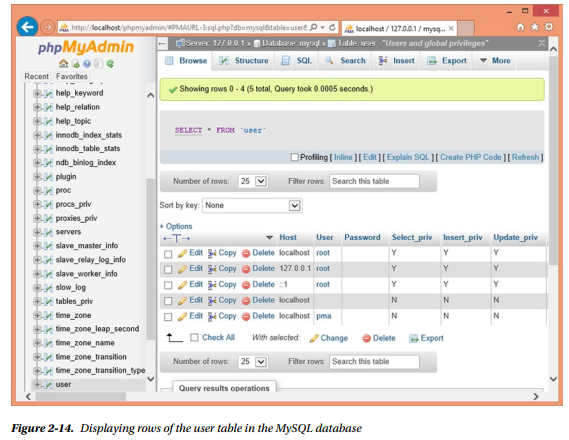
To see the list of default users of the mysql database, browse the contents of the user table within it Just select the check box next to the user table and click the Browse icon in that row (the first button next to the table name) You’ll find that there are five rows in the user table shown in Figure 2-14, which shows that by default there are five users of the mysql database (Users are the people who are authorized to access the mysql database) You can edit the contents of these rows to change the username and password, and you can also add new users and delete existing users The five default users are as follows:
- root (Host: localhost): This user can access the mysql database only locally.
- root (Host: 127001): This user can access the mysql database locally and from the Internet That is, a person can log in remotely and access the mysql database In that case, the host column in the user table of the mysql database should be set to the IP address of the remote MySQL server.
- pma (Host: localhost): This user is used by the phpMyAdmin application.
- ” ” (Host: localhost): No username is provided, and you can assign it any name It will have the same privileges as pma and can be used to perform necessary database functions via phpMyAdmin.
For security reasons, you should change the password of root (keeping default passwords is too risky) Because you will be accessing the mysql database locally, you will edit the root user that has the value localhost in its Host column.
Select the first row (which has the value root in its User column and localhost in its Host column) by checking the box for this row and then select the Edit tool in that row (the Edit tool looks like a pen) The table will open in edit mode, and you can alter its contents, as shown in Figure 2-15.
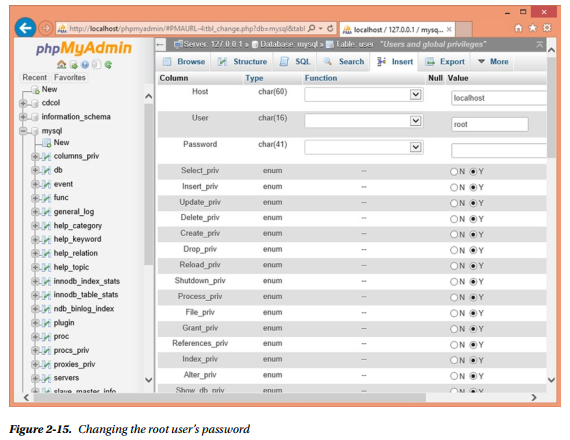
Enter a password for the root user I used mce here, but you can use whatever you want Click the Go button at the bottom to save the password You can skip this step if you are using an already existing (installed on the machine) version of MySQL.
If you don’t want the password to be stored in the user table as plain text, you can use the PASSWORD function from the Function drop-down box to encrypt the password.
You need to change default password of the mysql database for security reasons After saving the password, you’ll see a screen like the one shown in Figure 2-16.
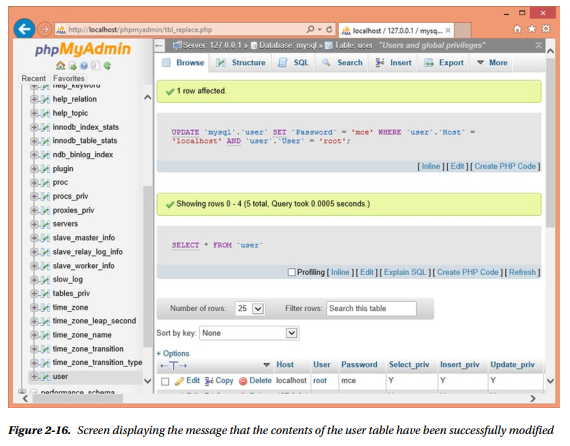
You get a message that one row has been updated, and the SQL command that carried it out is displayed below. The message confirms that the password of the root user has been changed.
5. Creating a Database
Because Joomla will store all the raw contents of your web site (articles, images, user information, etc) in a database, you should now create a database. I’ll show you how to create a database in MySQL I call mine joomladb, but you can use any name you like. Open the initial screen of phpMyAdmin by clicking the Home button at the top left, underneath the phpMyAdmin banner. Type the name of the database to be created in the Create New Database text box and click the Create button, as shown in Figure 2-17 Don’t worry about the rest of the settings; leave everything else as-is for now.
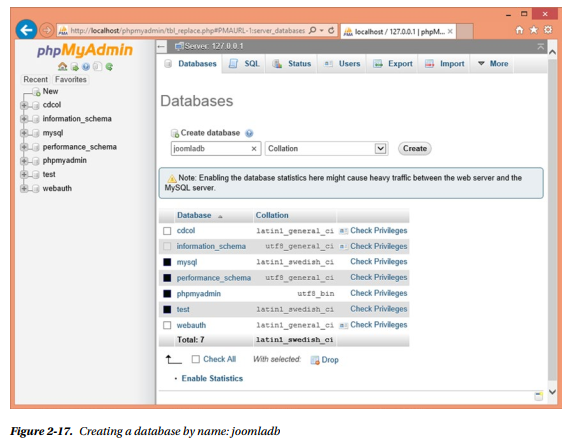
■ Note If you don’t create a database, the Joomla 30 installer will automatically create a database for you during the installation process. The only condition is that the specified user account must exist and should have sufficient privileges to create a new database.
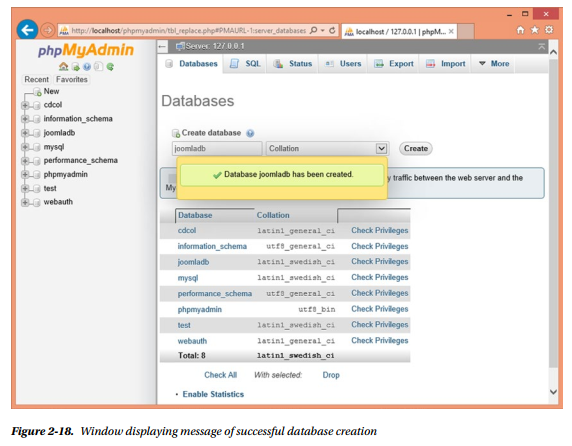
You’ll get a message informing you that the database has been successfully created, and a message that the database created (which I’ll refer to as joomladb from here on) has no tables in it (see Figure 2-18). However, you don’t need to create any tables manually because it will all be done automatically by Joomla when you start adding features to your web site.
6. Requiring User Authentication
This step is required only if MySQL is not already installed on your machine; skip it if it already exists. The final thing that you’ll do before installing Joomla is make phpMyAdmin a little more secure by requiring users to authenticate themselves before opening phpMyAdmin (it isn’t essential for installing Joomla, but it is good practice). You will do this by assigning a password to phpMyAdmin. To do so, return to the XAMPP admin screen and select the Security tab in the navigation bar. You will see the screen shown in Figure 2-19.
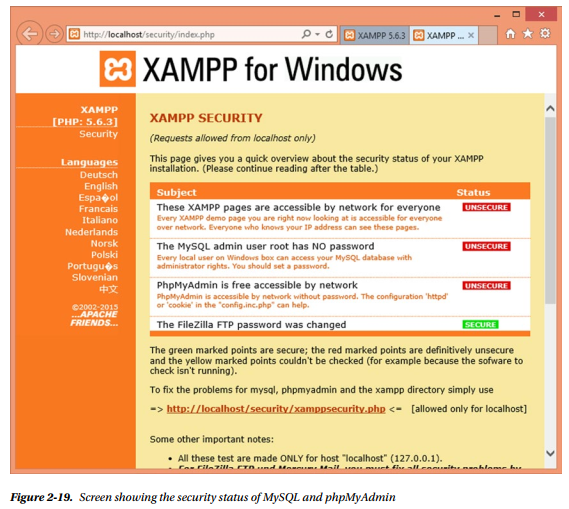
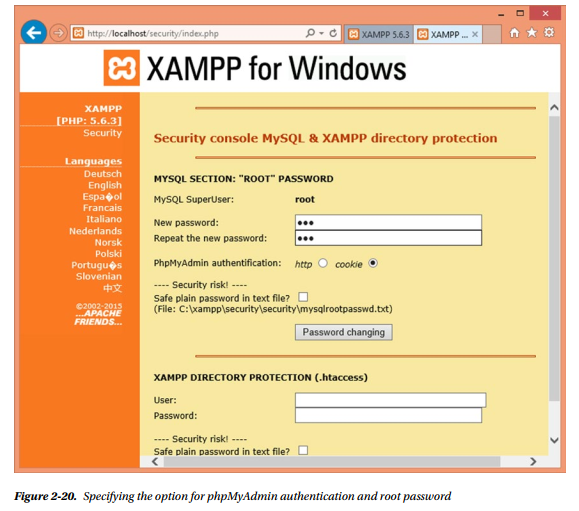
Click the http://localhost/security/xamppsecurity.php link to open the security console, as shown in Figure 2-20. Specify the password for MySQL SuperUser: root in both the New Password and Repeat The New Password text boxes.
■ Note The superuser has all the privileges for maintaining the databases. The superuser can create more users, delete existing users, assign and revoke permissions to other users, create backups, and even restore databases in case of system crashes.
You can also assign superuser rights to any user by performing the following steps:
- Open the cmd window.
- Login as root on MySQL.
- Execute the following SQL command:
GRANT ALL PRIVILEGES ON *.* TO ‘any_user’@’%’;
Enter any password you like, but make sure that it is something you can remember. Then select either the http or cookie radio button for PhpMyAdmin authentication, and click the Password Changing button to save the password.
HTTP and cookie are authentication modes used in a multiuser environment where you want users to be able to access their own database only. These modes also determine how phpMyAdmin connects to MySQL as the root superuser. By default, cookie mode is used, in which the password is stored in a cookie Alternatively, you can use HTTP mode, for which you will be prompted to enter the root password every time you access phpMyAdmin. Typically, cookie mode is preferred because the password is stored in encrypted form.
You should now get a confirmation message, telling you that the MySQL root password change was successful as well as a message telling you to restart MySQL so that the change will take effect (see Figure 2-21)
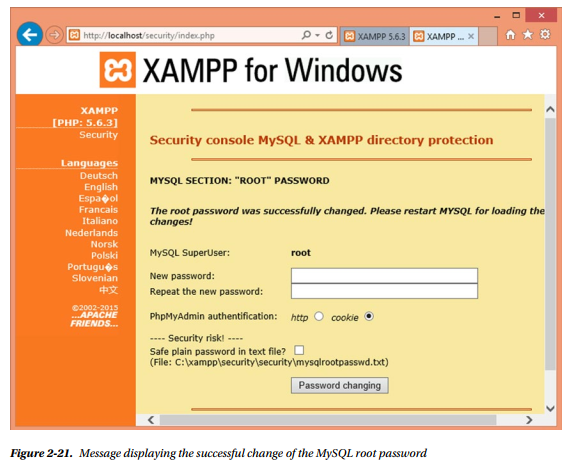
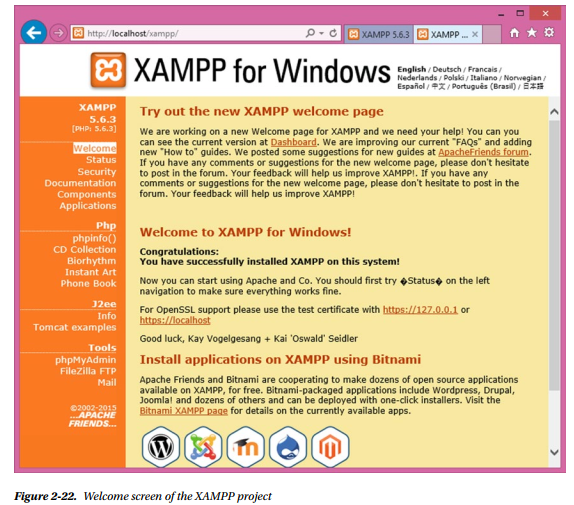
Restart MySQL by clicking the Stop button in the MySQL section of the XAMPP Control Panel (refer to Figure 2-7). The MySQL server is stopped, and the button will change to Start Click it to restart MySQL. To invoke the XAMPP project, click the Admin button in the Apache section of the XAMPP Control Panel The XAMPP project will be invoked and its welcome screen will be displayed, as shown in Figure 2-22.
If you find an error here, something is wrong with the password you entered. To fix that error, go to the phpmyadmin directory of the xampp directory and open the configincphp file In it, search for the following line:
find $cfg[‘Servers’][$i][‘password’] = ”;
Add your password in the single quotes after the = (equals) sign For example, if you want to set the password to world2009, the line will be changed to the following:
$cfg[‘Servers’][$i][‘password’] = ‘world2009’;
Save the file; and you will be able to invoke the XAMPP project. The welcome screen that may appear is shown in Figure 2-22.
If you now invoke phpMyAdmin by clicking the phpMyAdmin button from the navigation bar, it will not open directly as before; it will prompt the user to enter the password for the root user (see Figure 2-23)
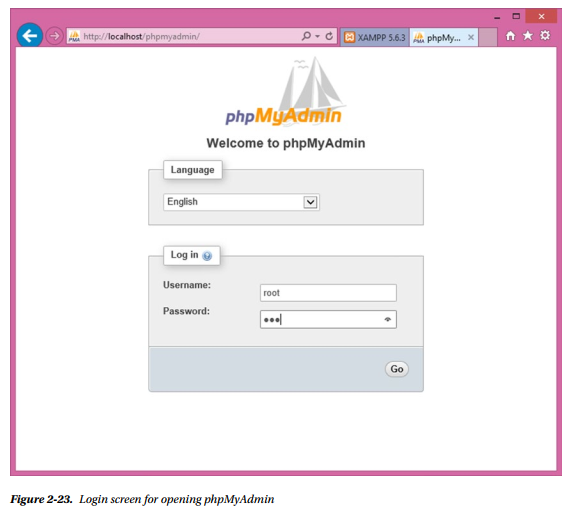
Until you enter the correct password in the preceding page (you have to enter the same password that you specified in the security console — refer to Figure 2-20), phpMyAdmin will not open, and you cannot maintain the MySQL database.
Now that the prerequisite conditions of Joomla installation have been successfully met (ie, you’ve installed XAMPP, which has automatically installed PHP, MySQL, and Apache), you can install Joomla on the local server (Apache) installed on your PC.
Source: Harwani B M (2015), Foundations of Joomla!, Apress; 2nd ed edition