One of the best ways to interact with your visitors is to allow them to leave comments on your site, and because WordPress was developed as blogging software, it has an extensive comments system. This lesson shows you how WordPress handles comments and the ways you can manage them.
1. Allow comments?
WordPress offers two ways of deciding whether visitors can leave comments: on a sitewide basis and on a per-content basis. Both of these are mentioned in earlier lessons on site admin- istration (Lesson 5, “Basic Admin Settings”) and on creating Posts and Pages (Lesson 9, “Advanced Post Functions”), but it’s worth repeating here.
How you control your settings depends on the kind of content you have on your site. If it’s the kind that cries out for comments, such as a personal blog or a newspaper/magazine style site, it makes sense to turn on comments so that they’re activated by default each time you create new content. Then, you simply turn them off in those situations that don’t call for comments (such as your Privacy Policy Page).
If your site is more informational—not talking about issues, controversies, opinions, and so on—you probably want comments off by default, turning them on only when you need them.
The important point is that you need to consider the purpose of your website and how the WordPress comment function might fit in. Every site will be different, and every area on your site needs to be considered separately as well.
2. Admin Settings For Commenting
You can find the sitewide settings for commenting on the Admin menu under Settings ➪ Discussion. By default, WordPress sets up the following parameters:
- The comment form and existing comments appear on any Post or Page.
- To post a comment, visitors must fill out their name and e-mail address.
- The ability to comment is always open—there’s no time limit on the comments for a particu- lar Post or Page.
- All comments are held for approval unless the commenter has been approved before.
- The e-mail address listed in WordPress administration will be notified if any comments are posted or if any comments are held for moderation.
- Any comment is held for moderation if it contains more than two links.
- No words or web addresses are blacklisted.
- Avatars (small graphics or photos) display with each comment, and a default avatar is selected if the visitor doesn’t provide one.
When comments are active, these are standard settings, so in most cases, you won’t need to make any changes. The key setting you need to decide on is the ability to comment on every Post and Page, as shown in Figure 23-1, under Default Article Settings. (“Article” just means Posts or Pages.)
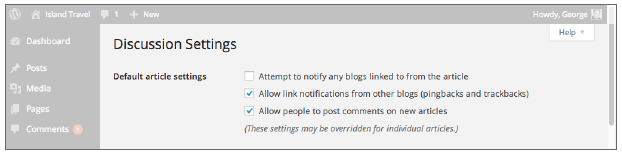
FIGURE 1
If you turn off commenting for every Post and Page, you still have the ability to allow commenting on any particular one. WordPress reminds you of this when it says, “These settings may be overrid- den for individual articles.”
In the past, WordPress showed the Discussion settings for individual content at the bottom of every Post or Page Edit screen, so it was there to refresh your memory and check the status for that item. Now, however, the Discussion box is hidden by default, and you need to choose it under Screen Options if you want to make any changes.
One other useful option under Settings ➪ Discussion is the ability to automatically have comments close after a specified period of time, say, 60 days. Existing comments continue to show; there just can’t be any new comments.
Some people use this feature if they have trouble blocking spam comments, but they want to allow a bit of time for legitimate comments to be made. Others don’t want to deal even with legitimate com- ments on old topics. With this feature, you don’t have to remember to manually turn off comment- ing after a Post has been up for a while.
2.1. Display Order of Comments
Traditionally, blogs have shown the oldest comments first. Part of the reason is that comments can often flow in the form of a discussion—you need to know what’s been said earlier to follow what a later commenter is reacting to.
However, some people prefer to show the most recent comments first. One theory is that visitors who keep returning want to first see what’s new in the comments area, without having to scroll (sometimes a long way) to the bottom.
WordPress makes it possible to choose between the two. The default is still oldest comments first, but under Settings ➪ Discussion in the Other Comment Settings area, you see a drop-down menu enabling you to first select Older or Newer Comments.
2.2. Threaded Comments
No matter what order comments display in, comments often don’t flow in an orderly manner. If someone is commenting on a point made 15 comments earlier, it can get difficult to keep track of the conversation. That’s why WordPress has threaded or nested comments enabled by default. This creates a Reply link with each comment in addition to the general comment box at the bottom of the Post. If visitors use the Reply link, the comment shows up inside the comment they’re replying to.
You can turn off this feature under Settings ➪ Discussion Settings. Look for Enable Threaded (Nested) Comments. You can also allow the nesting to go up to 10 comments deep. (The default is 5.)
3. Knowing You Have Comments
Assuming you retained the default settings that require comments to be approved (at least the first time someone comments) and for the administrator to be e-mailed about it, you’ll know there are comments waiting because you’ll get an e-mail.
But you’ll also know there are comments waiting from several indicators on Admin screens, as shown in Figure 2.
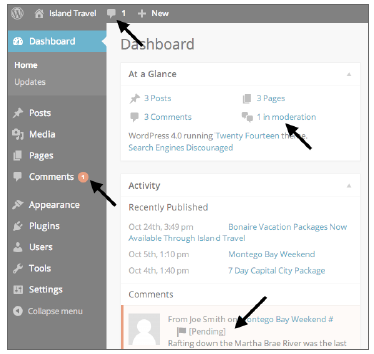
FIGURE 2
You’ll also see any new comments for individual Posts or Pages when you open their Edit screen. The Comments meta box is shown in Figure 3.

FIGURE 3
The Comments meta box automatically appears on Post or Page Edit screens after the first comment is made, but you can still manually control its appearance from Screen Options.
4. Approving, Editing, Or Deleting Comments
The most common way of managing Comments is through the link on the main Admin menu, taking you to the Comments screen, as shown in Figure 4.
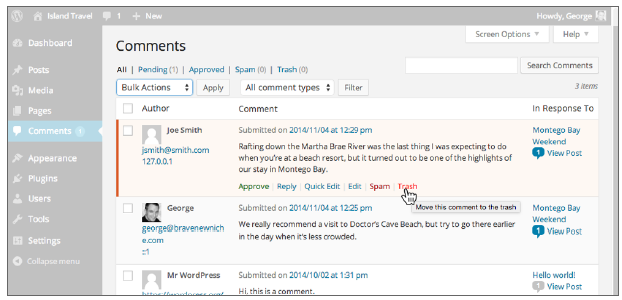
FIGURE 4
For each comment, you see the author’s name and a URL if the author entered one. Then you see the comment itself, along with the date and time it was submitted. Underneath the comment, if you mouse over the row, you see a menu with the following options:
- Approve—You can approve the comment (or unapprove it, depending on context).
- Spam—This marks the comment as spam, so the information can be used by antispam plugins to learn what to block.
- Trash—This removes the comment to the Trash area. From there, you can restore it later or permanently delete it.
- Edit—Use this to edit the parameters of the comment, including the body, so you can remove bad language and so on.
- Quick Edit—This enables you to perform virtually all Edit tasks without going to a new screen.
- Reply—This enables you to reply directly to the comment in the way described earlier when talking about threaded comments. If your theme is set up to do so, your reply is shown with the comment it’s in response to.
On the far right of the comments listing, you see the title of the Post that the comment was respond- ing to with a link to its Edit screen. The tiny speech bubble icon shows how many comments that Post or Page has, and the View Post link takes you to the item on the front end of your site.
At the top of the screen is the standard filtering menu, where you see comments based on whether they’re Pending (awaiting approval), Approved, Spam, or sitting in the Trash.
You can filter the comments by Comments or Pings. Lesson 25, “Connecting by E-mail,” explain pings or pingbacks in more detail, but basically these are links to your Post, as opposed to someone making a comment through your site.
You can also sort results by Author and by the item the comment is in response to by clicking their respective column titles.
Finally, you can search through the text of the comments by using the Search Comments box at the top right of the screen. You can take any of these same actions.
You can approve a comment by clicking Approve on the text menu that displays when you mouse over a comment on the Comments screen. If you have a lot of comments to approve, just check the box for each, choose Approve from the Bulk Actions drop-down menu at the top or bottom, and click Apply.
Before or after you approve a comment, you can edit the contents by clicking Edit on the text menu. You see a screen such as the one in Figure 5.
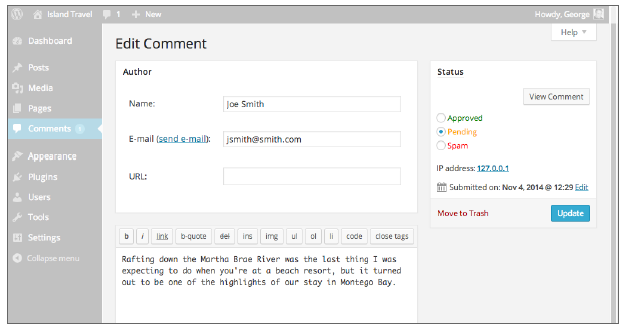
FIGURE 5
From this screen, you can edit all the parameters, including the date and time it was submitted (see the Status box).
Notice that the comment Content Editor is available only in Text mode. Visitors do not get any for- matting buttons when entering comments, but plugins are available that offer all sorts of options in that regard.
As always, remember to click Update when you finish editing.
To move a comment or comments to the Trash, you again have the choice to do it individually or in bulk when you’re on the Comments screen. When you edit an individual comment, you can trash it from the link in the Status box.
5. Dealing With Spam Comments
Although spam comments are dealt with from the same menus as approving or deleting, they are covered in a separate section. WordPress comes with a number of methods for dealing with spam comments but there are also Plugins that can help. Some are mentioned at the end of the lesson.
The first line of defense with spam comments is to make sure you require all comments to be moder- ated (not counting those visitors you’ve approved once already—if you keep that setting in place). That way, you don’t have just anything appearing on your site without knowing about it.
On the Settings ➪ Discussion screen, you’ll find several settings under Comment Moderation that can help deal with spam comments. The first checks how many links are contained in a comment and holds
it for moderation if the threshold is exceeded. The default setting is 2, the idea being that spam comments often contain multiple links. This option functions no matter what other moderation settings you have.
The next option enables you to specify words, names, URLs, e-mail addresses, or even IP addresses against which WordPress will check each comment—be sure to have only one item per line. If any- thing on this list appears in a comment, it will automatically be held for moderation—again, no matter what your other comments settings are.
The final moderation option enables you to create a blacklist. You specify words, names, and so on, but in this case, if a comment contains anything on the list, it’s automatically marked as spam, not simply put into moderation. You can still approve a comment if it wrongly is caught by this blacklist.
6. Farming Out Comments
If you don’t want to use WordPress’s Comments system, there are a number of alternatives.
Disqus is a popular comment application that has good integration with WordPress. It has many more features than the WordPress commenting system, including voting comments up or down, seeing who else voted, built-in social media sharing, antispam, replies notification, and much more. Another advantage here is that users can log in to Disqus using Facebook or other social logins, and they stay logged in when visiting any of the more than 1 million sites using Disqus. In that sense it becomes its own social network.
Other popular third-party commenting applications that make integration easy with WordPress include LiveFyre and IntenseDebate.
Another alternative is to use Facebook Comments, which enables people to comment right on your site using their Facebook account. Google+ offers a similar commenting interface that embeds in your site. The drawback here, of course, is that you have to use part of Facebook or Google+ to com- ment. In the case of Facebook, that’s still a large audience, but you may not want to limit yourself.