During the last couple of years, WordPress has outgrown any other Content Management Solution worldwide. Numerous websites are built using WordPress on a daily basis. WordPress is even popular among large companies. Currently about a quarter of all websites worldwide are powered by WordPress.
WooCommerce is a plugin for WordPress that turns your website into a complete online store. Practically in minutes, but that doesn’t mean that the solution is very limited. This book will show you what you can do with it. WooCommerce is a versatile plugin that gives the possibility for everyone with a little WordPress knowledge to start their own online store.
Originally, WooCommerce was derived from the Jigoshop plugin. The WordPress theme developers of WooThemes quickly brought the solution to a higher level and soon it became the most popular plugin for e-commerce within WordPress.
In 2015, Automattic (the company behind WordPress) acquired WooThemes and WooCommerce. So we could almost say that WooCommerce has become the default ecommerce solution for WordPress now. At time of print WooCommerce is even powering 30% of all online stores worldwide.
In case you are not familiar with WordPress at all, this book is not the first one you should read. No worries though, WordPress isn’t that hard to learn and there are a lot of online possibilities resources to learn about WordPress solution very quickly. Or just turn to one of the many printed books on WordPress that are available
1. Setting up your test environment
Before we start, remember that it’s only possible to install your own plugins if you’re working in your own WordPress installation. This means that users that are running a website on WordPress.com will not be able to follow along. It’s simply impossible in that environment to install plugins yourself. WooCommerce has recently become a part of WordPress itself. I can imagine that because of this WooCommerce might become available for WordPress.com users in the future. But so far there are no signs yet of an integration of WooCommerce into WordPress.com.
When starting with WooCommerce there are two situations that might occur:
- You have a running WordPress website to which you’d like to add WooCommerce
- You want to start from scratch and create a new WordPress installation including WooCommerce
Either way, you’ll need a test environment to be able to play with WooCommerce and follow along with this book. Although technically possible to add WooCommerce to an existing WordPress website immediately, I highly recommend using a test environment. Things can and will go wrong and you don’t want to confront your current visitors with your experiments.
Setting up a WordPress test environment isn’t as difficult as it might seem. There are tons of tutorials available, whether you’re working on Windows or working with a Mac. When you want to add WooCommerce to your existing website, this is what you need to do to setup a test environment:
Create a backup copy of your complete WordPress environment using FTP. Alternatively use a plugin to store a copy into your Dropbox folder automatically: http://wordpress.org/plugins/wordpress-backup-to- dropbox. There are lots of solutions available, just pick your own favorite.
- UpDraftPlus is another option and delivers a complete backup solution as well: http://wordpress.org/plugins/updraftplus/.
- Don’t forget to backup your WordPress database as well. You may do this using a tool like phpMyAdmin and create an export from there. But also in this case, there are plugins that make life easier. The UpDraftPlus plugin mentioned above can perform this task as well. The steps 1 and 2 aren’t necessary when you’re starting a new WordPress installation from scratch.
- Once your backups are complete, install XAMPP on a local (Windows) machine: http://www.apachefriends.org. Although XAMPP is available for Mac users, MAMP is a widely used alternative for this group: http:// www.mamp.info/en/index.html. Restore your WordPress backup on your test server by copying all files to a subfolder and by restoring the database using phpMyAdmin.
- Note that after restoring your database using phpMyAdmin, it’s necessary to update the contents of the database as well. Unfortunately WordPress stores the full path URLs in lots of different database records. Without changes, those would still point to the location of your live website and not to your test environment. I mostly use a ‘Search and replace’ script to solve this issue. https://interconnectit.com/products/search-and-replace- for-wordpress-databases/. You can download the script, and store the contents of the zip file in a new subfolder of your test environment. Start it from there, like in the screenshot below. Next, replace the old URL with the new one from your test environment:
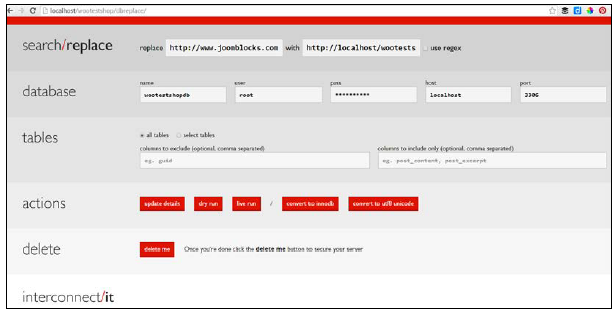
Alternatively, install a copy of your WordPress website as a temporary subdomain at your hosting provider. For instance, if my website is http://www.example.com, I could easily create a copy of my site in http://test.example.com. Possibilities may vary, depending on the hosting package you have with your hosting provider. Also in this scenario you need to adjust the content of the database, as mentioned in step four above.
If in your situation it isn’t needed to add WooCommerce to an existing WordPress site, of course you may also start from scratch. Just install WordPress on a local test server or install it at your hosting provider.
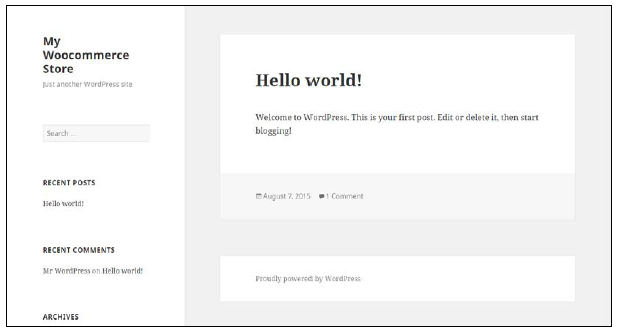
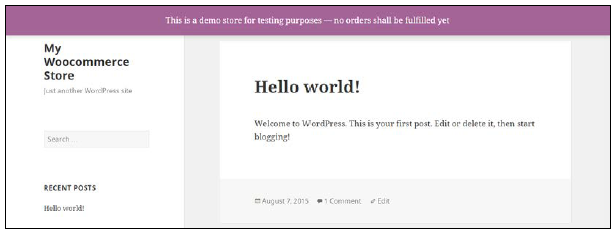
To keep our instructions in this book as clear as possible we did just that, so that there’s no visible interference with already existing content and a custom theme. We created a fresh installation of WordPress version 4.2. Below you see a screenshot of our setup, still completely empty using the Twenty Fifteen default theme:
More information about setting up a test environment and restoring your website on it can be found in the following articles:
- http://wpsites.net/wordpress-tips/how-to-restore-your- wordpress-website-backup-on-your-local-server-using-wamp/
- https://codex.wordpress.org/Installing_WordPress_Locally_on_ Your_Mac_With_MAMP
- http://code.tutsplus.com/tutorials/migrating-wordpress-across- hosts-servers-and-urls–wp-20104
More tutorials will also be available on our website: http://www.joomblocks.com. Don’t forget to sign up for the free Newsletter, that will bring you even more news and tutorials on WordPress, WooCommerce and other Open Source software solutions!
Once ready, we’ll be able to take the next step and install the WooCommerce plugin. Let’s take a look at our WordPress back-end. In our situation we can open this by browsing to http://localhost/wootestshop/wp-admin. Depending on the choices you made above for your test environment, your URL could be different.
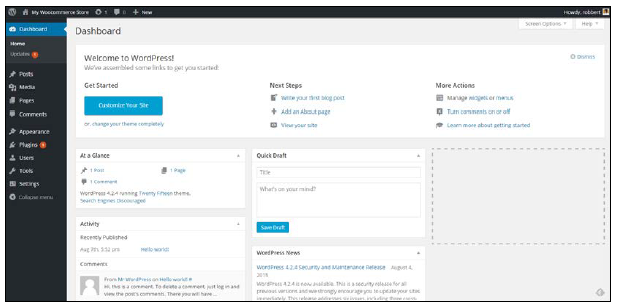
Well, this should all be familiar for you already. Again, your situation might look different, depending on your theme or the number of plugins that are already active for your website.
2. Installing WooCommerce
Installing a plugin is a fairly simple task:
- Click on Plugins in the menu on the left and click on Add New.
- Next, simply enter WooCommerce in the Search Plugins field and hit Enter.
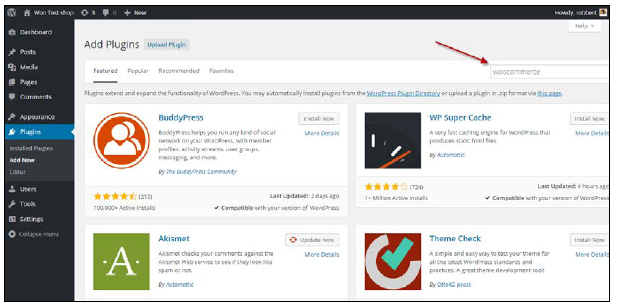
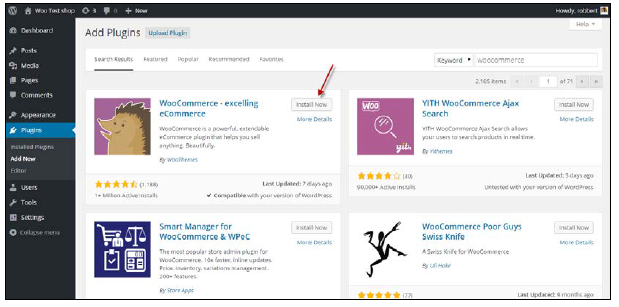
- Verify if the correct plugin is shown on top and click Install Now. Over time results will vary, but the WooCommerce plugin itself should always appear on top:
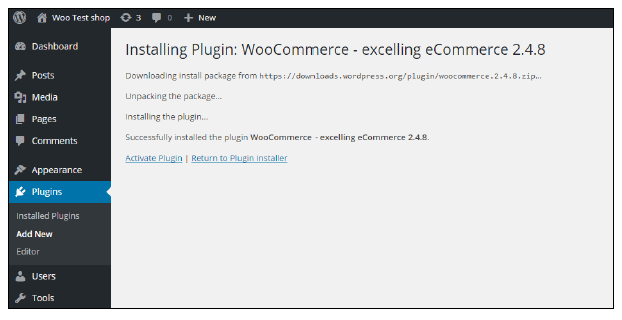
- Click on Activate Plugin. Note that in the shown screenshot, we’re installing version 2.4.8 of WooCommerce. New versions will follow rather quickly, so you might already see a higher version number:
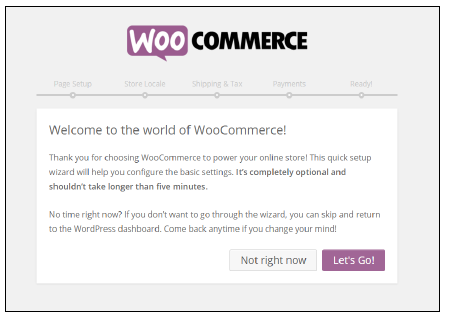
- Next, WooCommerce starts a quick setup wizard, that gives the possibility to go through the most important settings. The wizard is optional. If you’d like to skip it just press Not right now, otherwise click the Let’s go button. If you chose to skip the wizard, please read on at number 11 of this step-by-step guide.
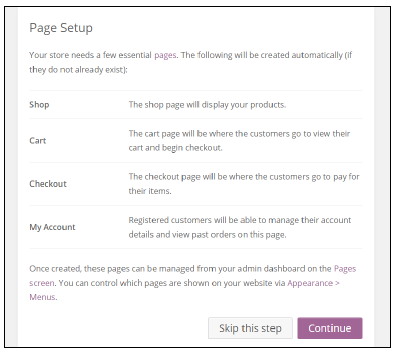
- When using the wizard, first a couple of pages will be created by WooCommerce. These pages are necessary to correctly run your store, so just press Continue:
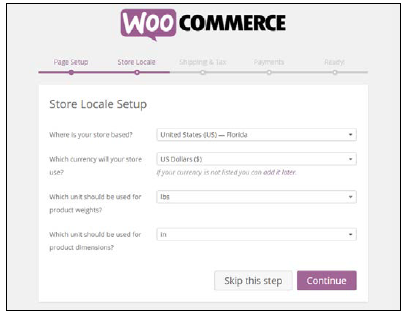
- Next, choose your local settings, like the country you’re based in and the currency you want to use. Also, set the units of measure, even if you think you won’t need those for your products:
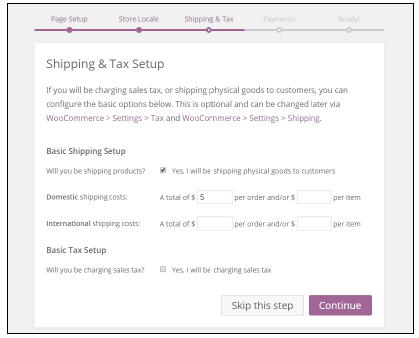
- Set some basic shipping costs and determine how you want to work with taxes. Don’t worry if you’re still unsure here. You may Skip this step if you want to. Later on in this chapter these topics will be discussed in more detail:
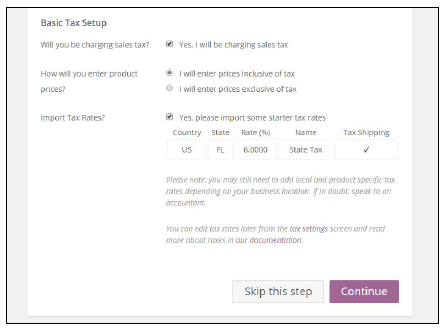
If you enable the checkbox Yes, I will be charging sales tax, additional options will become visible. WooCommerce will suggest some default tax settings, based on the country/region you selected at step 7:
- In the next screen, you can decide which of the default available payment methods you’d like to use. PayPal is widely used and adding your PayPal e-mail address is enough to start using it. Also in here, you may skip the step if you’re unsure about it. Adding other payment possibilities than the ones shown here will be discussed later on:

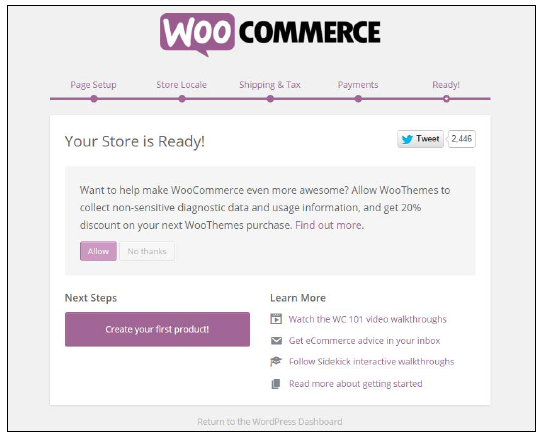
- In the last step you’re asked if you want to allow WooCommerce to gather diagnostic data of your store. If you do, you’ll receive a discount coupon for extensions, which might be handy later on. Of course this step is optional. We recommend to click on the link Return to the WordPress Dashboard on the bottom. Although it is possible to immediately start adding products, we suggest to first pay more attention to the other WooCommerce settings:
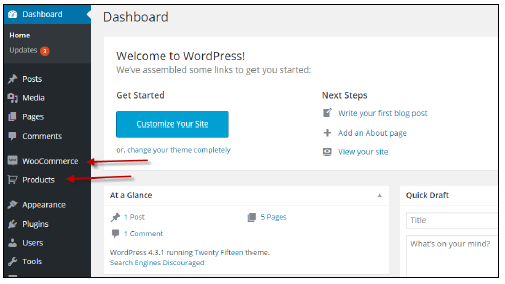
- Once we finished the wizard and returned to the WordPress Dashboard, two new menu items (WooCommerce and Products) have been added to the main menu on the left:
- Meanwhile the plugin created the necessary pages that you can access by clicking on Pages in the menu on the left:
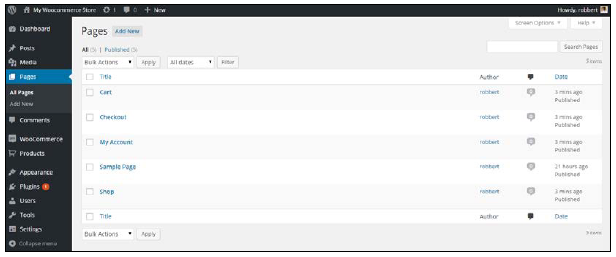
Note that if you open a page that was automatically created by WooCommerce, you’ll only see a shortcode, that is used to call the needed functionality. Do not delete the shortcodes, or important WooCommerce pages like Cart, Checkout, and Shop will not work properly. However, it’s still possible to add your own content before or after the shortcode on these pages.
3. Setting up WooCommerce
WooCommerce is usable straight out of the box. However, in this section we’ll cover almost every setup parameter that you may use to control your online store. Going through all settings might be quite overwhelming in the beginning, but it will help you in exploring the possibilities of WooCommerce.
3.1. The General Settings Tab
Click on WooCommerce in the left menu and then click Settings. A new page holding different tabs with settings appears. The first one visible is the tab named General:
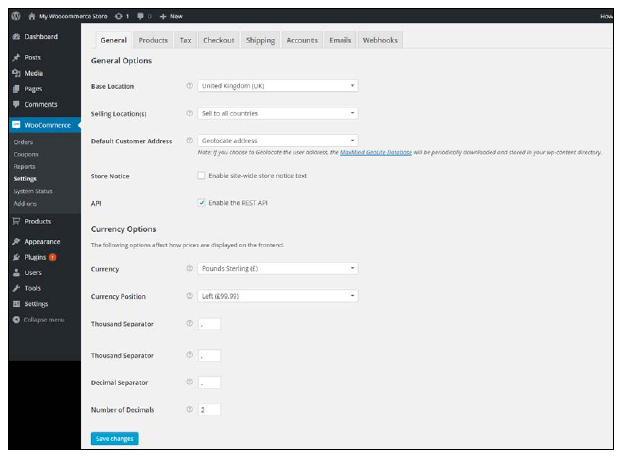
You will find certain fields described as follows:
- The Base Location holds the country of your store. The default setting may vary, depending on the country and language settings of your WordPress environment. Just change it if needed. Note that if you’re in the United States, you’ll also have to choose the correct state in this field. Note that the country field will be used as the default country for calculating taxes. It will also be used as the default country for customers checking out or creating an account.
- Next, determine to which countries you want to be able to sell at the field Selling Location(s). Give it some thought, because enabling a country also means you must be able to ship to that country. If you set this field to Specific Countries Only, a new field appears in which you must select the countries that you want to allow selling to.
- At the field Default Customer Address you can decide how WooCommerce should set its defaults when a visitor wants to make a purchase. It can automatically set the country field based on the Geolocation of the customer, but of course this will only work if the customer is not working from behind an anonymous proxy. It’s also possible to set the base address of the store as a default or no address at all. Why is this setting important? Because shipping costs and tax calculations might be based on the address of the customer. The better you’re guessing the customer’s location, the better shipping costs will be estimated immediately.
- If you immediately installed WooCommerce in a live website—which is not recommended— you have the possibility to show a warning message to your visitors. By checking the field Store Notice, the field Store Notice Text becomes available, giving you the opportunity to write your own text that will be shown on the top of your site:
- The next five settings are all used to set the way WooCommerce should handle your currency. WooCommerce is only able to work with one currency at a time. Set the desired Currency and choose where to show the Currency symbol.
Finally, choose the thousand separator, the decimal separator and set the number of decimals you want to calculate with.
3.2. The Products Settings Tab
Moving to the next tab you’ll find different settings related to the usage of products in WooCommerce. Note that this tab is divided into four different sub areas, starting with another General tab:
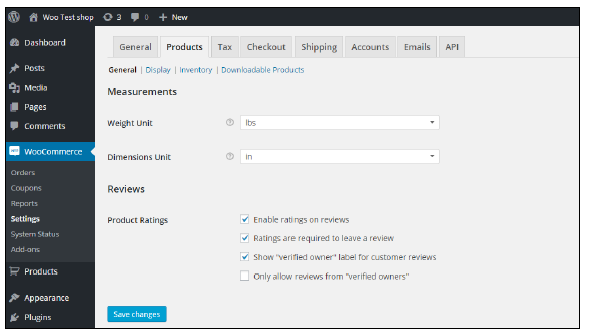
- First set the unit of measures for weight and dimensions.
- Next, check the settings for working with product reviews. You may choose to disable them, although generally that isn’t recommended. Having
- customer reviews is important for almost all kinds of products and services. And even negative reviews are not always as bad as they seem to be.
- By default a user that wants to send in a review also has to give a rating to the product. If in your case that isn’t needed, you might disable that setting.
- The last two settings here are used to show if a user posting a review actually bought the product in your store. You may also decide not to accept a review from someone that didn’t buy the product in your store.
The next area, named Display, shows several settings for products and categories:
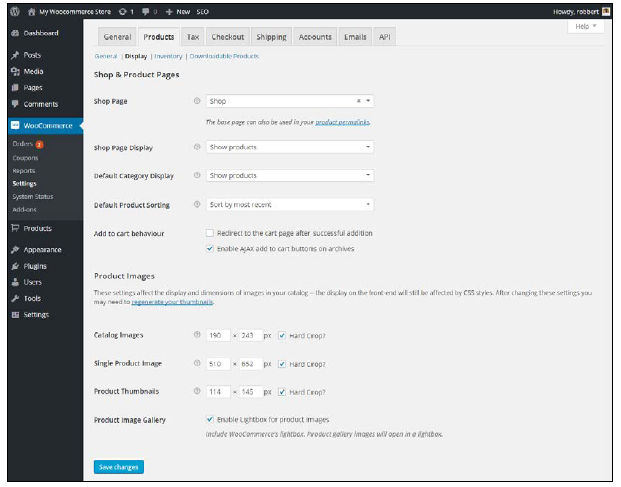
The setting for products and categories are as follows:
- The Shop page is already prefilled for you. Don’t change it unless there’s a real reason to. If you want to give this page a different name just go to the Pages menu and change it in there.
- Next, decide what will be shown on this shop page and on the product category pages. By default they will only show Products, but you can also choose to show (sub) categories or both. Of course a setting like this can be changed later on as well, so if you’re unsure, just leave the defaults and come back later to try the different options.
- The field Default Product Sorting sets the way the products will be sorted in the front-end. Visitors have the possibility to change the sort order for their session.
- The add to cart behavior is important to understand, although also this one can be changed later on. The field Redirect to the cart page after successful addition is switched off by default. If you enable it, the user will be redirected to the cart page immediately when adding an item to the cart. This is especially useful for shops where in most cases the user will only buy a single product. If you leave the first setting disabled and enable the field Enable AJAX add to cart buttons on archives the page is not reloaded when an item is added to the cart. You may just try these settings to see what fits your store best.
- At Product Images, you define the size of your product images in the category overview, product detail page and thumbnail display. The uploaded pictures have to be at least as big as the highest value entered here. Take a little time to think about the right dimensions. Changing it later on is possible, but not that easy. The least you need to do is to decide if you’d like to keep the default square images, or maybe use photos in portrait mode. This highly depends on the products you are going to sell. Note: the theme you’re using influences these sizes as well. You will read more on themes later on, but this might be a good moment to look at your theme documentation to find if it’s mentioning anything about product image sizes.
- Keep the product image gallery enabled for a better, user friendly view of your images.
- Press Save Changes at the bottom.
The next section shows various settings to manage the inventory of your products.
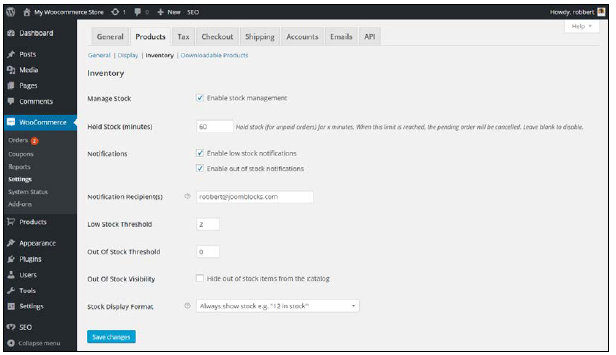
The inventory settings for the product page are as follows:
- First of all, set the Manage Stock field to Enable stock management if you want to work with inventory at all. If you’re only going to sell services or downloadable products this might not be needed. If you’re selling services as well as physical products then enable it here. It’s possible to switch of inventory on product level later on.
- If you have limited stock available, you don’t want it to be in a user’s cart forever. On the other hand, once an item is in the cart you don’t want to confront the user with a ‘sorry sold out’ message when they want to pay. The field Hold Stock gives you the possibility to influence the behaviour of WooCommerce in this area.
- When stock levels are important, you want to keep the Notifications field on enabled. Next, enter the email address these notifications need to be sent to.
- Next, set the Low Stock Threshold and Out of Stock Threshold, that will determine when the mentioned notifications will be sent. Unfortunately this is not a default. The settings chosen here will be the same for all of your products.
- Use the Out of Stock Visibility to decide whether or not to show products to visitors that are no longer available.
- Finally, set the field Stock Display Format to determine if stock levels are or aren’t visible to your customers.
Remember to click the Save changes button at the bottom!
The last section holds some settings for downloadable products. If you’re not planning to work with digital products you may skip this section:
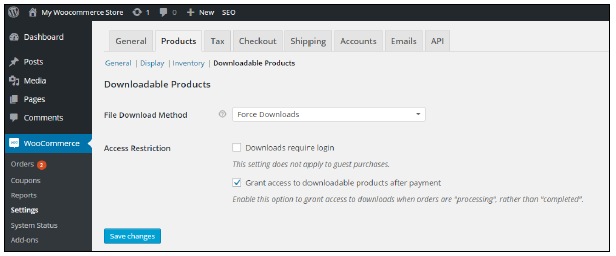
The options are as follows:
- Change the first setting File Download Method only if you have any issues with downloading the products by your customers.
- Next, decide if a login is required to be able to download an item using the Access Restriction field. Technically this isn’t necessary, but you might have other reasons to force a customer to create an account on your website.
3.3. The Tax settings tab
Setting up taxes can be a difficult task. Of course there’s no ‘one size fits all’ approach possible here. Tax laws and calculations differ from country to country and region to region. Besides that there’s a large difference in handling taxes when selling goods to consumers or to other businesses. So in here we’ll just stick to the basics, by explaining the functionality WooCommerce has available. It’s up to you to find out how tax calculations should be done for your specific situation.
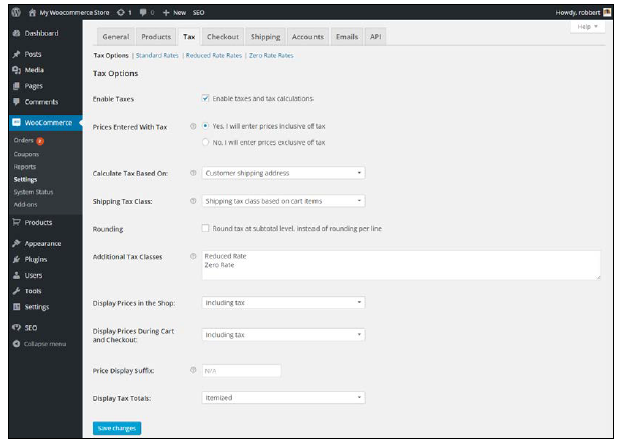
The settings for Tax Options page are as follows:
- First of all, decide if you want to Enable Taxes. It’s not always necessary to display taxes in your store to your customers. If you decide to switch it off, you may ignore all other fields below.
- Next, assuming that you enabled the field above, decide if you want to enter your sales prices including or excluding tax in the Prices Entered With Tax field. Including tax is quite common in a consumer oriented store, but again, this differs per region.
- Depending on the tax rules in your country, you need to set the Calculate Tax Based On field. Sometimes taxes should be calculated based on the shipping address of the customer. In our example the base address of our store is used, which means that all customers will pay the same rate. By using the setting as shown, the applied tax rate will only depend on the product, not on the address of the customer.
- For the shipping costs, that will be discussed later on, you must also determine how the rate needs to be calculated. You set that using the field Shipping Tax Class. Although not always true, the default setting is often a good one, where the rate for shipping is the same as the one used for the item that is sold.
- WooCommerce works with a Standard tax rate by default. It’s not possible to delete this one. You can add additional rates if you need them by adding a description of your choice to the Additional Tax Classes field. The Reduced Rate and Zero Rate have already been defined.
- The field Price Display Suffix may be used to display a short text just after the Price field. Use this to display for example including VAT.
- Once done, click on the link Standard Rates at the top of the screen to set your default tax rate. Click Insert Row. Just fill in the Rate % and set a Tax Name that makes sense for your customers. Note that it’s possible to set rates per Country, State, or even based on Zip Code. Note that this will only work if you’ve chosen to base the tax calculations on the address of your customer! By default your Tax rate will also be used for the Shipping amount. Finally, using the field Compound it’s possible to use multiple tax rates at once (tax on tax). Don’t forget to hit the Save changes button:
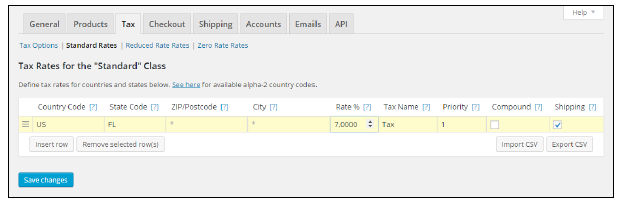
Note that it’s possible to import a CSV file with tax rates, which can be handy if you need to setup a lot of them. The Import CSV button brings you to the Tools | Import section of WordPress. Over there you’ll also find the possibility to download an example file.
In a simplified way, assuming only one tax percentage applies, WooCommerce offers this method to calculate the tax amount:
Tax calculation for gross price (amount entered inclusive tax) is: tax_amount = price – ( price / ( ( tax_rate_% / 100 ) + 1 ) ).
Tax calculation for net price (amount entered exclusive tax) is: tax_amount = price * ( tax_rate_% / 100 ).
Setting up sales tax for the USA can be quite challenging sometimes. There’s an easy solution for it, which is made available by WooTax: https://wootax.com/. Alternatively, have a look at the services offered by woosalestax.com (http://www. woosalestax.com/).
3.4. The Checkout Settings Tab
Moving on to the Checkout settings tab, we see again several sublevels. For this moment, we’ll only discuss the Checkout Options. All other panels contain setup information about specific payment methods. More on choosing and configuring payment methods will be discussed in more detail in Chapter 4, Payments, Shipping, and Coupons:
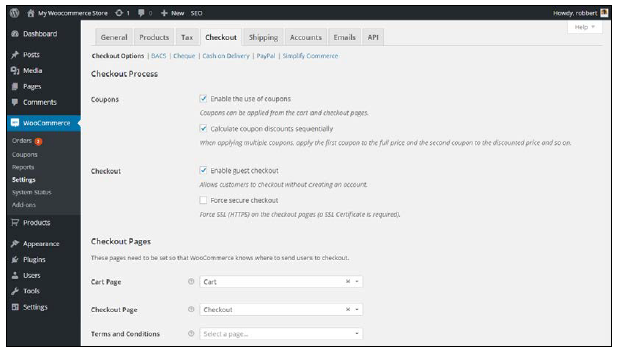
The Checkout Options are as follows:
- First, decide if you want Enable the use of coupons in your store. Using coupons gives a lot of marketing possibilities, but there’s also a downside. Enabling this field will show a enter your coupon field on the front-end during checkout. Visitors will see the field and might start searching for a valid coupon on the web. In other words, only enable this setting if you’re planning on using discount coupons.
- The next field is also enabled by default. Allowing a guest checkout has proven to be positive for conversions. Not everyone always wants to create an account for every store they buy something at. Having guest checkout enabled makes sure that these users can buy and pay without creating an account.
- The Force secure checkout field is used when working with SSL certificates. Enabling the field will mean that checkout is only possible when a SSL certificate is in place and a secure connection between the client (visitor) and the server (your website) could be made.
- At the Checkout Page, the first two fields have been pre filled again. You can keep them as they are. The third field, Terms and Conditions, is optional. If you want your customers to agree with your terms and conditions then do the following: save your changes here and head over to the Pages menu. Add a new page named Terms and conditions and fill it with your content. Save and publish that page. Next, come back here at the Checkout settings tab to select that page from the dropdown and save the settings again.
- The checkout endpoints were also automatically created. We recommend not to change these.
- Finally, the table with Payment gateways is shown and can be sorted here, but we’ll discuss the usage of that one in Chapter 4, Payments, Shipping, and Coupons.
3.5. The shipping settings tab
Setting up Shipping works in a similar way as the Checkout setup. In here we’ll show the Shipping Options and in Chapter 4, Payments, Shipping, and Coupons we’ll get back with more detailed instructions:
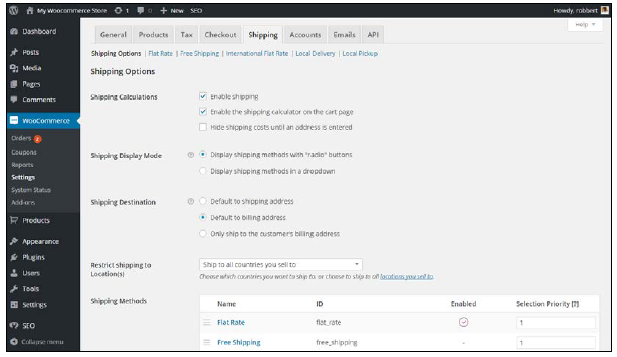
The Shipping Options settings are as follows:
- The first setting is enabled by default. It is needed if you want to be able to charge shipping costs to your customers. If you’re only selling digital goods it isn’t needed.
- Selecting the field Enable the shipping calculator on the cart page will result in the Calculate Shipping option appearing on the cart page. The customer will be able to calculate the shipping costs for a delivery to his location before continuing with the checkout process. The calculation is based on the country and zip code, which means that it’s only useful if your shop offers shipping costs that differ per region. This is a handy function if you have configured your shipping options to apply different shipping costs based on the customer’s region.
- The next option will do the opposite. If you enable it, the shipping costs will not be shown as long as the customer did not enter an address.
- The Shipping Display Mode just determines the way the shipping options are presented to the user: using radio buttons or using a dropdown field.
- The Shipping Destination controls which of the customer addresses is used by default.
- The field Restrict shipping to Location(s) gives the possibility to limit the number of countries you’re shipping to. For instance if you want to sell digital products to all countries, but can only offer shipping of physical goods to a couple of them. By default, WooCommerce allows to ship to all countries that you enabled in the General settings tab.
- Next, you see the available Shipping Methods. It’s possible to expand this list using additional plugins. More details on configuring your shipping methods will follow in Chapter 4, Payments, Shipping, and Coupons.
3.6. The Accounts Settings Tab
We’re moving to the next tab, named Accounts. There are only a couple of settings here that you need to pay attention to:
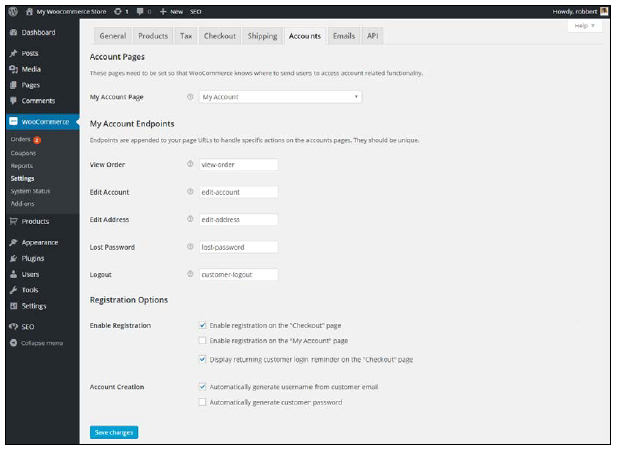
The setting for Accounts is as follows:
- The first part, Account Pages and My Account Endpoints may all be left at their default settings.
- The Registration Options deserve some more attention. First of all, you set where the customer can create a new account for the store. Make it easy and enable them both. Next, by default WooCommerce will show a reminder on the checkout page, so that existing customers remember to login.
- At Account Creation, WooCommerce can use the e-mail address as a username, or let the customer pick a username for themselves. The default option is generally the best one, because customers often forget the usernames they chose. Besides that the username must be unique, so in a large shop it could become a frustrating task for a user if the username of their choice has already been taken.
3.7. The Email Settings Tab
In this tab, you can configure the way WooCommerce handles e-mails it will send to your customer:
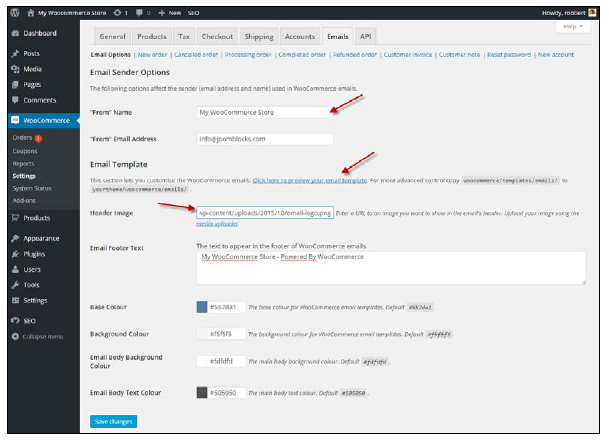
Also this tab contains several sub areas, starting with Email Options and followed by a couple of settings for every type of email WooCommerce can send:
- The “From” Name field is the name the receivers see in their email client. By default this is the name of your online store.
- The “From” Email Address field defaults to the administrator of the website, which defaults to the address created when installing WordPress. Of course this may be overwritten here.
- Next, if you want to you may add your logo as the Header Image for your emails. To be able to do that, do the following: Save any changes here and navigate to the Media menu. Upload your logo in the media manager. Open the image by clicking on it and copy the contents of the URL field. Go back to the WooCommerce settings and paste the URL in the Header Image field, like in the shown example.
- Feel free to change the default Email Footer Text field, which will be printed at the bottom of every e-mail.
- At the bottom of this settings tab, you have the possibility to change the default colors of the email messages, so that they fit to the colors of your website. Just click the color fields and use the color picker to change them. Or enter the hexadecimal color code directly into the field if you know the correct color codes of your website.
- After saving your changes, click the link in the middle of this tab to check the results. The shown e-mail message is empty, but it still gives you a good idea of how the messages will look like.
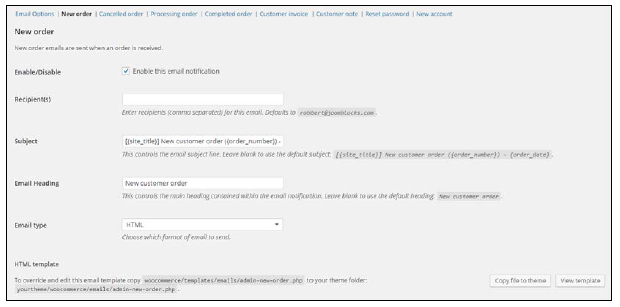
- If all seems correct, you can one by one check and change the settings of the various e-mails WooCommerce will send. The example below shows the settings of the New Order e-mail, which is the confirmation message that you will receive when your customer creates a new order:
3.8. The API Settings Tab
The Api Settings tab is not discussed in this book. Api keys and Webhooks can be used to integrate third party tools with WooCommerce. Based on a trigger, another website or service can receive data from WooCommerce when certain events happen on your site, for instance when a new order is created. More information on Webhooks can be found here: http://docs.woothemes.com/document/webhooks/.
3.9. Preparing our test store
Now that we had a look at all settings of WooCommerce it’s time to start adding products to our store. Before we do so, there are a couple of things that we need to do before moving on:
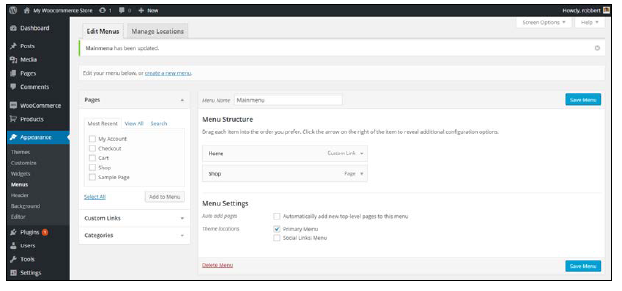
- We need to add a link to our Shop in our menu. To do this, navigate to Appearance | Menus in the WordPress admin menu on the left. In your menu, add the Shop page to it. The simple example below shows a menu with only the home page and the Shop page assigned to it:
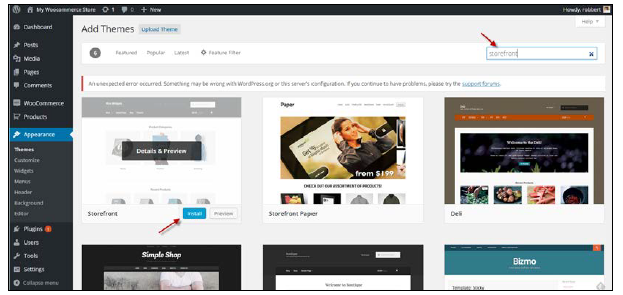
- Since we are working on a clean installation of WordPress, it’s wise to install a WooCommerce compatible WordPress theme. Don’t worry yet if you have an existing website and don’t know if your theme is compatible with WooCommerce—we’ll cover that later on. Only do this if you started with a clean install and want to follow along. In our demo store we simply install the free theme named StoreFront, which is a standard and good starting point for new WooCommerce users. The theme has been developed by the developers of WooCommerce themselves. Navigate to Appearance| Themes and click Add New. Type Storefront in the search box and hit Enter. Click the Install button and activate the theme after installation.