Now that WooCommerce is up and running and we had a look at its settings it’s time to start creating a couple of products and build our online store. WooCommerce offers several possibilities to create your product catalog. In this article, we’ll stick to the basics. You’ll learn to:
- Setting up product categories
- Creating your first product
- Setting the categories, tags, and images for your product
- Learning about the other product types
1. Setting up product categories
When setting up your product catalog, it often makes sense to create Categories for your products, even if you have not so many products. Using a clear category structure makes it easier for your visitors to navigate and search your store. Further on you can use Tags and Attributes in your product catalog. Categories and Tags work in the same way you’re used to from WordPress itself. Attributes are important for more complex product types. For instance, if I have a category for women’s dresses, I could add Attributes for size and color. We’ll discuss that in more depth in Chapter 3, Using Downloadable Products and Variations. Besides this, Attributes can also be used to add additional information to simple products.
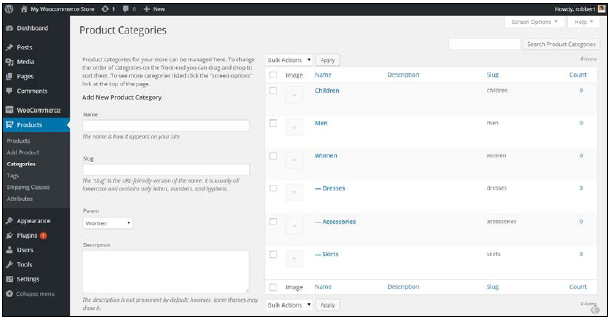
For now, we’ll just set up our category structure. Let’s assume we are going to sell apparel in our store. We could start with three main categories in that case: Women, Men, and Children. If you’re used to working with categories for (blog) posts in WordPress, you’ll have no problem in creating them for your products. To create categories, perform the following steps:
- Click in the left menu on Products | Categories. A form opens that lets you create a new category immediately.
- Just fill in the Name of your category. If you want to you may change the Slug field that is used to create the link to your product category. If you do not enter a slug, it will automatically be created for you. In that case the category name is used, where spaces are replaced by hyphens.
- Leave the Parent field to None. This is the first category we create, so automatically this field gives you no other choice.
- You may use the description for your own purposes. There are themes that actively use the description of the category, but that isn’t always the case. Note that WooCommerce does not accept the usage of shortcodes and/or HTML in the description field.
- It’s possible to add a thumbnail image to your category as well. Also in here, it depends on the WordPress theme whether or not this image is used on the product category page. If your theme doesn’t show them, more experienced users can change the theme code to add them: http://docs.woothemes. com/document/woocommerce-display-category-image-on-category- archive/. Still in doubt? Don’t worry, you can always come back later here and adjust the settings of your categories.
- Hit the Save button to store the category.
Now that our first category has been created it’s easy to add some more. Also we can create the next levels, by choosing one of the top categories for the Parent field. A simplified category structure could look like this:
2. Creating your first product
Once we’ve created some categories, it’s time to start entering our first product. Click Products | Add Product in the menu on the left. Looking at the categories we created, most of the products will require sizing and colors as well. That’s something we’ll discuss later on, so for now we are going to create a simple women’s belt in the category Accessories.
In the example below you’ll see that we already pre-filled a lot of information, just to give an idea of the fields you need to start with:
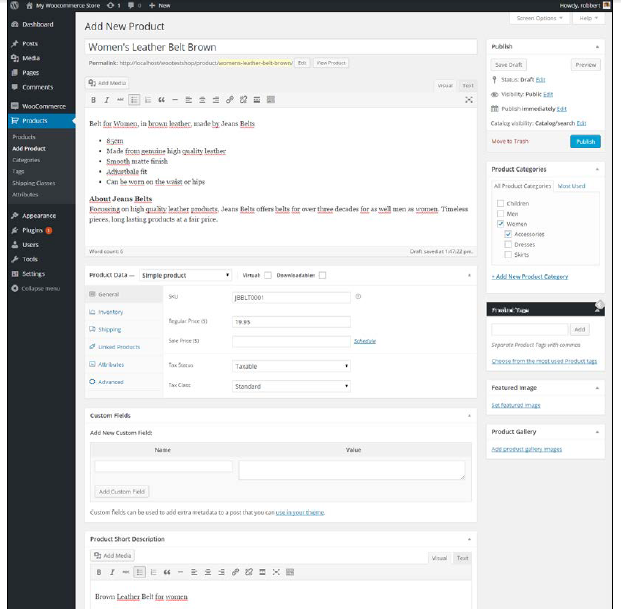
Let’s have a closer look at all the available fields:
- Start with the product name on the top. Make sure to use important key words in this field. The permalink will automatically be created, just as with regular WordPress posts, but you may change it if you want to.
- In the editor underneath that, you may type the description of your product. Please note: this is the long description, which will be displayed at the bottom of your product page! The Short Description is more important, because that one will be displayed near your Add to Cart button. Strangely enough, this field can be found at the bottom of this page. You can move it to another spot on the page by dragging it, but you cannot move it above the long description. Also, in both description fields, make sure that important key words are mentioned to improve rankings in the search engines. It makes sense to fill both description fields at once and continue with all other product data after that.
- Below the description fields, there’s an area containing a lot of fields that are important to understand. Using this area, you can control how your product will behave.
2.1. General data
The first tab in the area with product data is active by default and is named General. Just above that, you will notice that it’s possible to select a Product Type and that there are two checkboxes available: Virtual and Downloadable. These are all items that will be discussed in Chapter 3, Using Downloadable Products and Variations. For this moment, we’ll stick to the Simple products. These are suitable for anything that is a regular, physical product, without the need for the buyer to choose options or variables. For instance, a t-shirt available in different sizes is not a simple product, but a variable product. Let’s take a closer look at the available fields for our simple product:
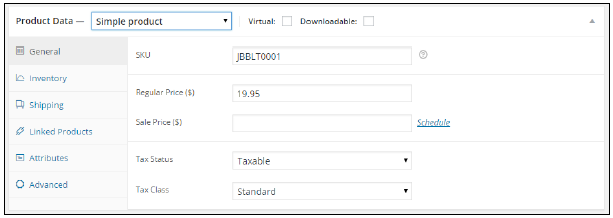
The parameters in the General tab are as follows:
- SKU stands for Stock Keeping Unit, also referred to as item- or article number. You may choose one yourself or just use the codes your supplier is using. Make sure to use a unique code. In most themes the SKU is also shown to the customer.
- The Regular Price is the sales price of your product, that your customers will see in the front end of your store. In case of a promotion you may use a Sale Price, for which it’s also possible to enter a Schedule, so that the offer is only valid on certain dates.
- Depending on the settings you chose earlier in Chapter 1, Setting Up WooCommerce, for calculating taxes, you should choose whether or not the calculation of taxes is applicable for this product using the Tax Status. If a product is Taxable, also select the correct Tax Class. Using the Tax Class it’s possible to work with different tax calculations, based on the type of product.
2.2. Inventory data
Moving to the next tab, we’ll find a couple of settings that control the way we’re handling stock levels for this product:

The parameters in the Inventory tab are as follows:
- First, decide if it’s necessary to manage stock levels at all for this item. It’s not always necessary to do so, if you’ve a small shop with only a couple of items. If you check the Manage stock? field, the Stock Qty field automatically becomes visible. In there enter the stock level you have available at the moment of creating your product.
- Decide if you want to be able to accept backorders from your customer if an item is no longer on stock. If you do, consider that customers might start asking you questions about the delivery date of the item they ordered.
- Next, make sure that the item’s Stock status is set to In stock.
- Finally, there’s a parameter named Sold Individually. If you check it, your customers will only be able to add one of this item to their order.
2.3. Shipping data
Sometimes you need to be able to add additional information to your product, because shipping possibilities or rates might depend on the weight and size of your product.
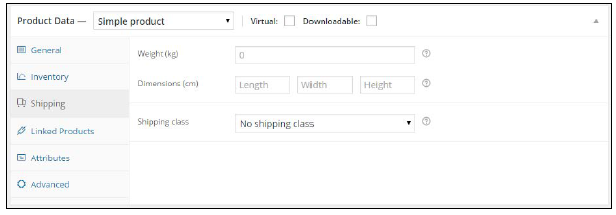
The parameters in the Shipping tab are as follows:
- Just enter the Weight and Dimensions if they are important for shipping, or if they are important for your customers to know. Note that premium carriers like for example UPS or FedEx require this information in most cases. The weight and dimensions are shown on the product page to your customer. Remember that the units of measure for the item’s weight and dimensions can be set in the WooCommerce settings page.
- Select a Shipping class if the shipping rates are depending on the product that is being sold. More on shipping calculations will follow in Chapter 4, Payments, Shipping, and Coupons.
2.4. Linked products and attributes
Since this is our first product, we can skip the Linked Products and Attributes tabs for this moment. We’ll use those later on.
We’ll be using attributes a lot during the next chapter, when we’ll be discussing more complex product types. The usage of attributes often even makes sense for simple products. Attributes offer a way to store structured product data in a way that it can be used for searching and filtering products. Instead of entering for instance the fabric as text, we could create an attribute for it. Using that method will give more possibilities to your customers to filter your product catalog. Besides that the attributes will be shown to the customer in the front end on the product page, in the More information tab.
3.1.2.2.5. Advanced data
There are a few interesting fields in the Advanced tab:
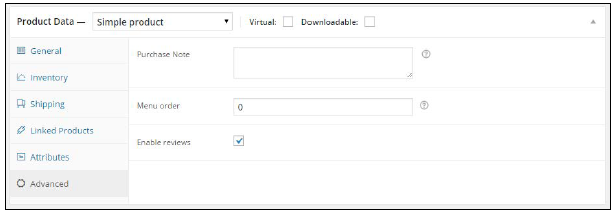
- The Purchase Note will be included in any order for this product. It will also appear on the Order Receipt e-mail your customer will receive.
- Using the Menu order, you can influence the way your products are ordered. Note that this function depends on the settings you made during Chapter 1, Setting Up WooCommerce, If the Default Product Sorting field in your WooCommerce settings has been set to Default sorting, the Menu order field becomes active. You can enter any numeric value into this field, where the product with the lowest value will be displayed first on your shop page.
- Make sure that the Enable reviews field is checked. Having good, genuine reviews on your store is an important reason for potential customers to buy as well.
3. Setting the categories, tags, and images for your product
We’re almost there now. Under the product data section there’s a possibility to use custom fields that we also know from regular WordPress posts. We do not need that now. Always first try if you can solve your need using the standard available Attributes and Tags.
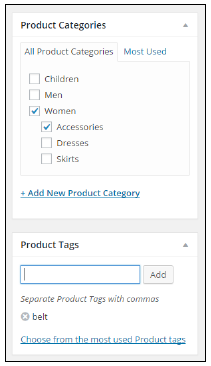
So far we’ve just used the main part of the product creation page. On the right there are the well known fields to publish the item. But before we do, we first need to take care of some other data, starting with the Product Categories. Just as with any regular WordPress post, just click the categories your product belongs to. Note that it’s possible to select more than one category.
Next, set the Product Tags by entering them in the field and just press Enter. Don’t use too many tags per product, stick to using a few. Having too many tags might lead to duplicate content, because the chance of having multiple pages with the same content increases in that case.
In the next screenshot you see an example of as well the selected categories as some tags that were entered for this product.
Below the Product Tags, there are two areas that allow you to add two of images to your product: the Product Gallery and the Featured Image. Before we start adding images, let’s go back to the first chapter. Remember that we crossed a couple of settings that influence our image sizes? If you want to go back there now, first save your product as a draft and then go to WooCommerce | Settings | Products | Display using the menu. The image settings are on the bottom of that tab:
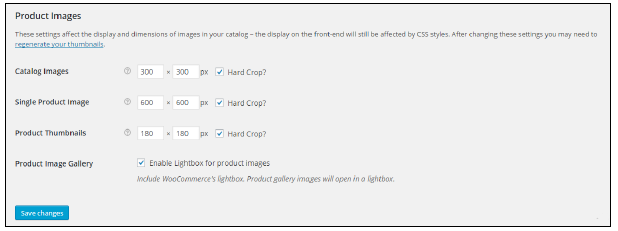
There are three image sizes that will be used by WooCommerce:
- Catalog images is the image that is used in your category and tag pages, when visitors are browsing through your product catalog
- Single Product Image is shown on the product page, showing a single item
- Product Thumbnails are only shown in your cart and checkout
It is important to use the same ratio for all three sizes. It’s not mandatory to keep the width and height the same, the portrait format (where the value for width is smaller than the value for height) is often used as well, especially on fashion websites.
The check box at the field hard crop means that if you upload an image with a different ratio, they will automatically be cropped to the correct ratio as set here. This might mean losing a part of your image. Therefore it’s always good to just prepare your images before uploading them to your website. Use the correct image ratio and use an image size that is at least as large at the dimensions of the Single Product Image.
We’re heading back to our product to start adding our images. The first and most important image is the Featured Image. Just add that by clicking on the link Set Featured Image. This will open your media library, just like you are used to from creating WordPress posts or pages.
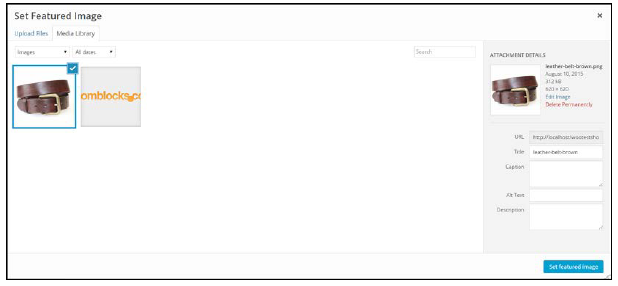
Click Select files and open a single image from your local machine. Don’t forget to set a Alt Text and Description. Those are important for search engines! Then click the Set featured image button on the right. You’ll return to the product maintenance page. If you have multiple photos available, don’t hesitate to add those as well. Lack of good product photos is for sure a conversion killer. Click Add product gallery images and add the images you have available. Again, also for these images fill the Alt Text and Description fields. The result looks something like this:

We finished the most important steps for our product and can publish it on the top right by clicking the button Publish. Of course we also want to have a look at the result in the front-end of our store. You may open the product page directly by clicking the button View Product on the top of the product screen.
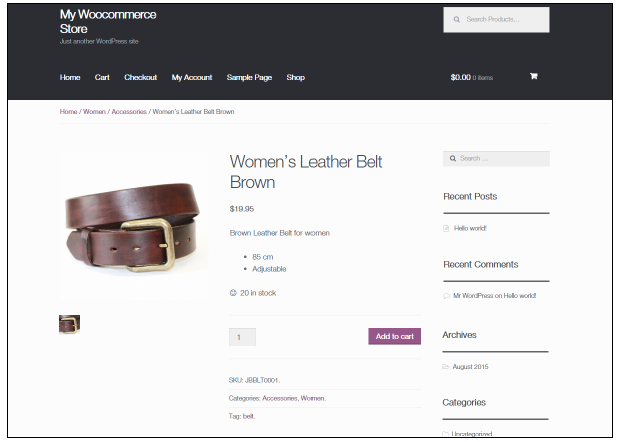
Since we are using the default Twenty Fifteen theme here, the layout of the page is okay but not more than that. Things could be better if we’d used an optimized WooCommerce theme. More on that topic will follow during Chapter 5, Working with WooCommerce Themes.
4. Product visibility options
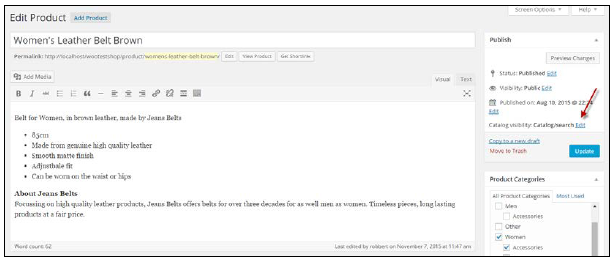
When publishing our product there are some more options that we can use to influence the behavior of WooCommerce for this product. First navigate back to your product and edit it. On the top right we see several default WordPress fields, that we already know from regular posts like Status, Visibility, and Published on. The behavior of these fields is exactly the same as for a regular WordPress post and gives you the possibility to control if and when a product becomes visible.
Next, click on the Edit link near Catalog visibility, as shown in the following screenshot:
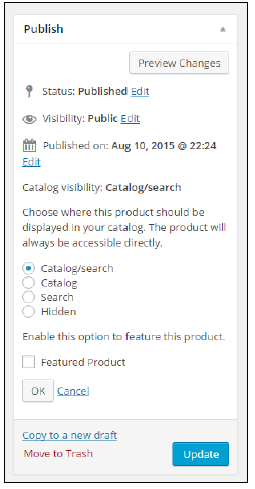
The default value, Catalog/search will have as result that:
- Your product is shown on the shop and category pages
- Your product will be shown in the search result if a visitor is searching for it The other possibilities are:
- Catalog: In this case the product appears on the shop and category pages, but it will not be shown in search results.
- Search: In this case the product is not shown on shop and category pages. It can only be found by a visitor by searching for it.
- Hidden: A product with the value hidden will never be shown to your visitors and is only accessible if you know the exact URL. This can be handy if you would like to offer a product to for instance your e-mail subscribers, but do not want to make the product publicly available.
Just above the Ok button, there’s a checkbox to make your product a Featured Product. Featured Product allows you to showcase specific products in different parts of your online store. You can for example show featured products in a slider on your homepage or in a widget. We’ll show those possibilities later on in this book:
Remember to click the Update button if you make any changes to your product.