Up until now, you have been working with individual Posts and Pages, but what about managing them on a site-wide basis: finding materials, making large-scale changes, importing content, and so on? That’s what this lesson is all about.
On the Island Travel site, for example, I might want to see which Posts are in the Jamaica Packages category, but scrolling through hundreds of items would be time-consuming. Or suppose I want to add a Tag for the name of an airline to every Post that mentions that airline. If dozens and dozens of Posts meet that criterion, to open each one, add the tag, and then update would be a painfully long process. But in this lesson, you learn how to perform tasks like these with a single action.
1. Finding Posts And Pages
If your site is new or relatively small, finding Posts isn’t too much of a problem. But as you add more content, it can be a hassle to find items, especially 2 years later.
By default, WordPress displays listings of Posts and Pages in reverse chronological order—the newest items first—and it shows you 20 items at a time. Though you can increase the number of items displayed at one time using your Screen Options button at the top right, more efficient strategies exist for finding material than simply scanning long lists.
1.1. Finding Posts
The starting point for finding posts is the Posts ➪ All Posts link on the main admin menu. You already know that this brings up a list of your Posts, but look closely at the top area of the screen, as shown in Figure 1. You can see a menu containing all or some of the following: All, Published, Draft, Private, Pending, and Trash. (If there’s nothing to show, the menu item won’t be there.)
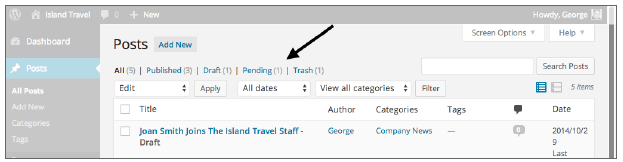
FIGURE 1
These menu items are filters for choosing what’s displayed on your list of Posts. The numbers in brackets, of course, refer to how many there are of that type. Maybe you want to see only your Drafts or you need a list of what’s in your Trash. If the number next to “All” does not equal the total of the others, it’s because Trash is not included.
On any list of Posts, you can re-order them by clicking the title of certain columns. The default order is by date, with the newest posts first, but you can sort by Title, Comments, or Date, either ascending or descending.
Often you’ll want to find a listing of all Posts in a particular Category. There are two ways to do that:
- In the Categories column, if you click the name of a Category, you’ll get a list of only the Posts in that Category. You can do the same with Tags.
- At the top of the screen is a drop-down to View All Categories, and from it you select the one to view. Click the Filter button when you’ve made your choice.
You can also restrict your list to Posts from a certain month. That’s the drop-down next to Categories. Again, you need to click Filter after choosing a month.
If you know the name or part of the name of a Post, you could use the Search function to find it. It searches only the titles of Posts, not the body or tags and so on. Also, the search is performed on only the Posts you’ve included through any filtering. So, if you’re viewing posts in a particular category, the search is performed only on those posts.
Just below the Search box are two icons. The one on the left produces the List View that you see by default. The one on the right is Excerpt View, and it displays a short excerpt from each Post, which is helpful if you can’t remember what a Post was about. However, mostly I don’t use it because the excerpts take up a lot of space, and you end up doing a lot of scrolling.
For mobile users with narrow screens, the listings page is greatly simplified, as you can see in Figure 2.

FIGURE 2
In addition to the general filters at the top, there is still a search function, but at the bottom of the list.
1.2. Finding Pages
Finding Pages is slightly different from Posts because there are no Categories or Tags to choose from, as you can see in Figure 3.
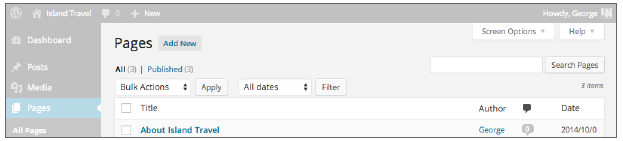
FIGURE 3
You also don’t have the Excerpt View option.
There is still a drop-down date filter, and you can filter pages by their status—Published, Draft, and so on. You can sort the results on the screen by title, author, and date, and you can perform a search for words or phrases.
There are plugins that enable you to customize what information is shown on both the Post and Page listings screens; some are mentioned at the end of the lesson.
2. Using Quick Edit
There’s a very powerful feature on Post and Page listing screens that enables you to change parameters—title, author, status, allowing comments, and so on—without going into the actual Post or Page. It’s called Quick Edit, but it’s only visible when you mouseover a list item, as shown in Figure 4.

FIGURE 4
When you click Quick Edit, it opens up an area within the list item, as shown in Figure 5 A (Posts) and Figure 5 B (Pages).
There’s quite a lot you can change through Quick Edit. Remember to press Update on the right after you make any changes.
For mobile users, Quick Edit has all the functionality available on wider screens, but just stacked vertically, as Figure 6 demonstrates.
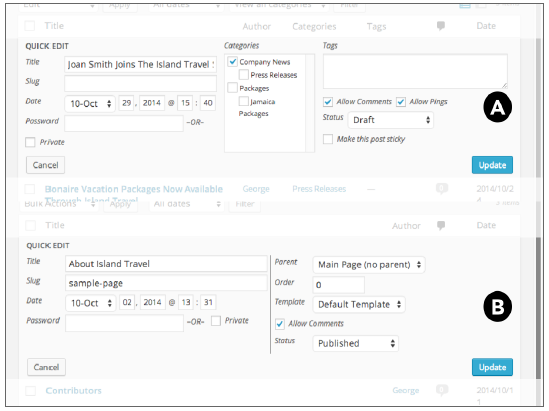
FIGURE 5
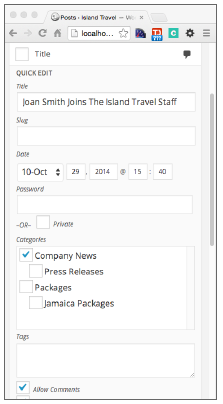
FIGURE 6
3. Using Bulk Actions
There will be many times when you need to perform the same action on a few or even dozens of Posts or Pages. That’s when Bulk Actions comes in handy. It’s the drop-down at the top left of listings’ screens, as shown in Figure 7.
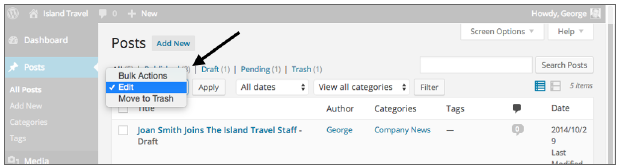
FIGURE 7
Bulk Actions works by checking the box next to any number of list items, choosing an action, and clicking Apply. And this applies to mobile devices as well. The two choices you have for Posts and Pages are Trash and Edit.
3.1. Move to Trash
If you have to clear out a lot of items at one time, this is handy. Suppose Island Travel stopped offering any packages to a particular country. I could filter all Posts in that category, check the box next to Title, and all of them would be selected. Then I can just choose Trash from Bulk Actions and click Apply.
3.2. Edit
The advantages of the Quick Edit feature are available in a more limited form using the Edit function of Bulk Actions. Here’s how that works for Posts and then for Pages.
Bulk-Editing Posts
Suppose you create a new Category under Packages for the city of Kingston and you want to add all relevant Posts to that Category. With Bulk Edit you do not need to leave the Post listings screen.
Check the box next to each Post you want in the new Category. After choosing Edit from Bulk Actions and clicking Apply, you see the screen in Figure 8.

FIGURE 8
On the left side of the highlighted area is a list of all the Posts you checked. Beside each is a circle with an X; clicking that removes the Post from the edit, so there’s still time to change your mind.
Then simply check the box for Kingston Packages under Categories, click Update, and you’re done. Every Post you edit will now be in the new Category. Keep in mind that for the Categories and Tags, you can add them only to Posts using Bulk Actions; there is no bulk removal.
Following are the Bulk Edit functions you can simultaneously perform on a group of Posts:
- Assign to one or more categories
- Add one or more tags
- Change the author
- Allow or disallow comments
- Change the publishing status
- Allow or disallow pings
- Stick or unstick
- Change the Post Format
Bulk-Editing Pages
The Bulk Edit feature on the Pages screen is more limited than the one for Posts, as you can see in Figure 9.
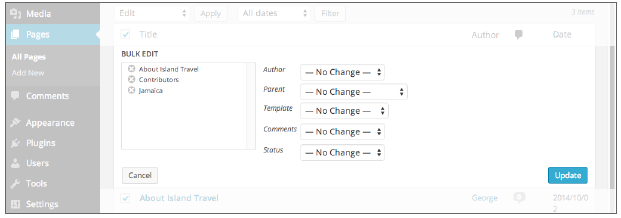
FIGURE 9
Following are the possible parameters you can bulk edit for Pages:
- Change the author
- Assign a parent page
- Assign a page template
- Allow or disallow comments
- Change the publishing status
If you wanted a section of your site to have a different look, you can also assign the Pages of that section to a specific page template you create. Lesson 1, “Thinking Like WordPress,” discusses having thousands of web pages use a different header. Bulk Edit, along with a customized page template, is the means for making such a large change fairly simple.
4. Importing Content From Another Site
It may be that you’ve been running a blog on a popular blogging platform such as WordPress.com (the hosted version of WP), Blogger, Typepad, and others. Even if it’s just a dozen or so posts, that’s a lot of material to be copying and pasting to your new WordPress site.
Fortunately, WordPress has a powerful set of import tools, which you can find under Tools ➪ Import on your admin menu, as shown in Figure 10.
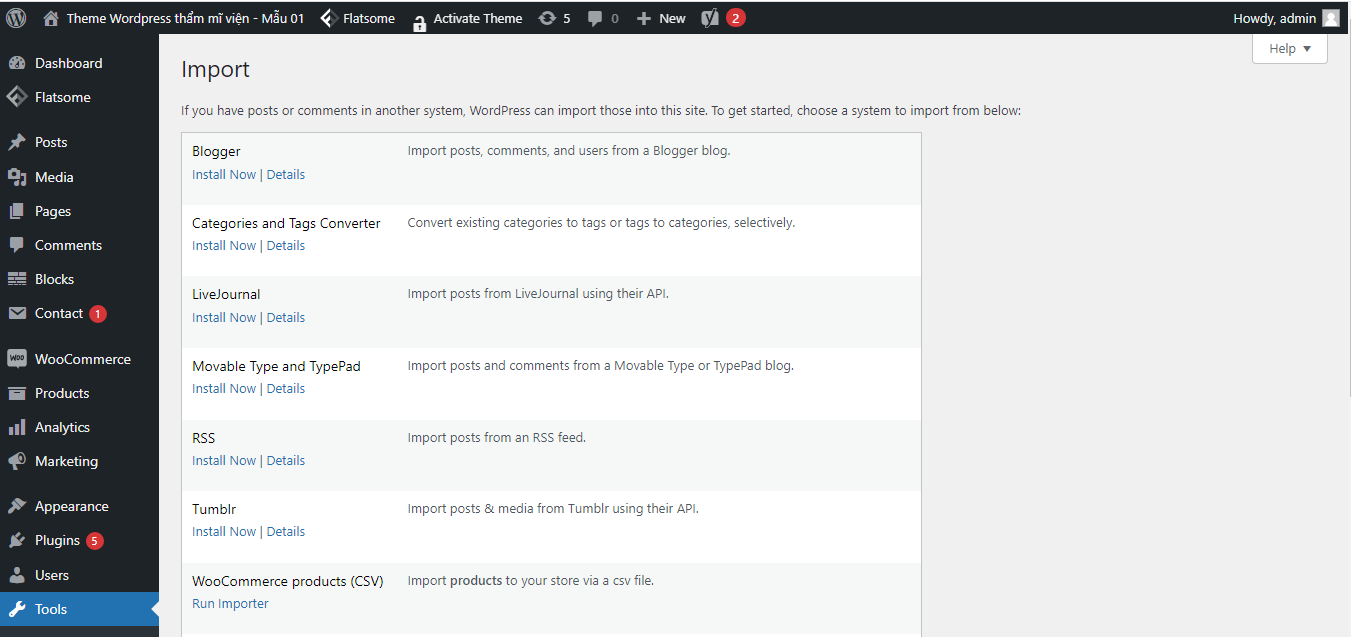
FIGURE 10
Following is the full list of current tools:
- Blogger
- Blogrolls (sets of links from other sites)
- Categories and Tags Converter (for within your own site, which Lesson 20, “Managing Post Categories and Tags,” discusses)
- LiveJournal
- Movable Type and TypePad
- RSS
- Tumblr
- WordPress (other self-hosted installations of WordPress or from WordPress.com)
When you click any of these, you’re asked to install a plugin, which is easy—just click the Install button. At that point, you’ll have a set of instructions, which includes details of how to prepare your content on the old site or blog for importing. For example, on WordPress.com blogs, there’s an Export I won’t go into the details of each of these import functions—they all run roughly the same way as just described, except for the Categories and Tags Converter, which Lesson 20 covers. The point is that you have a fair number of options for bringing in materials from other sources. You can also search the WordPress plugins directory for other plugins that can handle the import process for sources not covered in this admin screen.button that produces a text file that you save to your computer.
The Import function on your new WordPress site prompts you to find whatever file was created by the export process on the old site and upload it. At that point, you’ll be asked some questions about how you want to import the data; for example, do you want the authors created if they don’t exist already or do you want to map an author to an existing author?
I won’t go into the details of each of these import functions—they all run roughly the same way as just described, except for the Categories and Tags Converter, which Lesson 20 covers. The point is that you have a fair number of options for bringing in materials from other sources. You can also search the WordPress plugins directory for other plugins that can handle the import process for sources not covered in this admin screen.
5. Admin Settings Affecting Posts And Pages
You can also affect Posts and Pages in general through several areas of the Settings menu.
5.1. Allowing or Disallowing Comments
This setting was mentioned in Lesson 5, but it’s worth repeating here because it directly affects Posts and Pages. By default, WordPress allows comments on both. If you look under Settings ➪ Discussion near the top, you see a check box that says Allow People to Post Comments on New Articles
(Articles is just another way of saying Posts and Pages). This check box is active by default, but you can turn it off any time.
There’s a reminder with this setting telling you that, no matter what you do here, comments can be controlled on an individual basis for each Post or Page. In other words, if they’re turned off for the site as a whole, you can turn them on for individual Posts or Pages and vice versa.
Some themes have options enabling you to control comments separately for Posts and Pages. There are also plugins that offer this more fine-grained control, as mentioned at the end of the lesson.
5.2. Assigning Your Home and Blog Pages
By default, the homepage or front page in WordPress consists of the 10 most recent posts from all categories. However, you can change that on the Settings ➪ Reading screen, which is shown in Figure 11 A.
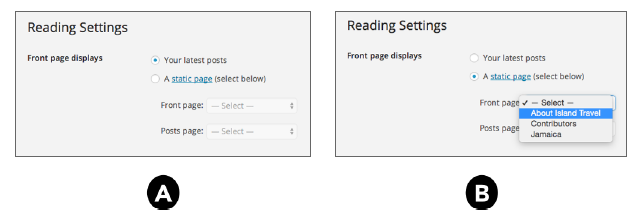
FIGURE 11
You can see the default setting for the front page is Your Latest Posts. The other choice is to make one of your WordPress Pages the site’s homepage, by clicking A Static Page and choosing from the drop-down menu next to Front Page (as shown in Figure 11 B).
Although it’s clear enough what choice you’re making for Front Page, it may not be obvious what the second drop-down—Posts Page—is for. If you think about it, when you choose one of your Pages to replace the default homepage structure, there’s no longer a place for people to find all your latest blog posts in one location. That’s what the Posts Page drop-down is for. It takes the Page you choose from the menu and replaces it with your most current blog entries.
5.3. Other Admin Settings for Posts and Pages
On the Settings ➪ Writing screen, you can change the following:
- Default Post Category.
- Default Post Format. If your theme supports these, a list of available formats display here, and you can choose which one will automatically be used for new Posts. Of course, you can still change the format for any individual
On the Settings ➪ Reading screen, you can change the following:
Blog Pages Show at Most. The default is 10 posts. Keep in mind that this setting affects not only the homepage (if it shows Posts) or the Posts Page if you’ve set that, but also any listing of Posts showing anywhere.