One of WordPress’s greatest strengths is the user-friendliness of its administration interface. From both an organizational and a design standpoint, it’s laid out in a way that’s intuitive. As with any system, of course, you need to take some time and learn how it works, where things are, and so on, and that’s what this lesson is about: helping you become familiar with the WordPress Admin Area.
1. Logging in
At the end of the installation process, you’re either sent automatically to the default login page, as shown in Figure 4-1 A, or there will be a link to take you there.
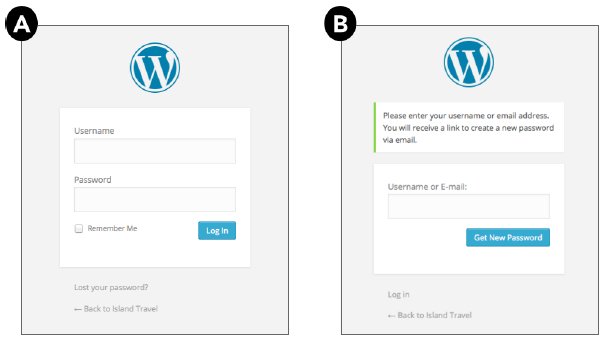
FIGURE 4-1
It’s a good idea to bookmark this page in your browser. Some themes include a login link – often in the footer area – but even without a bookmark or a link, you always have this fallback: add /wp-admin to the end of your site URL, like this: http://yourdomainname.com/wp-admin
This takes you to your login screen. Of course if you installed WordPress in a subdirectory, you’ll add /wp-admin at the end of that subdirectory URL.
Logging in is a matter of entering the username and password you chose during the installation process. If you forget or can’t find your password, there’s a link on the login page for setting a new password, as shown in Figure 4-1 B. You can use either your e-mail address (the one given during installation) or your username to set a new password. In either case, the instructions for setting the new password are sent to that e-mail address, so always make sure it’s a functioning address. In Lesson 5, “Basic Admin Settings,” you learn how to keep your e-mail address up to date through your Profile.
As mentioned, during installation the importance of having a strong password is the best way of protecting yourself from hackers. If you do reset your password, WordPress has a strength meter: Pay attention to it. There are other ways to make your login process more secure, which are discussed in Lesson 34, “Keeping Your Site Secure.”
One option you have during login is a check box that says Remember Me. By selecting that option, the cookie that WordPress always creates when you log in will last for 14 days instead of the default 2 days. This is particularly handy when you’re first setting up your site and likely to be coming back to it over the course of many days.
Logging into WordPress means you’re going into the administrative area of your website: the back end. This is where you create content, update content, control the look of your site, add or remove functionality, and much more. The admin area of WordPress is well laid out and easy to use, but you need to become familiar with it, and that’s what this next section is all about.
2. Navigating The Admin Area
The first time you log in to WordPress, you get a welcome message at the top of the Dashboard screen, as shown in Figure 4-2.

FIGURE 4-2
The Welcome to WordPress! area provides beginners with helpful links to key areas of WordPress for starting the site. You can dismiss the welcome area, but it is well worth leaving in place until you become more familiar with the software.
2.1. The Main Admin Menu
The most important tool for getting around WordPress is the main admin menu (Figure 4-3 A), which is on the left side of all admin screens. Get to know this menu. One of the most common problems is users simply being unsure of where to find what they need.

FIGURE 4-3
The first level of the main admin menu shows all the admin sections. When you’re in one of the sections, its submenu items display as well. When you mouseover any other menu item, you see a fly-out menu with all the links for that section (Figure 4-3 B). When referring to one of these submenu items, the following convention is used: Main Admin Menu Item ➪ Sub-Menu Item. So for example, to edit post categories, you see, Click Posts ➪ Categories.
If the entire main admin menu is visible in your browser window, it stays in place as you scroll through other content on the screen. If part of the main admin menu is not visible, it automatically scrolls as you use the browser’s scrollbar.
After you’re familiar with the main admin menu, you might find it unnecessary to see the names of each of the main admin menu items, or you simply might want the screen to be less cluttered. In that case you can collapse the main admin menu so that it looks like Figure 4-3 C. (The collapse button is highlighted.) If you mouseover any of the icons, the submenu items appear as usual, complete with full names (refer to Figure 4-3 D). If your browser window becomes narrow enough, WordPress automatically collapses the main admin menu.
On mobile devices, WordPress’s admin area shifts to a single column with a menu icon at the top left, as shown in Figure 4-4. When you tap the icon, the full menu appears. Just tap the icon to collapse the menu again. When you tap a top-level menu item, the submenu slides down rather than becoming a fly-out to the right. The submenu remains open until you tap the parent again, and you can have as many submenus stay open as you want.
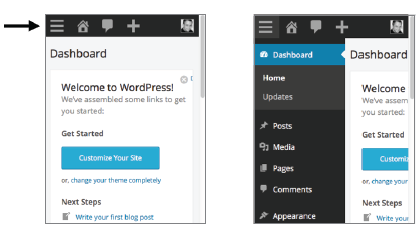
FIGURE 4-4
2.2. The Toolbar
The toolbar is at the top of WordPress admin screen (Figure 4-5).

FIGURE 4-5
The Toolbar provides additional navigation for the admin area, including (from left to right) the following:
- Links to WordPress.org, the Codex (documentation), the support forums, and a feedback page
- A link to the front end of your site
- An icon indicating how many comments await moderation
- A quick link menu for creating a new Post, adding Media, creating a new Page, or adding a new User
- Your user display name (here it’s the username), your profile photo, and links to your Profile and to Log Out
As with so many elements of WordPress, this toolbar will vary according to what theme you have and which plugins. You can turn off the toolbar for the front end of your site (see Lesson 5, “Basic Admin Settings”) but not for the back end or admin area. And, as mentioned at the end of this lesson, there are plugins to give you control over what’s on the toolbar.
3. The Dashboard
Whenever you log in to WordPress, the first screen you see is the Dashboard, which is the homepage for the administration area. In default mode it consists of five modules, or widgets (as they’re some- times called). Here they are referred to as boxes.
You saw something of the Dashboard earlier when you saw the Welcome to WordPress box. It’s meant for beginning users, although many people leave it in place permanently as a reminder of functions they can perform. The other four boxes on the page basically summarize what’s going on with your site and in the world of WordPress.
I don’t use the Dashboard much. I do pay attention to the At a Glance box because it tells you the version of WordPress and whether you’re blocking search engines from indexing your site. (Lesson 5 explains when you might want that turned on.) I also keep an eye on WordPress News because it talks about new versions, security issues, and so on. Other than that, I don’t spend much time with the Dashboard.
For others with busy blogs, the Dashboard has a handy summary of your recent activity, the latest Comments and whether some need approval, and a running total of your Posts, Pages, and Comments. And if you need to jot down some notes for a possible Post, there’s a box for writing a Quick Draft.
However, the Dashboard may do a lot more, depending on your theme and the plugins you have. An e-commerce plugin, for example, may show your recent orders, whereas an SEO plugin may show you some statistics.
For all these reasons, the Dashboard is a personal admin screen that can vary greatly from one WordPress installation to the next. There’s another way the Dashboard can be personalized: by physically changing the screen. Actually, most admin screens have this capability, but the next section illustrates the tremendous flexibility you have with WordPress.
4. Customizing Admin Screens
Here are some common ways you can structure admin screens to suit your needs, using methods built in to WordPress. At the end of the lesson I mention some plugins that provide additional customization options.
WordPress screens are divided into boxes; each one performs a function or set of functions. Most boxes enable you to customize them in one of four ways:
- Minimize a box.
- Show or hide available boxes using Screen Options.
- Reposition a box.
- Change the number of columns of boxes.
4.1. Minimizing Boxes
To minimize or collapse a box, click anywhere on its header area, as shown in Figure 4-6.
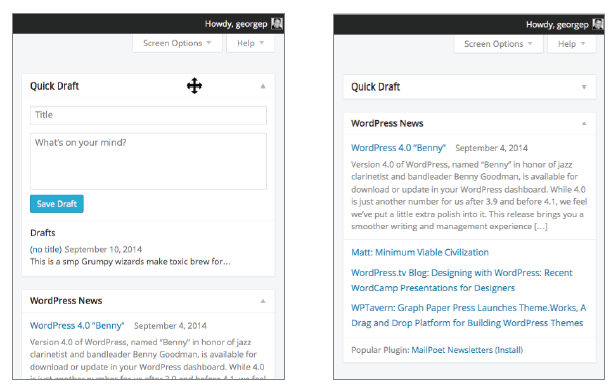 FIGURE 4-6
To restore the box, click again in the header area. This is handy when you need the box out of the way temporarily. After you minimize the box, it stays that way even if you leave the screen and come back. It won’t restore until you click the header.
4.2. Hiding or Showing Entire Boxes Using Screen Options
You can completely hide (or show) a box from the Screen Options button at the top right of the screen, as shown in Figure 4-7. Dropping down this area allows you to pick and choose from the boxes available for that screen.
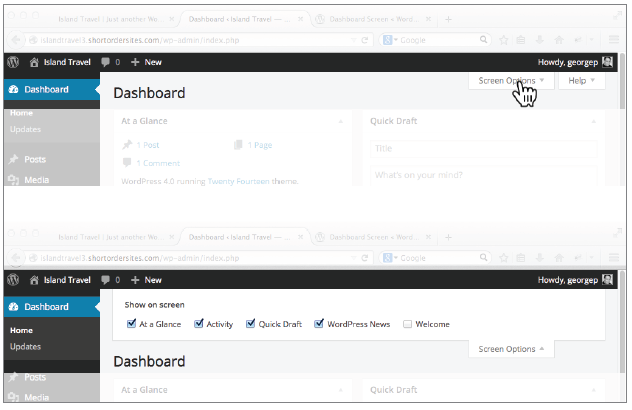
FIGURE 4-7
Checking a box makes the element appear, and unchecking it makes it disappear. What’s nice is that this happens in real time, so you can see what the change looks like before closing Screen Options.
Again, the boxes available for a screen vary tremendously depending on your theme and plugins. The key is to remember that Screen Options exists. If you’re not seeing something on a screen that’s mentioned in instructions or shown on a video, remember to check Screen Options. If a box that you remember from a few months ago is not showing on the screen, remember to check Screen Options.
Screen Options can also control more than just box visibility. You learn about these additional functions throughout the book, but here’s one good example: On screens that list items such as Posts or Pages, you can customize how many display on one screen by going to Screen Options.
4.3. Repositioning Boxes
The third way to customize the display of boxes is to physically move them around the page. For example, if you don’t use the QuickPress feature much, but often read the WordPress News, you can switch places by moving them around. On Post screens you can move the Featured Image box up to the top to remind you whether you assigned a featured image yet.
All you do is mouseover the header of the box and you’ll see the cursor change to the hand icon or crossed arrows icon, depending on your operating system. At that point, you can click and drag. (For mobile, hold your finger down on the header and drag.) As the box moves from its original location, a rectangle with dashed borders appears when your cursor approaches a point where the box can be dropped, as shown in Figure 4-8.
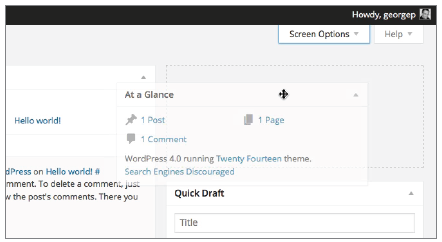
FIGURE 4-8
When you see that dashed outline in the spot you want, release the mouse button, and the original box now appears there. It will remain there until you move it again.
4.4. Changing the Number of Columns
The fourth way to customize the admin screen is to change the number of columns available to display boxes. By default, WordPress displays admin screen boxes in two columns on a desktop, laptop, or large tablet, whereas smaller tablets and smartphones default to one.
On most screens, the only choice is between one or two columns, but some offer up to four columns. You can find this under Screen Options. Because WordPress now adjusts to one column automatically if your browser is below a certain width, the column feature is less important, but there may be situations in which you want this kind of manual control.
5. Getting Comfortable
The point of this lesson has been for you to become comfortable with the WordPress admin screens. In addition to slowing you down, being uncomfortable with any software has an even worse effect: You stop using it. A website is a living, growing, adaptable tool for your business (or your personal life) and unless you keep working on it, it will die. And the more you work on it, the better it becomes. Don’t let your website suffer because you don’t “get” WordPress.
Part of what makes people feel uncomfortable with technology in general is the fear that they don’t know everything about it—they don’t know all its functions. Many people using WordPress only know how to write some content, add an image or a video, and press Publish. They learned only what they needed.
There’s a sense in which WordPress is its admin screens. No matter what you need to do with WordPress, you need to find your way around, adapt the admin screens to your working style, and understand the “language” of WordPress. It’s another part of learning to think like WordPress, the concept introduced in Lesson 1, “Thinking Like WordPress.” And the more you can think like WordPress, the more comfortable you’ll be using it.
The next lesson starts to shape WordPress into the tool you need by adjusting some administrative settings—or you at least learn where to go if you need to change those settings later.