Our first product is available and we could easily continue using the same method to create multiple products in the same way. However, WooCommerce offers more possibilities than we just learned. In this chapter, we’ll cover the following topics:
- Working with tags
- Virtual products
- Downloadable products
- Using attributes
- Setting up variable products
- Grouped products
1. Working with tags
We’ve mentioned the usage of product tags already in Chapter 2, Creating Your First Products. Using tags works exactly in the same way that you’re used to when writing WordPress posts. So in here, we do not want to spend too much time in explaining the concept.
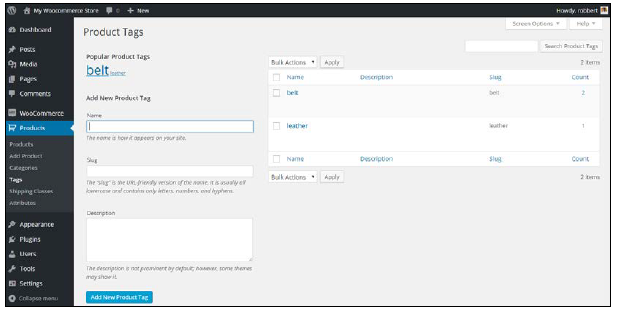
Just be aware that Product Tags and Tags for Posts are actually separated from each other. You may find the tags that you already used by navigating to Products | Tags in the menu on the left-hand side of your screen. Note that the tags that you entered during product creation appear here. Besides that, it’s also possible to create a list of tags immediately in the Edit Product screen and use them later on. In general, when using a new tag, always ask yourself: Will this be a tag that I’ll use more often?. If the answer is yes, go ahead and use it. If the answer is no, then it’s better not to create that tag.
2. Virtual products
This product type is used for non-physical products. Use it to sell services, for instance. Virtual products will not be shipped, and as soon as you mark a simple product as virtual, the Shipping tab will disappear from the Product Data area. Besides that, if a customer only buys one or multiple virtual products in their order, the shipping address will be removed from the Checkout process:
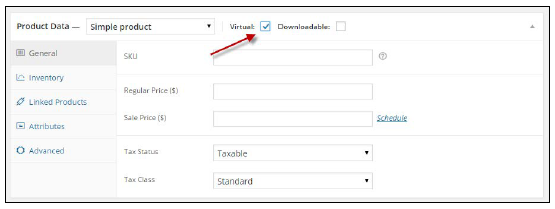
Note: In the preceding screenshot, the Virtual field can only be set for a Simple product. If you need a variable product to be virtual, that’s still possible but not using this field.
3. Downloadable products
If you have digital goods to offer to your customers, WooCommerce supports this using the Downloadable product type. Often, you’ll also want to mark these items as Virtual since you won’t physically ship anything. On the other hand, if your item will be as well downloaded as shipped, you should not check the Virtual field. An example could be a book that is physically shipped, but where the buyer also receives a downloadable copy.

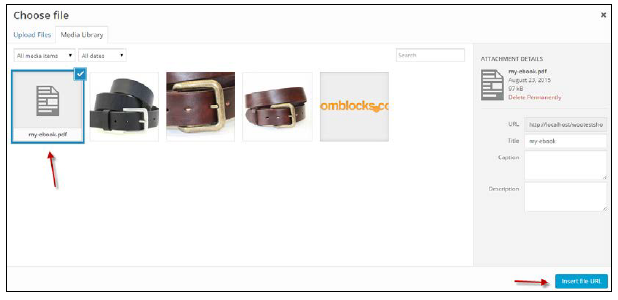
Once the Downloadable field has been checked, new fields become available in the General tab. Click on Add file, followed by the Choose file button to upload, and attach a digital file to your product:
You may also set the Download limit, which determines how often a customer can come back to download the same item again.
Besides that, you can set the Download expiry. Fill in the number of days that the download stays available for your customer after purchase. By default, both fields are blank, which means that there are no restrictions and your customers can always come back to download the purchased items again.
Finally, the field Download type can contain the value Standard Product, Application/Software, or Music. If there’s no fit for your product then leave it to Standard Product. This field controls the markup of your product page. To the end user, this field isn’t visible, but it will tell the search engines what type of content the product contains. Unfortunately, the book type isn’t supported in WooCommerce yet. More information can be found at http://schema.org/docs/schemas.html.
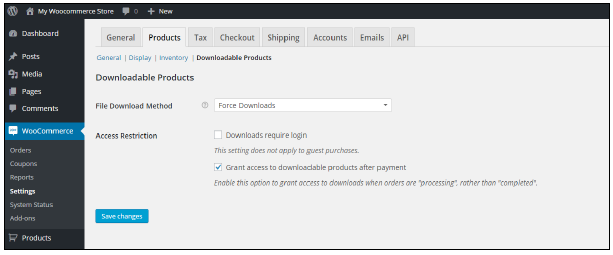
When your customer purchases a downloadable file, a link to download the item will be sent to the customer via an e-mail. But only if you enabled this e-mail in the WooCommerce settings. The link will also become available in the My Account section for that customer.
Whether or not a customer is forced to create an account in your store depends on the settings. Head over to WooCommerce | Settings | Products to check the settings for Downloadable products. See Chapter 1, Setting Up WooCommerce, for more information on these fields.
More information on using Downloadable products is available at the WooCommerce documentation website: https://docs.woothemes.com/document/ digitaldownloadable-product-handling/.
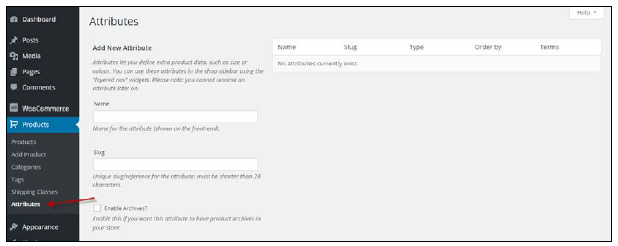
4. Using attributes
At first glance, attributes look like tags when we’re accessing the function using the menu, Products | Attributes:
However, there is an important difference between Attributes and Categories. Attributes deliver a powerful mechanism to create different kinds of products. Besides that, working with Attributes is often smarter than working with Categories alone. Categories are used to organize entire products, whereas Attributes are a way of organizing product properties. Let’s start with an example to clarify this.
Our simple product that we created earlier (the Brown Women’s Belt) could easily be put in a category structure like: Women | Accessories | Belts. But that would give us all available belts in your store, right? And not just the brown ones. Ok, so we’ll add another category for that! But no, although it is possible, it’s not the best way to do it. Using Attributes in such a situation for the color is much more powerful. It will give your visitors the possibility to immediately filter all brown products once they’re in the Accessories category so they can mix and match. Using categories for describing the color of your product is really a no-go. In other words, a category is a group in which a set of products can be bundled together. An attribute is a specific characteristic of a product. Other products may share that characteristic (for example, multiple products can be a medium size or have a brown color).
Since the usage of colors in our fashion store example is something that we’ll need for sure, we are going to create that Attribute.
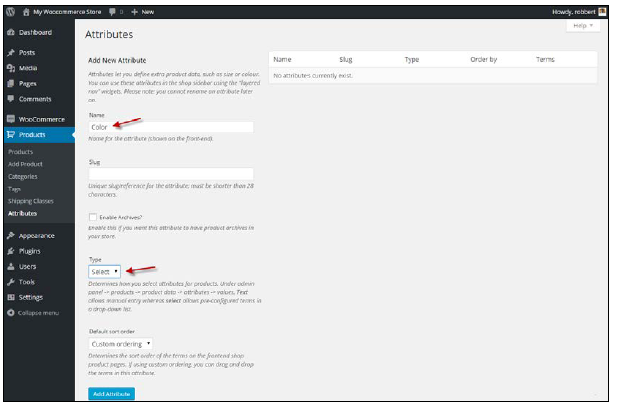
Creating an Attribute is very simple. Just enter the Name of the attribute (Color, in our example). You may leave the Slug field empty, it will automatically be filled based on the name of your attribute. Next, make sure that the Type field is set to Select. If you would set it to Text, it will give you the possibility to add values for every single product manually. Using Select will make sure that you enter and standardize the values beforehand. In most cases, using Select is the better choice.
The Enable Archives checkbox may stay switched off. This field allows you to create separate pages based on your attributes. So for instance, a page holding all the products in your store that are black. This can be handy, but also requires some additional coding to reach the desired result.
Leave Default sort order to Custom ordering so that later on, we’ll be able to sort our Attribute values in the way we want to.
Click on the Add Attribute button:
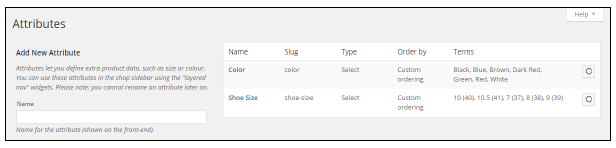
Now that our Attribute has been created, it appears in the table on the right-hand side of the screen:

Click on the button on the right to Configure terms.
Next, add all the colors that you will possibly need in your store. Don’t worry though, it’s always possible to come back later and add more. For every color, just enter the name and click on Add New Color. You’ll soon have a long list of colors available. Remember that these colors will be used later on, when we’re creating new products.

Once done, go back to the Attributes form again by clicking in the menu on the left. Now repeat the preceding steps and create a new Attribute named Size or Shoe Size. When working with sizes, there are a lot of different possibilities, so you might want to distinguish the sizes depending on the products that you are going to use them for. We create Shoe size to support our next example. Our result looks like this:
Now that we created some attributes, we’ll be able to create a Variable Product.
5. Setting up variable and grouped products
We’ve just created our first attributes that we’ll use to add some shoes to our women’s fashion store. Of course, we do not want to display all the sizes as individual products. We want to show our visitors one product and let them choose the right color and size. This is done using a variable product. To create a variable product, perform the following steps:
- Start by creating a new product. Add a long and short description, select the correct category or create one, and assign a couple of tags. Set a featured image that will appear in your product category page.
- Next, in the Product Data area, select Variable product as the product type:
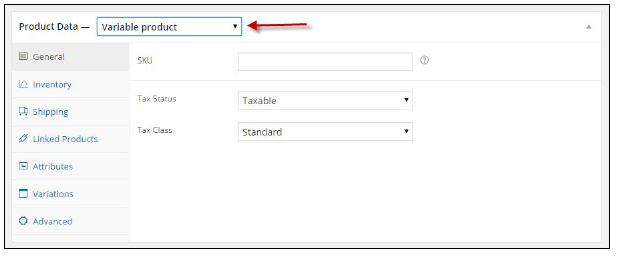
- Note that some fields have disappeared; it’s no longer possible to add the product price here. The SKU field is still available, but normally, you would leave it empty and set individual SKUs at a lower level. We’ll see that in a minute. On the Inventory tab, Enable the Manage Stock? field, but do not set the Stock Qty field. Later on, we’ll add the stock levels for individual products. Skip the other tabs for now and head over to the Attributes tab:
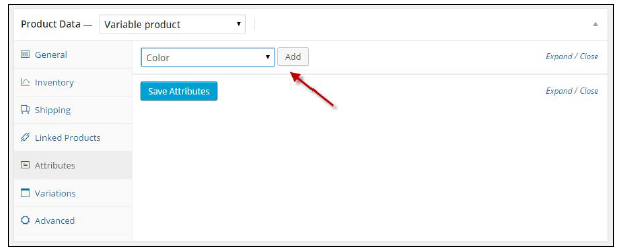
- Click on the drop down that says Custom product attribute, select Color, and click on the Add button.
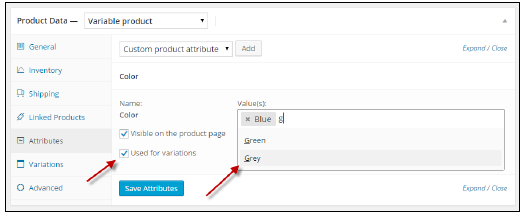
- Next, check the fields, Visible on the product page and Use for variations. This will make sure that our visitors will be able to see this attribute, and we’ll be able to create multiple instances (variations) of our product using different colors.
- On the right, click into the Value(s) field and select the colors that you want to use for this product. To keep things a little bit simple for our example, we just select Blue and Grey:
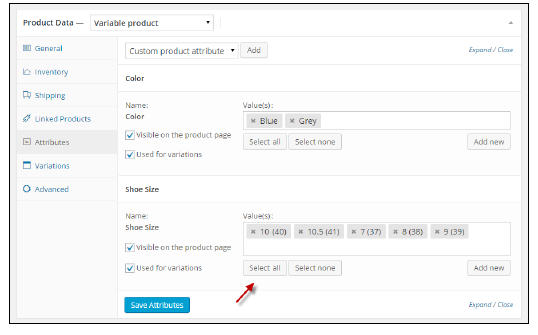
- We repeat the same steps for our Shoe Size attribute, but now we push the Select All button to immediately select all the available shoe sizes. The final result will look as follows:
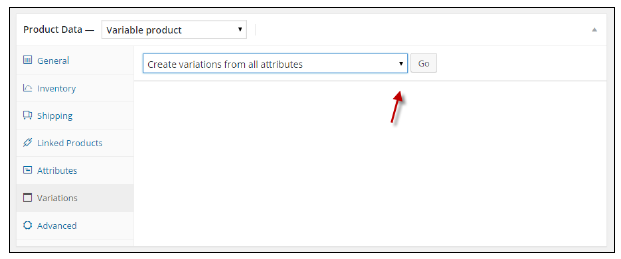
- Click on the Save Attributes button on the bottom left of the Attributes tab. Or alternatively, save the draft of your product in the top-right corner of the product screen. Next, head over to the Variations tab. If you forget to save your attributes before moving on to the Variations tab, the following error message will appear:

- Return to the Variations tab and note that now some fields have become visible. Click on the drop down and select Create variations from all attributes to assign all the possible combinations of colors and sizes at once. It’s also possible to add them one by one in case you do not have all the possible combinations of the attribute values available. Click on Go:
- WooCommerce will give you a warning message because this may create a large number of combinations (two colors having five different sizes makes a total of 10 variations). Click on Ok. Another message appears mentioning the number of created variations. Click on Ok again.
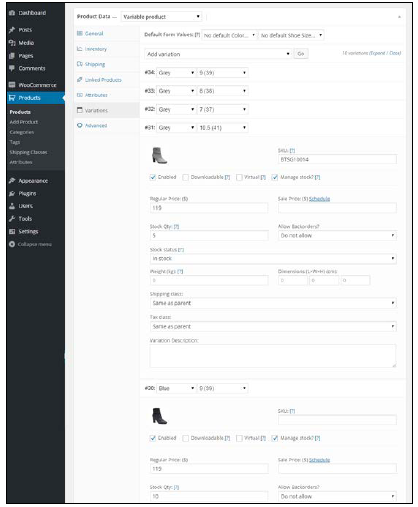
- A large area with all the variations will now be displayed. Click on one of the rows to expand all the underlying fields of that variation. Note that it’s now possible to set a number of fields for every variation individually. The price may differ, the available Stock Qty may differ, and you can set an individual SKU for every variation. It’s also possible to assign a different image per variation. Start filling in your variations individually. If a field is set to the value Same as parent, then the variation holds the same value as the parent item.
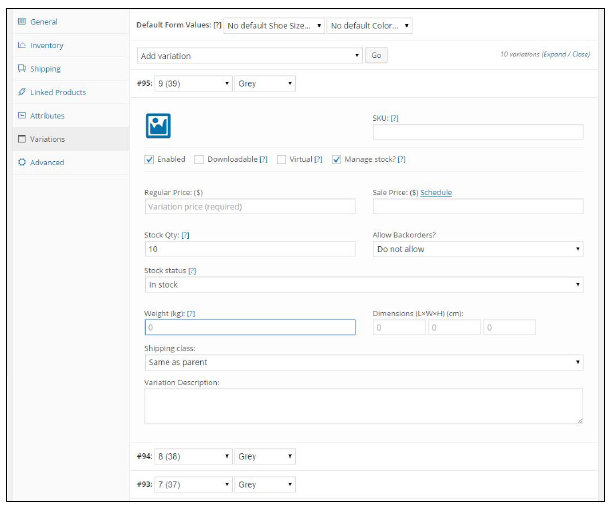
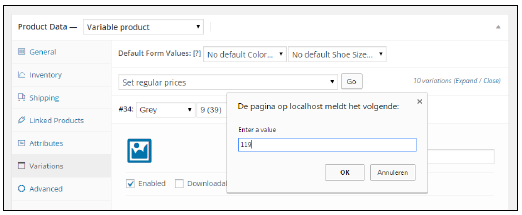
- You may also use the handy Bulk Edit function on top to change fields for all the variations. That function is a bit hidden in the current WooCommerce version, but you may find it by clicking the drop down at the top that currently still says Create variations from all attributes. For example, when creating our demo shoe product, generally all the sizes will have the same sales price. We could enter them one by one for every variation, but it’s much faster to do them all at once using the function, Set regular prices:

- We normally work this way to set everything we need, but your situation may differ depending on your products of course:
- Set the field Regular Price for all the products at once using the Bulk Edit function.
- Click on the little image area to set a separate product image per variation. In our demo product, we need this to be able to show a different image depending on the color that the user chooses. So, if the user selects the shoes in blue, we want that automatically the product image changes to the blue variation. You reach this by assigning an image to every single variation.
- Set the SKU, Image, and Stock Qty individually for every variation, assuming that the stock quantities are not all the same.
- The following image below shows the Bulk edit option to change the regular sales price for all the variations at once:
- The result should look something like this:
- The last step that we have to take now is to publish the product in the top-right corner of the screen.
- Now that we published our product, of course, we want to see the end result in the frontend:
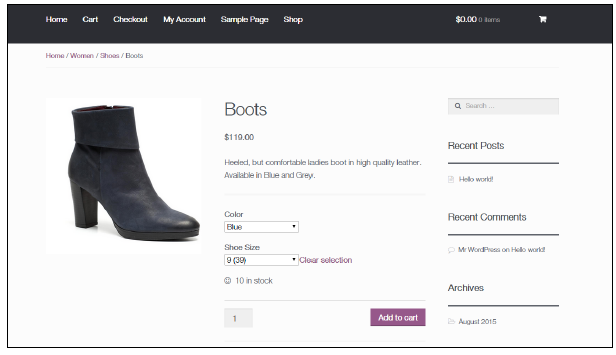
Note that the image that is shown automatically updates if the visitor selects a different color. If that doesn’t happen, in your situation it’s a problem of the WordPress theme and not an issue in WooCommerce. Are you thinking about changing the way this product page looks like? In Chapter 5, Working with WooCommerce Themes, we’ll learn how to adjust the look and feel of our store.
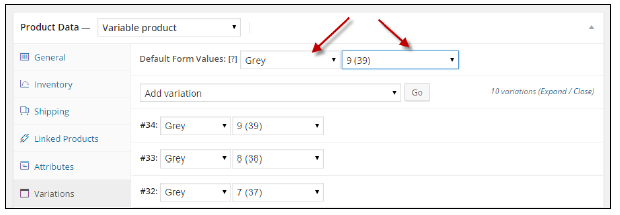
You probably noticed that the Add to cart button does not become available if no variation has been chosen yet. To overcome this problem, you can set a default form value for your product in the backend so that it will be displayed immediately:
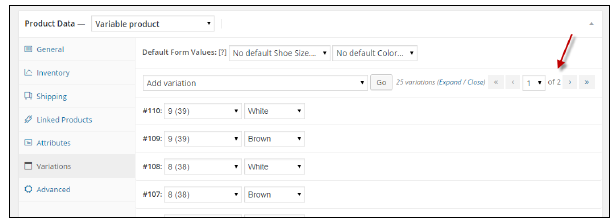
When working with a product with lots of variations, there’s something important that you need to know about the product page your visitors see. Because of performance reasons, WooCommerce does not load the availability of all the variations if you have over 20 variations in a single product. In such a case, the attributes of the variation will be loaded using Ajax once a variation is selected by the user. This might mean that the user sees a certain color or size, but that it actually isn’t available anymore. WooCommerce will show a message to the user in that case. Below 20 variations this issue doesn’t exist.
Also in the WordPress administration, this limitation of 20 variations becomes visible. Pagination has been added on the top and bottom of the list with variations.
This has been done to make sure that the number of items that must be loaded at once is manageable. Loading lots of variations was a former issue within WooCommerce, where products became very slow in the WordPress backend. This has been solved as of WooCommerce version 2.4.
6. Other product types
If you paid some attention to the screenshots earlier in this chapter, you would have noticed that there are even more product types available in WooCommerce. Besides Simple and Variable products, we can create the following:
- Grouped products: Think about a package, like for instance, a complete set that contains a computer, monitor, and mouse. Or a fashion set that includes a dress and matching shoes.
- External/Affiliate products: This is a special kind of product, which is actually sold on another website.
6.1. Grouped products
To create a grouped product, just simply select the type at the top of the Product Data area:
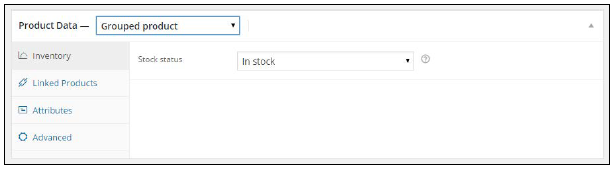
Fields that are no longer necessary will be removed. For instance, note that for a Simple product, there are various settings to control the stock levels. For a Grouped product, this isn’t the case. You can only set the group to in stock or out of stock.
Unfortunately, it’s not possible to set a sales price for the group. In your product catalog, WooCommerce will display From $xx, where xx is the price for the individual item with the lowest sales price. The final price that your customers pay will be calculated automatically, by adding the total sales prices of the individual products that your customer selects. In fact, the grouped item will display the individual items of the group together. Your customer is still in control of the items that will be put in the basket. Finish your product and create individual (simple) products that will belong to this group.
When creating the individual products for your group, please note the following:
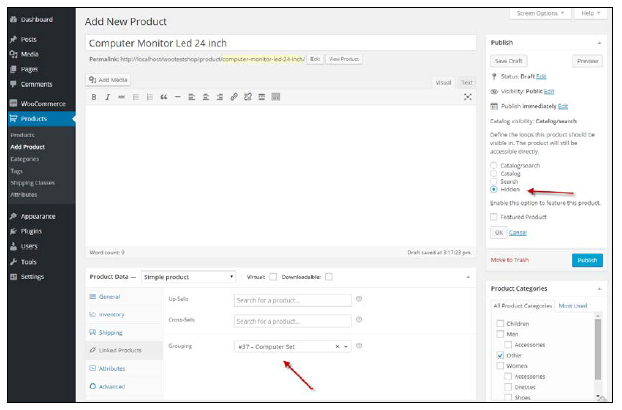
- Do you want to sell this Simple product individually as well or only as a part of the Grouped product? Depending on your needs, set the appropriate value in the Catalog Visibility field in the top-right corner. In this example, I’ve set the visibility to Hidden so that this product can only be sold as part of the group.
- To link your individual product to the group, click on the Linked Products tab and select the correct grouped product by typing a part of its name:
The end result of the grouped product in the frontend could look as follows:
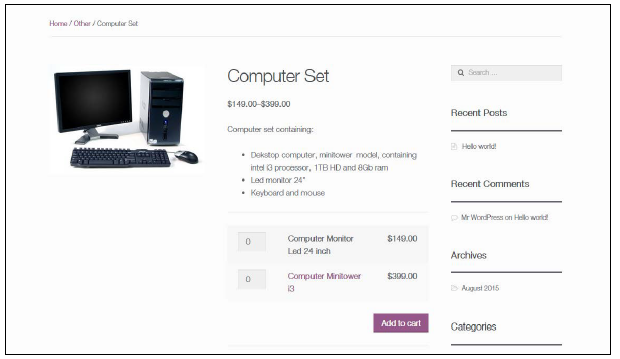
Note that the user has to enter the number of items he wants for every simple product. Often, that doesn’t make sense. If you need more functionality for your grouped products, then you’ll have to add additional plugins to WooCommerce.
6.2. External/Affiliate products
This last product type that WooCommerce offers is a special one. As you probably know, affiliate marketers promote products of other websites. Using this product type, you can create products that are actually sold elsewhere. As a site owner, you’ll often earn a percentage of the sale. This product type is popular among bloggers since it gives them the possibility to monetize their blog without having to create a full featured online store and keep stock levels themselves.
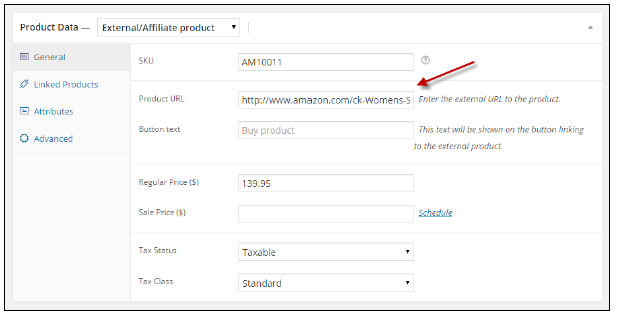
When creating such a product, the Product URL is the most important field. It redirects the visitor to the store that the product is actually sold in, including a unique code. Using this code, the seller will know that this buyer came from your website and you will receive your affiliate fee if that customer closes the sale.
If you use your products in this way, the buyer will no longer be able to add an item to the cart. They will simply be redirected to the original store.