1. Overview of WordPress Themes
One of the biggest advantages of a content management system is the ability to easily change the look of your site without having to redo all your pages, and WordPress makes it easy with its use of themes. With thousands of themes (free and paid) to choose from, the question is this: How do you choose?
The key to choosing a theme is not to be taken in by looks. That sounds strange to say when one of the principal tasks of a theme is to control the look of your site. But when you understand what themes do and how they can differ widely, you’ll understand that “looks aren’t everything.”
1.1. What is a wordpress theme?
A theme is a set of files, graphics, and scripts that, most obviously, controls the look of your site: layout, colors, typography, and so on. However, behind the scenes, these theme files perform an equally, if not more, important job.
Think of WordPress as a set of functions waiting to be used—functions that pull information from a database, manipulate it, organize it, and display it. It’s your theme that makes use of those functions to output the content that’s stored in the database, and at that point applies the design elements.
WordPress themes have two distinct roles:
- Functionality
- Design
Figure 1 A shows the default Twenty Fourteen theme for Island Travel with a lot of files to run the site, of which only one is solely devoted to looks—the CSS style sheet.
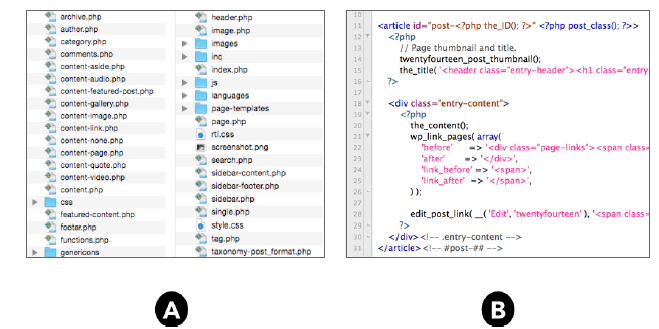
FIGURE 1
Figure 1 B shows some of the coding in a theme file that uses WordPress functions to get content and settings from the database.
Plugins also use WordPress’s functions—to add Facebook-like buttons, show random content in a sidebar, and so on—but the basic functionality of a site is controlled by the theme.
In the last few years an explosion has occurred in the ways themes use and extend WordPress functions. In particular, themes have increasingly modified the back end or administrative screens so that your WordPress and my WordPress can be quite different. Just as some people use more or different plugins than others, the theme used by one person can provide far different administrative options and site functionality than the theme used by someone else. For example, Figure 2 shows four very different options screens from two different themes.
Increasingly these days, when people ask me questions about using WordPress, the questions turn out to be about how their particular theme works. Unlike the elements of WordPress that we all share, these sophisticated add-ons put us in different places for how we use the software. That’s not a bad thing; it’s just a noticeable change from the world of WordPress only a few years ago.

FIGURE 2
1.2. Choosing A WordPress Theme
My rule of thumb for picking a theme is:
Quality, functionality, and flexibility first, design second.
The reason? It’s much easier (read, lower-cost) to make a site look exactly the way you want than it is to make the quality of coding better or create new functionality (especially easy-to-use functionality).
Having said that, one of the must-have features for themes today is responsive design, which means, it displays well on any size of device screen. An alternative is to use a theme-switcher plugin that displays a different theme (and even different content) to mobile devices, but a quality responsive design is as effective and a simpler option.
DIY Design?
One of the features that a lot of people are impressed with in a theme is the ability to quickly switch layouts and change colors, fonts, and all kinds of design elements through easy-to-use interfaces.
Don’t get me wrong, I think a lot of these do-it-yourself design interfaces are not only cool, but also extremely well-thought-out and brilliantly engineered. But think about design for a moment: How often do you need to change colors and layouts? And if you do it often, should you? Does it help you get and retain visitors or does it confuse them?
The point is that these useful tools are great when you’re first setting up a site and they enable you to change your mind a lot, but after you settle on something, how often do you need them again? And, not to be too blunt about it, maybe you should be hiring a designer to set up some of these things, anyway—they have an eye for it.
I know, I’m back to the “functionality is a bit more important than design” rant, but that’s because it’s those functions that you’re going to use day in and day out. A theme that makes it easy to create and manage your own custom widget areas is more valuable than one that focuses on cool color wheels for picking the shade of your H2 headers. If the theme can do both, more power to it.
There’s also a part of me that worries about complexity in the back end. It takes a lot of programming to produce these amazing interfaces, and that’s just one more point at which something can go wrong. I would rather see simpler (but clear and usable) interfaces that produce good functionality on the site than be wowed by cool effects and massive back ends. OK, rant over.
1.2.1. Do Your Homework
The key, then, is not to grab the first theme you like the look of or that has a lot of fancy design functions. You need to check the theme’s and the theme-maker’s reputation:
- Does the theme appear on a number of Top 10 WordPress themes lists?
- Is it made by an author or a company who receives good reviews for other work?
- How many people are downloading it (if it’s available at WordPress.org) and what are they saying about it in the forums?
- Put the question to the forums—what are other people experiencing with this theme?
This sounds like a lot, but this theme is going to run your website (along with WordPress) hopefully for several years to come. It should be the backbone on which to hang all future design changes. You want to get this right.
You also need to ask questions based on your needs:
- Is it well built; does it offer the functionality you need (not simply for controlling the design); and is it flexible?
- What do you need your site to do, and will this theme help make that possible and easier?
- Is it worth paying a consultant for one-half hour to pick out a good theme with you? Following are a few more actions you can take to ensure you have a great theme.
Checking a Theme for Best Practices
What are best practices? It’s another way of saying “follows standards,” and just like there are standards for using HTML or CSS, WordPress has a certain way of doing things.
Using best practices is about making your experience, and ultimately that of your visitors, better. Part of it involves consistency: Using up-to-date WordPress coding means your theme isn’t going to cause conflicts and break, and using built-in WordPress tools rather than creating new ways to do something means you don’t have to spend time learning a new function.
Some checks for WordPress best practices are easy:
- Does it use the menu system?
- Does it use the header and background interfaces?
- Does it use the customize interface?
Others are not so easy to quickly spot. For example, I recently had a call from a client who couldn’t figure out how to change the header image on a particular page. It turned out that the theme they switched to used a special Custom Field for unique page headers instead of the built-in Featured Image function of WordPress. That’s just sloppy theme building.
Some sloppiness occurs at the coding level, so how is the average user to know when that happens? When WordPress is deciding what themes to put in its directory, it has a plugin to help assess the quality of the theme’s coding and other factors. You can download and use this plugin. It’s called
Theme Check, and even with themes approved for the WordPress directory, it can tell you some things to watch for, as shown in Figure 3.

FIGURE 3
The theme checker is pointing out that this theme does not style the Content Editor to look exactly the way your content will look on the live site. It’s also alerting you to possible issues with a link that’s coded into the theme. It turns out the link is harmless because it goes to the theme maker’s site, but it could just as easily have gone to some phishing site or other nasty place.
1.2.2. Important Theme Features
Following are some key features to look for in a theme, in addition to using built-in WordPress features and back-end design standards, passing Theme Check, having clear documentation, and so on:
- A lot of Widget areas, especially ones that you can place anywhere on the page. (Not the Widgets themselves, but the areas in which you can place Widgets.)
- Many front page control options—easy to update and control slide shows, user-selectable content areas (allowing you to put either a Post or Page, or custom Post-type content, into these areas).
- Several areas (or even the ability to easily create areas) in which you can have menus that use WordPress’s built-in menu system.
And what’s interesting is that when you find themes with these kinds of features, they’re usually good-looking themes, too. So design and functionality can live harmoniously….
1.2.3. Does This Feature Belong in a Plugin?
This is an important question to ask when looking at the features of a theme. And it’s easily answered in the following way:
If you need this feature even when you switch themes, it belongs in a plugin.
The classic example is Search Engine Optimization (SEO). There was a big push several years ago to include SEO functions within themes. At first it seemed so much simpler to have these functions available as soon as you installed the theme, but when people switched themes and suddenly lost all their SEO tweaks, well, a lesson was learned.
Following are some other examples of functionality that belong in a plugin and not in your theme:
- Social media follow and share buttons
- Contact or other forms
- Events calendars
- Portfolio items
- Special photo gallery functions or sliders
Now you might say that some of these functions also involve styling and won’t there be a clash with your theme? Well-written plugins will either automatically match your styling (because they use best practices for coding and naming) or allow you to easily change the styling to match your theme.
Of course, if an otherwise good theme happens to have some of this functionality, you can simply ignore it and use a plugin.
1.2.4. Theme-Recommended Plugins
A recent trend with WordPress themes is to recommend or even auto-install plugins. Figure 4 shows a theme suggesting several plugins and even offers to install them for you:

FIGURE 4
This can be a helpful feature given the large number of available plugins and the remote possibility they could clash with your theme. What the theme maker is saying here is that these are good plugins that work with this theme. However, recommended plugins might be ones theme makers are pushing for themselves or their affiliates, so you still need to check and see if those are good plugins.
Auto-installed plugins are another matter. Aside from installing something without my permission, I’ve seen some situations in which the theme will break if one of those plugins is removed. At worst, only some function of the theme should be affected, not the entire theme. The other thing to watch for with auto-installed plugins is that sometimes the updating process is not automatic for those plugins, and you have to do it manually with the potential to mess things up. These are just some of the reasons I’m not a fan of auto-installed plugins.
It can be user-friendly to have helpful plugins installed automatically, and not everyone wants to take the time to check if the plugins are good ones. Nevertheless, being offered the choice of having plugins installed for you is preferred.
1.3. Changing Themes
Although changing themes is as simple as clicking a button, it’s important to understand the implications. First, you will probably lose certain functionality by changing themes. I warned earlier about using theme functions that actually belong in a plugin, because switching themes loses that functionality, but here I’m talking about functions that do properly belong in a theme.
For example, consider one theme that may enable you to have a different header on each Page, while the one you switch to may not. Or consider one that makes it easy to switch off the date that displays with each Post, whereas the next theme may not.
One of the ways around this constant change in functionality is to use a theme framework.
1.3.1. Theme Frameworks
WordPress makes it possible to have Child Themes that work off the files of their Parent theme, adding only those files they want to change, most notably the style sheet. They’re used primarily to alter the look and feel of the Parent. (Lesson 29, “Advanced Design Customization,” discusses Child Themes.)
Many theme makers use this Parent-Child relationship to create Theme Frameworks. The themes they offer are the children of a single Parent theme, each offering a different design from the next.
Another way to think of a Theme Framework is the separating of functionality and design: The Parent in the Framework handles the functionality, and each Child handles the particular design. Some theme makers don’t explicitly separate Parent and Child, but within each theme they have a set of common files that essentially act like a Parent.
The advantage to you is that the back end of every theme running on the framework looks and operates the same way with only minor additions. So switching themes truly is a matter of just switching design.
1.3.2. Copy and Redesign
The other option that a lot of people aren’t aware of is that any theme can be made to look any way you want. In other words, if you like the way your current theme works or it has some customizations you’ve spent money on, you don’t need to throw it away just to have a new look.
Simply make a copy of your theme, give it a new name and new credentials, and then alter the design. Of course, that’s going to take knowledge of CSS and WordPress, but for anyone who knows what they’re doing, it’s a straightforward process. Lesson 29 discusses this more in the “Advanced Customization” section.
2. Theme Installation and Basic Customization
Up to this point in the book you have been working with the default WordPress theme. Now it’s time to install and activate the theme for the Island Travel site.
No matter which theme you choose, you need to customize the design, if only to insert your own logo or change some colors to better match your logo or branding. So this lesson also shows you some basic ways themes enable you to alter the look of your website without knowing CSS or HTML.
2.1. Installing And Activating A Theme
You need to understand that installing a theme is not the same as activating it. You can have many themes installed in your WordPress Theme Library, but you can activate only one of them at a time. The active theme is the one your visitors see.
You can install new themes and add to your WordPress Theme Library in two ways:
- Using the built-in theme selector for the WordPress.org Theme Directory
- Uploading the zip file for a theme, usually one you’ve purchased
To get to the Add Themes screen, however, there is no Add Themes link on the main Admin menu; you must go to Appearance ➪ Themes and click the Add New link at the top, as shown in Figure 28-1.
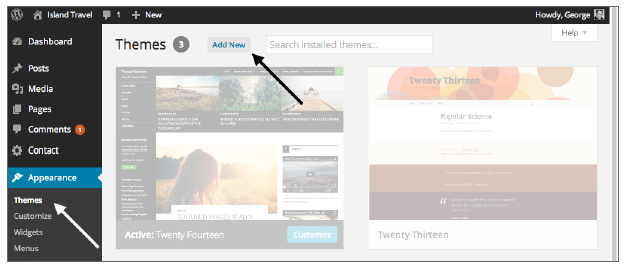
FIGURE 1
2.1.1. Searching the WordPress Theme Directory
What you first see when you get there is a series of screen shots of themes from the WordPress Themes Directory, as shown in Figure 2.
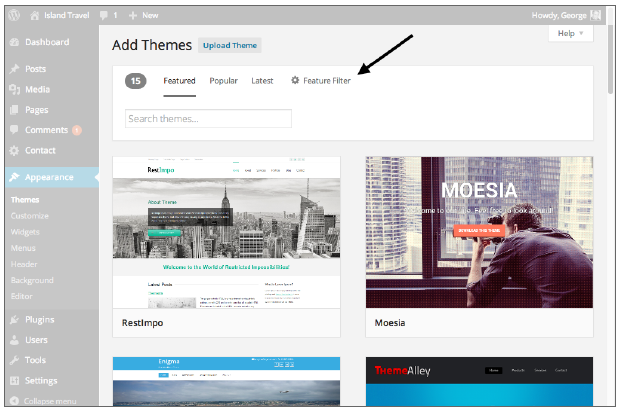
FIGURE 2
The default setting is to show the current Featured themes from the directory, but at the top of the screen I’ve highlighted a menu that also includes the most Popular and the Latest themes, which are self-explanatory. You can also search the directory.
But there’s also a link called Feature Filter that enables you to do a search according to all kinds of parameters, such as colors, layout, WordPress functions, and more. A portion of the filter system is visible in Figure 3.

FIGURE 3
However you look for themes in the WordPress Theme Directory, the great thing is that you can preview them from this screen simply by mousing over a screen shot and clicking Details & Preview or just Preview.
Depending on the browser width of your device and whether the theme has a responsive design, the resulting version of the theme varies. Part of this is the result of the details sidebar, as shown in Figure 4 A. You can collapse that using the lower-left corner button (expanded below Figure 4 A), which gives you more room and a different view of the theme, as shown in Figure 4 B.
One of the great features of this theme browser is that you can scroll between themes without having to close the window and return to the theme listings. Simply use the left and right arrows at the top of the details sidebar (as highlighted in Figure 4 C).
When you find a theme you’re interested in, simply click the Install button, either from within the theme browser or on the theme listings screen.
Remember, installing a theme simply makes it a part of your theme library; it won’t be visible to the public because it isn’t the active theme.

FIGURE 4
2.1.2. Uploading a Theme
The other method of installing a theme is to upload its zip file. When you purchase a theme from a commercial vendor, for example, you’ll be given instructions for downloading the zip file.
You can also go to the WordPress.org Theme Directory and download a theme’s zip file from there, but there’s not much point because you can install the theme using the previous method.
There are two key points to keep in mind when downloading commercial theme files:
- The zip file you receive may not be the zip file you’re going to upload to WordPress. Some vendors provide a zip file that contains instructions or graphics files along with the actual theme zip file. They should make this clear, but if WordPress rejects your zip file, that may be why; you just need to unzip the main file and use the zip file inside it.
- If your theme depends on a Parent theme, you should receive two zip files. You’ll need to upload the Parent zip file to WordPress first and then the Child theme zip file. Again, the vendor should make it clear that there are two files required, but WordPress will tell you if you’re missing a Parent theme.
To upload a theme’s zip file, you need to click the Upload Theme button at the top of the Add Themes screen, as highlighted in Figure 5 A.

FIGURE 5
And the resulting version of the Add Themes screen is a basic file uploading screen, as shown in Figure 5 B, where you select the file from your device and then click the Install Now button.
2.1.3. Activating a Theme
After a theme is installed, it’s available to be activated and made the theme that the public will see on your site.
When you’re on the Themes page, sometimes referred to as the Theme Library, the currently active theme is always displayed at the top left and clearly labeled, as shown in Figure 6.
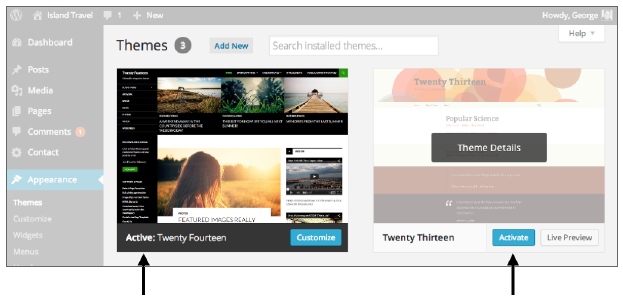
FIGURE 6
And when you mouseover any other theme that you have installed, a blue Activate button becomes visible, as you can see on the right side of Figure 6. Clicking the Activate button makes that theme live on your site.
But before you make any theme active, there are some tasks you need to perform.
When you switch themes, a number of key pieces of information are changed. In particular, the Menus and the Widgets you’ve chosen are tied to your current theme’s settings. When you make that theme inactive (by activating another), its settings are deactivated as well.
Another way to think of this is that the new theme you’re about to activate does not have any settings yet; it has no Menu settings and no Widget settings. (Although WordPress will try to put the Widgets from the last theme into what it thinks are equivalent Widget Areas in the new theme.)
You could, of course, just activate a new theme and then quickly add Menus and arrange the Widgets, but WordPress makes the whole process easier through its preview and customization function, which is just one of several native features of WordPress enabling you to customize your site’s design.
2.2. Built-In WordPress Design Functions
WordPress offers theme makers a number of built-in functions to make it easy for users to change the look of their site. The idea is to have a uniform interface for these functions, no matter what theme is used.
However, theme developers do not have to use these default functions, so they may or may not be active in the theme you use. In that case, themes tend to have their own Theme Options area, either under Appearance or with its own section on the main admin menu. (You saw some examples of these in Lesson 27.) Here I’m concerned only with the functions built-in to WordPress.
2.2.1. The Customize Interface
From Appearance ➪ Customize or from the Preview button on a theme’s listing in the Theme Library, a window displays, like the one in Figure 7 from the Twenty Fourteen theme.
On the right it shows a real-time version of the front end of your site; in this case, the width of the screen is forcing a tablet-width view of the Island Travel site. On the left you have elements of the site that can be changed. You see the changes as they’ll appear on the live site, but until you click the Save button, the changes are not actually applied.
What’s available to edit on the left side of the Customize screen is entirely dependent on your theme. Figure 8 shows Customize panels from three different themes.
Many of the options on the Twenty Fourteen theme are standard WordPress options that most themes include and are covered here.
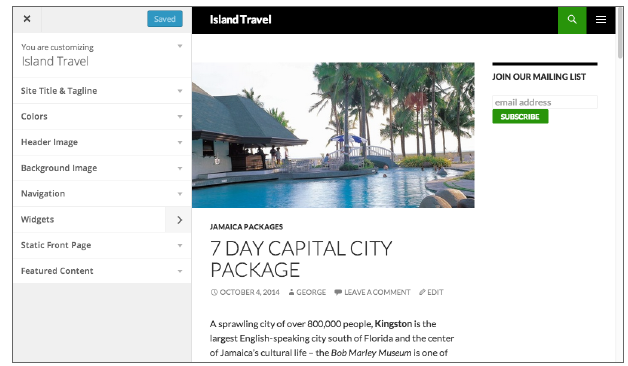
FIGURE 7
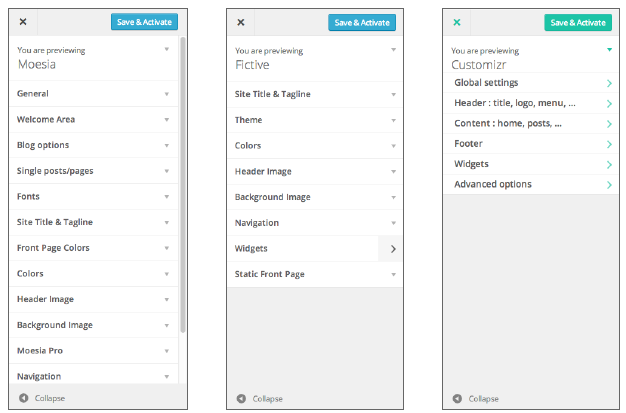
FIGURE 8
Navigation
As mentioned, WordPress does not carry over menu location assignment settings when you switch themes. That’s because each theme has its own locations, and there’s no way to tell which corresponds to which.
As you can see in Figure 9, you can set up the navigation from the Customize or Preview section. You can also change navigation on a live site from here.
You can, of course, still choose menu locations from Appearance ➪ Menus. You can work with Widgets from this screen as well, but for now move on to some settings that deal with the look of the site.
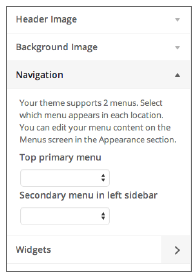
FIGURE 9
Header
If your theme has a header image function, you can work with it from here, as shown in Figure 10.

FIGURE 10
From here you can upload images or select from the Media Library. Or if there are existing header images, you would see their thumbnail here and be able to select one, or you can get rid of the header image altogether.
Background
If your theme has a background image function, there’s a Customize interface for that, too, as shown in Figure 11.
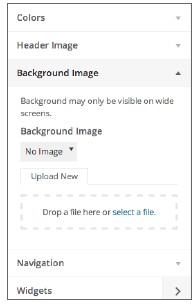
FIGURE 11
As with header images, you can upload, select from the Media Library, or select from existing backgrounds. Or you can delete the background image completely.
Colors
You can find color elements for the header and background in the Color section, as shown in Figure 12.
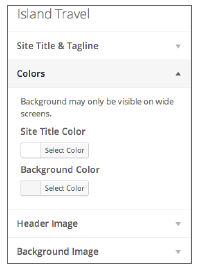
FIGURE 12
If the Site Title is going to be displayed along with the header image, you can select its color here. And if there is no background image, the color you choose here is the one that will be visible.
Because the Customize screen works in real time to show you the effect of your changes, it’s easier to see it in action in the video that accompanies this lesson.
For both the header and background images, many WordPress themes activate the individual admin screens for them, which appear as submenu items under Appearance.
2.2.2. Custom Header
The header image functions shown on the Customize screen are all available in one place on the Custom Header screen, as shown in Figure 13.
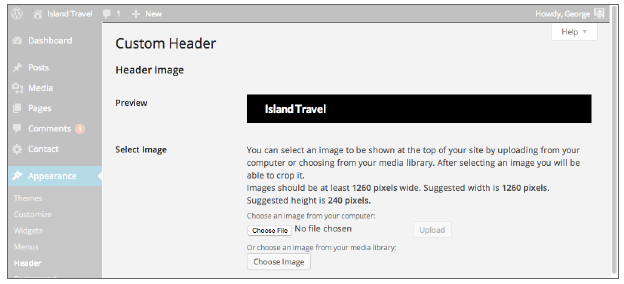
FIGURE 13
Some important wording is highlighted concerning the image size, which varies considerably between themes.
Some themes, such as the Twenty Fourteen theme, make the header image the full width of the site, whereas others make the header image a logo that’s placed on a colored header background. In that case the dimensions will be much smaller than you see in Figure 13.
Whether a full-width banner or a logo, there’s another important element to header dimensions: if the image needs to match the dimensions exactly.
Some themes force you to upload an image of a specific width and height, and crop any image larger than that. There’s a built-in crop function in WordPress, so you can do it right on the screen.
Other themes give you suggested dimensions and the ability to crop an image to those dimensions, as shown in Figure 14. But if you choose to skip the cropping (the button on the right), the theme publishes your image at its full size.
The final choice you may be given with header images is whether to display an HTML version of the Site Title along with the image. In some themes, if you leave the title in place, it will be super- imposed over the header image; others place it below or above the image. For the Twenty-Fourteen theme, the title goes below the image, as shown in Figure 15.
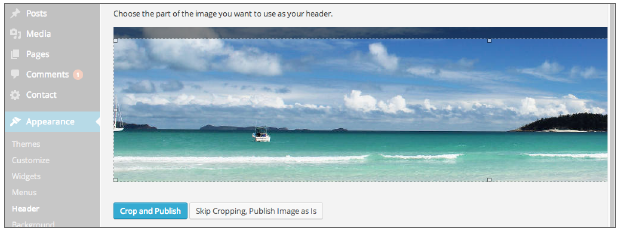
FIGURE 14
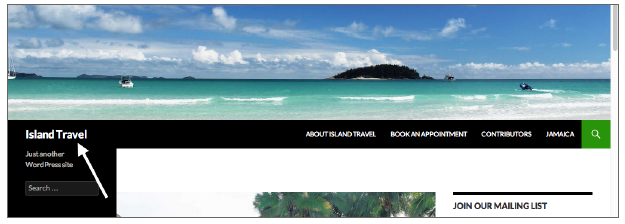
FIGURE 15
If I choose not to show the title, and the theme shows a full width header image rather than a logo-sized image, one option is to make the header image with the logo built in, as shown in Figure 16.
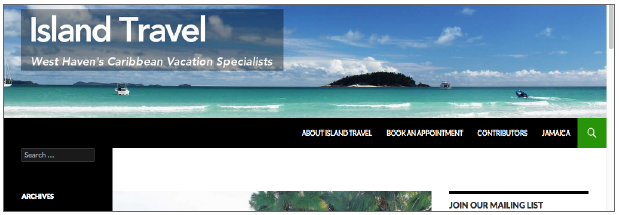
FIGURE 16
In any case, you’ll need to experiment with your theme to know how it will use header images, and the beauty of the Customize or Preview function is that you can do that before committing to the theme.
2.2.3. Custom Background
As with headers, some themes will use WordPress’s Custom Background screen as an alternative to working with the Customize screen.
It’s similar to the Custom Header screen but without image size recommendations or restrictions. That’s because background images work in a particular way in HTML; they tile, which means they’ll be repeated in a certain pattern that is specified by CSS. After you upload an image, you can see the tiling options, as shown in Figure 17.

FIGURE 17
The background color option enables you to choose the color to be shown if there’s no image or if the image does not cover the entire background.
2.3. Theme Options
As you saw in previous Lesson, themes sometimes create their own ways of customizing the look and lay- out of your site, and these are referred to as Theme Options screens.
Typically you’ll find these screens under Appearance ➪ Theme Options, although the name can vary, sometimes including the theme name followed by Theme Options or even a completely different sub- menu name under Appearance. The other common way of listing theme options is through a sepa- rate section of the main Admin menu, usually named for the theme.
In either case, you’re presented with a screen or set of screens or a single tabbed screen containing all the settings possible with that theme. And those settings vary widely, from just a few to several screens.
These settings, like the ones you’ve seen in Customize, make it easy for site owners to change the look and structure of their site without having to know any CSS or PHP.
When I was talking about choosing a theme, I mentioned the importance of checking what options a theme offers, either through the Customize screen or a Theme Options section. It could be the difference between two themes that each look great.