Widgets are elements outside the main content area of a web page that users can easily add, delete, and move around. A Widget might produce a list of all your blog categories; another might be a text box where you can update all your contact information; and yet another could contain the coding your mailing list manager provides for inserting a sign-up form.
Some Widgets come with WordPress, some are created by your theme, and still others appear when you install a plugin. There are literally thousands of possible free Widgets available through the Plugin Directory at WordPress.org and many more through paid plugins.
Widgets vary widely in complexity. Some have dozens of settings, whereas others you simply turn off or on. But no matter how complex the Widget, they appear in your administration screen as a simple box that you just drag and drop. You drop them into Widget Areas that are coded into your theme files—in the sidebar, the header, the footer, and any other spot theme developers can dream up.
For that reason, the available Widget Areas can vary depending on your theme. Some themes and plugins even enable you to create your own custom Widget Areas. If a Widget Area is empty, most themes collapse that part of the screen. However, for a side- bar, if the theme layout calls for a sidebar, there will be a space where an empty Widget Area exists. Some themes show placeholder widgets if you don’t include any.
1. The Widgets Screen
Widgets are controlled through the Appearance ➪ Widgets link on the main admin menu. You’re presented with the screen shown in Figure 1.

FIGURE 1
The left side of the screen shows the available Widgets, and the right side shows the Widget Areas that your particular theme has created anywhere on the website.
Referring to Figure 1, you can see the Twenty Fourteen default theme comes with three widget areas: one each for a left and right sidebar and one for the footer area of the site. Widgets you see on the left are some of the default ones that come with WordPress (they extend below the visible screen), but the list on your site will vary depending on your theme and what plugins you have installed. And for this theme, a number of the WordPress Widgets come pre-installed in the Primary Sidebar area on the right.
There are actually two lists of Widgets on the left, Available and Inactive (which is not visible in Figure 1), and the difference between them is covered in the final section of this lesson.
2. Activating Widgets
Following are two methods for activating a Widget:
- Dragging and dropping into a Widget Area
- Using the Add Widget button when you click a Widget
Dragging and dropping a Widget works well if the Widget Area you want is already open and if the two aren’t too far apart on the screen. If you have a lot of Widgets, dragging a Widget all the way up the screen can sometimes be a bit tricky—and if the Widget Area is not open, it can be frustrat- ing. That’s why the fairly recently introduced Add Widget button is much handier.
The Add Widget button appears along with a list of all possible Widget Areas whenever you click a Widget in the Available Widgets area, as shown in Figure 2.

FIGURE 2
You simply check the Widget Area you want, and then click the Add Widget button. You can choose only one Widget Area at any one time and it’s automatically opened, and the Widget is inserted and opened, ready for you to configure.
Mobile users with wider screens have the two-column layout for Widgets, but at smartphone size, the structure collapses to a single column, with Available and Inactive Widgets showing first and Widget Areas at the bottom. It’s still possible to use drag and drop here, but the length of the screen makes Add Widget the better choice.
There is no Save button for the Widget screen; each Widget has its own. After you place a Widget into a Widget Area, you must click that Save button to fully activate it. Even Widgets that have no user-configurable settings usually have to be saved when you first place them in a Widget Area. Whenever you make changes to the Widget, you also need to save it.
When you move Widgets within the Widget Area or if you remove them, there is nothing to save. WordPress automatically records the action.
Saving a Widget does not close it, as shown in Figure 3.
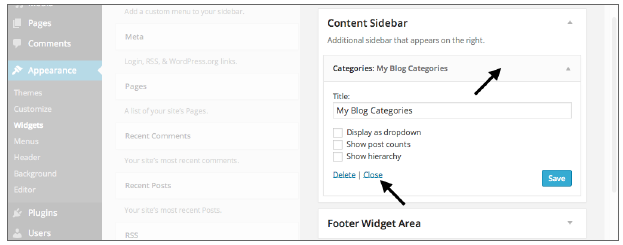
FIGURE 3
You have to click the highlighted Close link, which is probably handiest because it’s next to Save, or you can click the highlighted Widget header area and toggle it closed.
You can open and close the Widget Areas only by clicking the header area.
When you finish editing, you can click Close or click the down arrow at the right of the Widget header bar. (That same arrow opens the Widget, too.) You can also close or open the entire Primary Widget Area using the down arrow on its header (and do the same for each if you have multiple areas in your theme).
3. Moving or Removing Widgets
Re-ordering Widgets within or moving them between Widget Areas is as simple as dragging and dropping. Click and drag from the header area of the Widget. If the Widget is currently open, it automatically closes.
As you drag, an outline of the box appears. As you move the Widget, the outline moves to where the Widget would next be placed, so you can easily see if you’re targeting the correct spot, as shown in the sequence in Figure 4.
Removing or deactivating Widgets is as easy as dragging them from the right side back to the left— they instantly disappear from the Widget Area. Instead of dragging, you can also click Delete if the Widget is open. In either case, there’s nothing for you to save after making the deletion; WordPress automatically records the change.
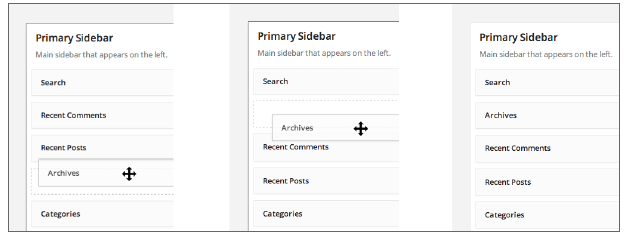
FIGURE 4
However, you need to think carefully about where you drag a Widget when removing it from a Widget Area:
- If you drag a Widget to the Available box, it loses all its settings and text.
- If you drag a Widget to the Inactive box, it keeps all its settings. This is handy, particularly if there are complicated settings such as URLs or specific wording that you might want later.
It’s easy to forget about the Inactive box because it’s often far down the screen. It’s also difficult to drag Widgets back and forth from that box, again because it’s so far down the screen and your browser doesn’t always want to move nicely with your mouse. An easy answer is to collapse the Available Widgets box so that it brings Inactive closer to the top of the page.
Using the Delete link only removes a Widget; it does not enable you to choose to put it in the Inactive category.