As your website grows and evolves, you may need to add a group of new sub-Categories, or you may decide that a particular Tag should be changed into a Category. This lesson shows you how to manage all aspects of your Categories and Tags.
1. Managing Categories
Lesson of Adding a New Post covers how to add a new Category from the Add New Post Screen (or the Edit Post screen). You also saw in Lesson 18, “Managing Posts and Pages,” how to add and remove Categories for a Post through Quick Edit and how to add a Category to multiple Posts at one time with Bulk Edit. Now it’s time to look at managing the Categories.
You access the Categories admin screen, as shown in Figure 20-1, by way of the Posts ➪ Categories link on the main admin menu.
The left side of the screen is for adding new Categories, and the right is for editing or deleting existing Categories.
In smartphone and smaller tablet formats, the existing Categories list displays first with the Add New Category section below it. To save room, the existing list does not display Category descriptions. There is no jump link to take you to Add New Category, so if you have a lot of existing Categories, you need to do a bit of scrolling.
The only disadvantage on this size of screen is that the search function is at the bottom of the page rather than at the top near the list of existing Categories.
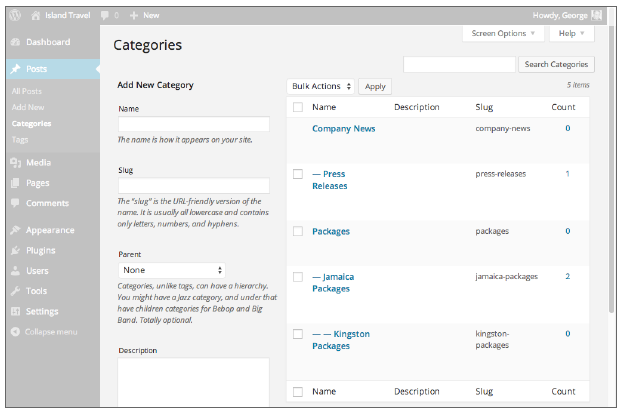
FIGURE 20-1
1.1. Adding a New Category
You can enter four parameters for a new Category:
- Name
- Slug
- Parent
- Description
The Slug is the wording used in the URL for the Category, but you rarely need to enter anything in here. WordPress automatically creates a Slug using the Name you give to the Category.
Normally, a WordPress URL for a category would be something such as http://www.yourdomain.com/?cat=4, but if you have friendly URLs turned on using the Permalinks settings (see Lesson 25, “Connecting by E-mail”), it might look like http://www.yourdomain.com/category/jamaica- packages. The jamaica-packages part is the Category Slug.
In some situations you might want a long Name but keep the Slug short. In that case make sure your Slug is all in lowercase and uses a hyphen instead of spaces between words.
Choosing a Parent for your new Category is just another way of saying that it will be a sub-Category of the Parent. The drop-down menu shows all Categories hierarchically. The Parent does not need to be a top-level Category; it can be a sub-Category of another Category.
The Description might be used by a theme at the beginning of a Category page, for example, or you could customize your theme to make use of it. However, it can also be useful when you have several people working on a site and you need to make clear what belongs in a particular Category.
When you finish entering information for your new Category, remember to click Add New Category at the bottom left of the screen.
1.2. Editing or Deleting Categories
On the right side of the screen, you see a list of all your Categories, by default, in alphabetical order. The four columns displayed are Name, Description, Slug, and Count (the number of Posts in the Category).
If you have a lot of categories, remember that under Screen Options at the top, you can change how many display at one time. (The default is 20.) If you have sub-Categories, they display with a dash beside them and in alphabetical order underneath their parent category. If you have sub-sub-Categories, each level is represented with an additional dash.
You can reorder the list of Categories by clicking the title of a column; clicking a second time toggles between ascending and descending order.
Finding Categories is also aided by a search function at the top right.
Like other admin listings screens, an options menu appears below the name of a Category by mousing over its row. The four options are Edit, Quick Edit, Delete, and View. The Quick Edit feature enables you to change the name and the Slug in the list.
If you don’t see the Delete option for a Category, that’s because it’s the Default Category.
Clicking the View link shows you a Category page on the front end of the site, displaying its Posts in whatever way your theme has chosen to display them.
If you click Edit or the title of the Category, a new screen displays, as shown in Figure 20-2.
This is where you can change not only the name and the slug, but also the description and, most important, the parent.
Think of changing the parent as a kind of moving process, whether it’s to a new sub-Category of the parent, to a new parent, or to the top-level categories.
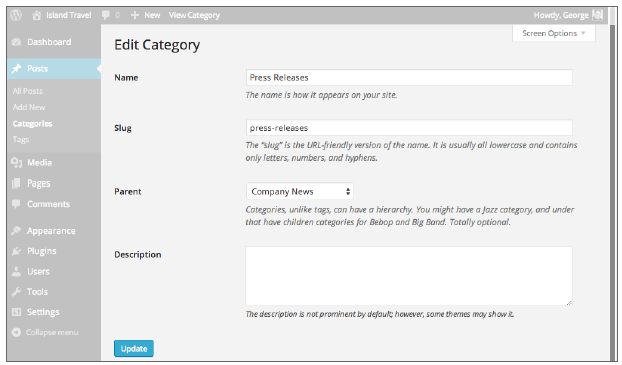
FIGURE 20-2
The final option for managing Categories is to delete them. Don’t worry about the Posts, however. You’re deleting only the Category and not the Posts that belong to it.
However, for Posts that belong only to the Category you’re deleting, WordPress automatically assigns them to the default Category. If you don’t want that to happen, then before deleting go through the Posts in the Category and assign them to the Categories you want; then proceed with deletion.
1.3. Managing the Default Category
Lesson 6 mentions that posts must be in at least one category and that WordPress comes with one category that can never be erased—if you forget to assign a category to a post, WordPress automatically assigns it to this default category. Though you can never eliminate this category, you can change its name from the default Uncategorized to whatever you like.
After you add at least one additional category, you can also change the category used by WordPress as the default when you forget to categorize a Post. You do this under Settings ➪ Writing, where you see a drop-down menu for Default Post Category.
2. Managing Tags
Tags are managed in almost exactly the same way as Categories via the Posts ➪ Tags link on the main admin menu, as shown in Figure 20-3

FIGURE 20-3
The only difference between the two is that Tags can’t be hierarchical-no parent-child structure-so you don’t have a Parent drop-down menu here.
You also see what’s called a Tag cloud at the top left. It shows the most popular Tags on your site, using size to represent the level of popularity. You can display this same Tag cloud on your site using a Widget that comes with WordPress.
Another important difference between Tags and Categories is what happens when you delete Tags. Posts do not need at least one Tag, so when you delete a Tag from this screen, it simply disappears from any Posts that used it; Posts for which that was the only Tag will not be assigned some default Tag.
3. Converting Categories And Tags
Categories and Tags aren’t different in their function except that Categories are usually general in nature whereas Tags are specific. You may find at some point that a Category is too specific and you prefer that it is a Tag or vice versa. WordPress has a Categories and Tags Converter, which you can access from the list of options shown under Tools ➪ Import or from either the Category or Post Tags screens—there’s a text link to the converter at the bottom right.
The converter is actually a plugin, so the first time you try to use it, you’ll be asked to install the plugin, which takes only a couple clicks. When that’s done, you see the screen shown in Figure 20-4.
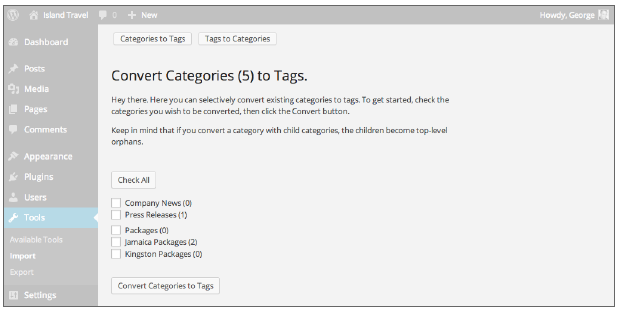
FIGURE 20-4
Simply select the Categories that you want to convert and click Convert Categories to Tags.
WordPress reminds you that if you convert a Category that has children, those sub-Categories will become individual top-level Categories. So, if you were relying on hierarchy to include a Post under several Categories, you need to rethink your Category structure or assign the relevant Posts to the additional Categories you need.
To change Tags into Categories, you need to click Tags to Categories at the top of the screen. This displays a list of all existing Tags, and again, you can either use the Check All button or select only the Tags you want to convert.