WordPress has a powerful built-in menu system that makes it simple for a user to create menus, add almost any type of content to those menus, order the menu with drag-and-drop functionality, and assign menus to various locations on the site.
One of the key features of the menu system is its flexibility. Menus are created independently of the possible locations of menus, so you can quickly assign or re-assign menus. How Pages, Categories, Posts, and Tags relate to one another is completely open. In other words, even if you made one Page a child of another, they could display side by side on the menu, or the parent Page could be a sub- menu item of the child.
1. Creating a Menu
Menus are all located in the right column of the Menus screen. When you first install WordPress there are no menus set up, and, as shown in Figure 21-5 A, there’s a text box on the right side labeled Menu Name.

FIGURE 5
By giving the menu a name and clicking Create Menu, not only do you get a success message and a new tab called Manage Locations at the top of the screen, but also the set of drop-downs on the left become active instead of grayed out, as shown in Figure 5 B.
Only one menu can display at a time, and you can access any others via the drop-down menu below the two tabs at the top. That’s also where you go to create a new menu: Simply click the little tab with the plus symbol.
2. Adding Menu Items
After you name your menu and save it, you can start adding items to the menu. In this case, I’ve created a menu called Top Main Menu. It’s going to be my primary navigation for the site, so I want all my key content pages up there.
Available Menu items are in the left column of the Menus screen, as shown in Figure 6.
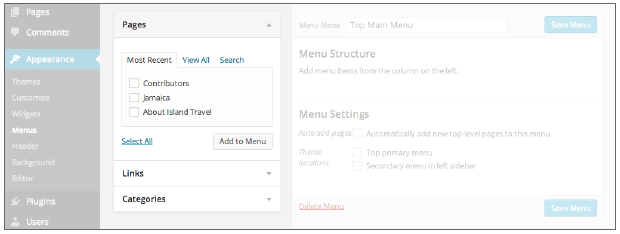
FIGURE 6
By default, the Pages section is open, but if you clicked on Links or Categories, the new one would open and the old one close.
More menu items are available, but you need to activate them using Screen Options at the top right. Hidden by default are Posts, Tags, and Format, but depending on your plugins, your theme, and any customizations you may have made, there could be many more choices. In other words, virtually any type of content can be a menu item!
One thing that can be a little confusing is that the drop-downs listing possible menu items all default to Most Recent. That’s good in one sense, because usually when you add something to a menu, it’s an item you recently added to WordPress. However, if you try to add something not so recent, it looks as if the item isn’t available. Simply switch the tab to View All or use the Search tab.
But how do you get these menu items onto a menu? Simply check the box beside one or more menu items, and then click the Add to Menu button. Make sure, of course, that the menu you want to add to is displayed on the right. A rounded rectangle that looks like a Widget then shows up in the Menu area for each of the menu items, as shown in Figure 7.

FIGURE 7
Smartphone users and smaller tablet users have a single column on the Menus screen rather than two, as shown in Figure 8.
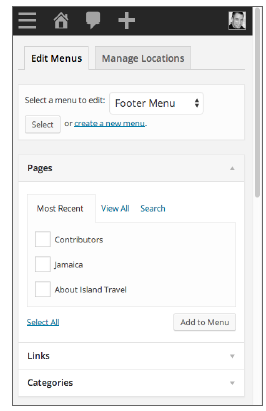
FIGURE 8
Because the menu currently being edited appears at the bottom of screen, you need to watch the menu select drop-down at the top of the screen to know where you are at the moment. One other difference for mobile users is that Screen Options is not available, so you cannot reveal any hidden menu item lists.
3. Assigning a Menu to a Location
Where you can place Menus is defined by your theme. Some themes might have six menu locations, whereas another has only one. If the theme documentation didn’t tell you the possible locations, you can easily see them all by creating your first menu. At that point, you get a tab on the Menu screen that shows you possible locations, as shown in Figure 9.
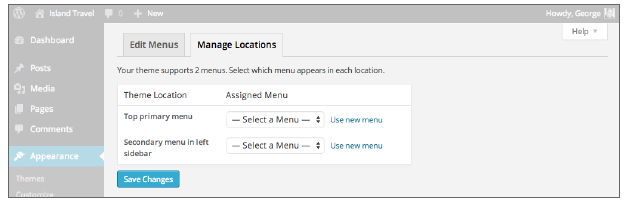
FIGURE 9
From here you can assign any menu to any menu location.
Menu locations are also shown at the bottom of each menu, from which you can also do the assign- ing, as you can see in the highlighted section of Figure 10.
WordPress tells you if any other menu is already assigned to an area, in which case it’s unavailable. You can also assign menus to any Widget Area using the Custom Menu widget. You’re given the choice of naming the menu and choosing which menu to assign from a drop-down list, as shown in Figure 11.
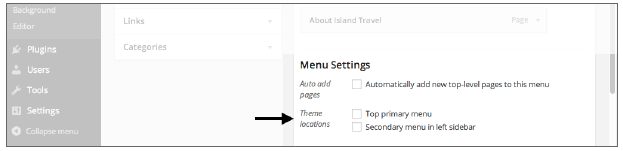
FIGURE 10
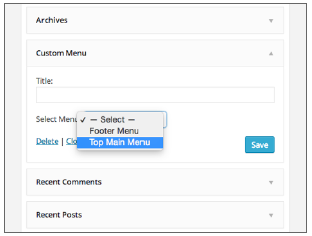
FIGURE 11
Notice that there’s still a Custom Menu Widget showing in the Available Widgets area on the left. You can create and use multiple menus in Widget Areas.
4. Managing Menus
After you have items added to a menu, you have a lot of options. One of the most important is the ability to rename the item using the Navigation Label field, which you can do by clicking the down arrow on the right side of the menu item box, as shown in Figure 12.
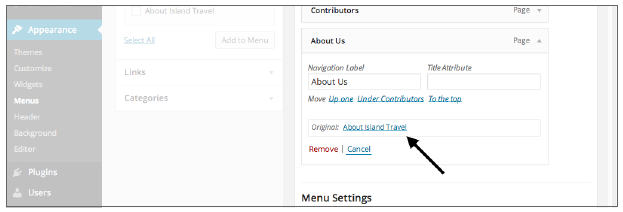
FIGURE 12
This is particularly important if something has a long name that needs to be shortened for use on a menu. Even when you change the name, you’re reminded what the original name of the menu item was (highlighted in Figure 12).
You can delete a menu item by using the Remove link. There is no system of dragging off menu items to delete them.
Dragging and dropping does work, however, if you want to change the order of menu items. Unlike Widgets, though, you must click Save Menu every time you make any changes. If not, the changes won’t appear on the site and will be lost if you leave the screen.
Creating submenu items (assuming your theme supports them, and most do) is as easy as changing the order. The only difference is that you need to drag a submenu item to the right and below its parent item, as shown in Figure 13.

FIGURE 13
You can have sub-submenu items and so on, provided that the theme supports more than one level of submenu items.
If you want to delete a menu, there’s a delete link at the bottom of the Menu Structure section. If you delete a menu and don’t replace it with another in the location where it appeared, most themes simply collapse the area, assuming the menu was the only element in that area.