You may know that the HT in HTML stands for Hyper Text and what makes text hyper is linking. Indeed, one of the primary goals in developing HTML was to make it possible to jump to other locations. Whether you want to link to another site or to a page on your own site, WordPress makes it easy.
With default Block Editor
With Classic Editor
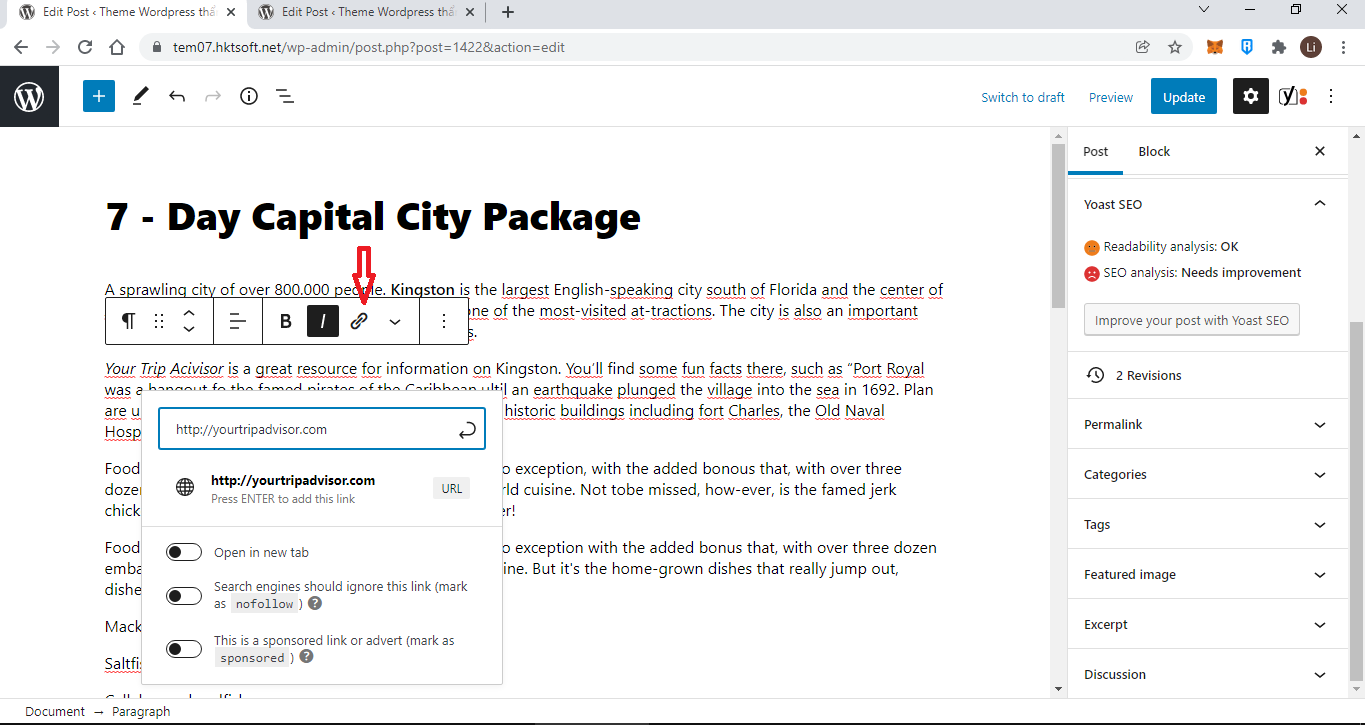
With default Gutenberg Block Content Editor
Linking Text
It’s valuable to visitors if you can help them find material on your site by creating links to other pages. But it can be time-consuming to open a separate tab, go find that other page, and then copy the URL from the address bar. That’s why there’s Link to Existing Content.
In the text editor, highlight the text on which you want the link to appear, as shown below.
Press Ctrl-K on a PC or Command-K on a Mac. A dialog box appears.
Click in the link field in the dialogue box and paste (Ctrl-V or Command-V) the URL you previously copied.
Editing Links
After you create a link, it’s easy to go back and make changes to it. Simply place your cursor anywhere in the text that’s linked. You do not need to highlight all the link text. The link buttons become live. You want to click the left one: Edit Link button.
Removing Links
As with editing links, to remove one, you don’t need to highlight all the link text. Place your cursor somewhere in the link text, and then click the Remove Link button. The text, of course, will still be there, but the link will be gone.
With Classic Editor
If you are familiar in Classic editor, you can see that as with styling text, linking is a matter of highlighting the text where the link will show and then clicking the Insert/Edit Link button.
In my “7 Day Capital City Package” article, I want to link to a website, Your Trip Advisor, where I found a quote. In Figure 1, I’ve highlighted the text and, as soon as I did that, the grayed out link but- tons became live, and I could click on them. Because I’m starting a new link, I click Insert/Edit Link:
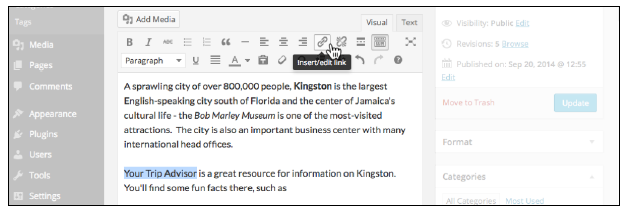
FIGURE 1
Clicking Insert/Edit Link produces a pop-up window where you enter the URL. The easiest way with an external website is to copy the address from your browser’s address bar or right-click a link, copy the address, and then paste into the URL field, as shown in Figure 2.
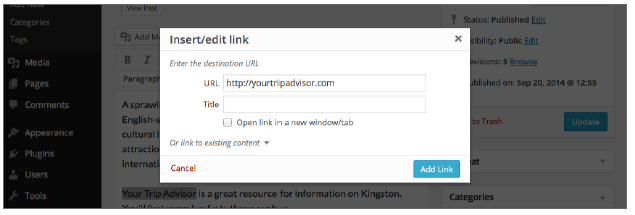
FIGURE 2
Below the URL there’s a Title field; use this to say a few words about where the link is going.
Below Title is a check box. If you check it, the link opens in a new tab or new window. By default the link opens in the current tab or window. Some people like to have external sites open in a new tab so that visitors still have the current site open, and that’s the approach I take. Others feel it’s a better user experience if links open only in the current tab or window.
When you’re finished, click the Add Link button. The window disappears and the text you highlighted now displays as a link.
Exactly how the link displays in the Content Editor depends, as I’ve said before, on your theme. By default, WordPress shows the link in traditional HTML purple with an underline, so no matter what, you should see the link displayed differently than the other text. (If your theme styles links exactly like other text, I’d look into getting a different theme.)
Internal Linking
It’s valuable to visitors if you can help them find material on your site by creating links to other pages. But it can be time-consuming to open a separate tab, go find that other page, and then copy the URL from the address bar. That’s why there’s Link to Existing Content.
As Figure 3 shows, clicking that link drops down a new area where you can search for any content on your site.
Start entering a phrase in the search box, and you see a list of possible content. If you have a lot, you can just scroll until you find what you want. (It’s an infinite scroll; that is, it keeps scrolling as long as there’s content to choose from.)
Found what you need? Then just click it, and the URL for that content is automatically placed in the URL field, and the title of the content is placed in the Title field. Clicking the Add Link button wraps your link around the text you originally selected.
Of course, I have virtually no content on my site right now, but imagine the time saving when you have hundreds of Posts and dozens of Pages (and other types of content).
Editing Links
After you create a link, it’s easy to go back and make changes to it. Simply place your cursor anywhere in the text that’s linked. You do not need to highlight all the link text. The link buttons become live. You want to click the left one: the Insert/Edit Link button.
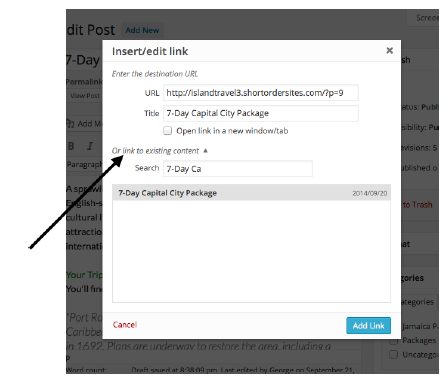
FIGURE 3
Removing Links
As with editing links, to remove one, you don’t need to highlight all the link text. Place your cursor somewhere in the link text, and then click the Remove Link button (the one that looks like a broken chain link, to the right of the Insert/Create button). The text, of course, will still be there, but the link will be gone.