1. Installation and SetUp Yoast SEO in WordPress
SEO stands for Search Engine Optimization, and it’s the practice by which you increase both quantity and quality of traffic to your website through organic search engine results. You want to create a website which is optimized for the search engines, and easy for them to index. When people search for topics you write about, you want your website’s pages and posts to have the best chance possible to show up on page 1 of Google search results.
For many sites, search engines provide the largest source of traffic. They use complicated algorithms to decipher and rank pages accordingly in search results. By optimizing your site for SEO, you are making it as easy as possible for Google – and the other search engines – to index your content.
Yoast SEO for WordPress is one the best content optimization plugin for WordPress. This SEO plugin can boost your site’s traffic better than any other WordPress SEO plugin. Yoast SEO is available in WordPress.org as a free plugin and can be installed automatically. You can install it manually by downloading Yoast For WordPress Free and then uploading it the unzipped file to the SEO directory in your WordPress Dashboard.
Automatic Installation: To install Yoast SEO automatically, Go to your Website dashboard and, GO to Plugins> Add New> Search for ‘Yoast SEO’> Find Yoast and click on Install Now. Once it is installed, Activate it.
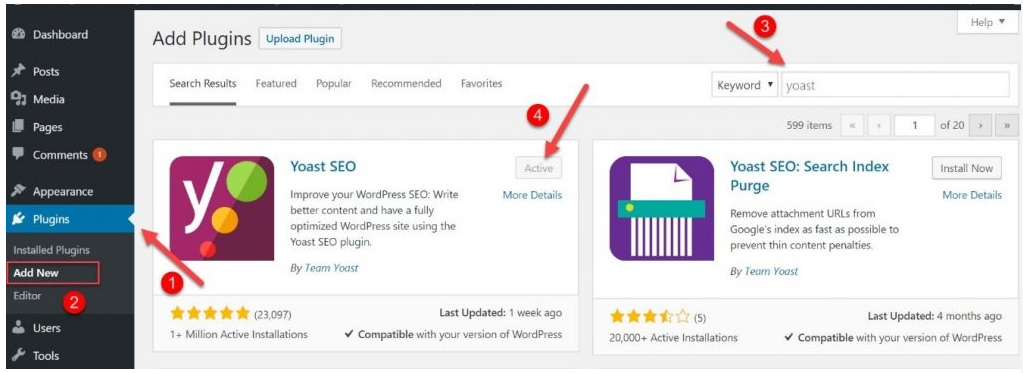
Install Yoast SEO plugin
Manual Installation: To install it manually, download Yoast SEO Free from its website or WordPress.
Upload the wordpress-seo folder to the /wp-content/plugins/directory
Activate the Yoast SEO plugin through the ‘Plugins’ menu in WordPress
Finally, Go to “after activation”
2. Setting Up Yoast SEO
So far, so good. You installed and activated the Yoast SEO plugin. Now it’s time to set it up properly to enable you to unlock its full potential.
To someone just starting out, it might seem challenging. There are lots of menus, tabs, and options to go through.
But have no worries, I’ll guide you through what each of them is and how you should set it up.
So let’s get down to the nitty-gritty of Yoast SEO configurations and settings.
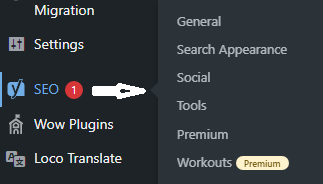
Yoast SEO plugin menu is categorized into 6 sections:
- General settings
- Search appearance
- Social setting
- Tools
- Premium
- Workouts
2.1. General settings
The first time you power up Yoast, you’ll see a general dashboard like this one:
There are three tabs in the general settings menu:
- Dashboard
- Features, and
- Webmasters Tools
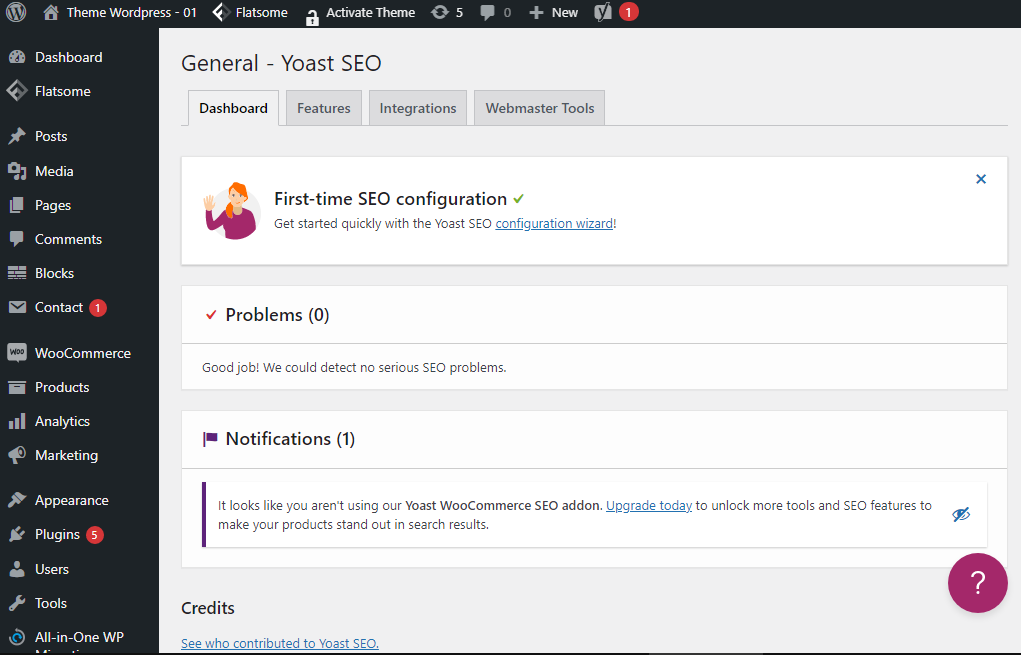
2.1.1. Dashboard Tab
Dashboard tab will greet you with the first time SEO configuration wizard, as well as “problems” and “notifications” bars.
The latter two will give you a quick overview of SEO issues you might need to address immediately when you log in. If there’s nothing here, you’re good to go. If there is, read on and get those problem fixed.

Problems detected in Yoast SEO dashboard
For first time users, the configuration wizard can be a good place to start.

First-time Yoast SEO configuration
It will take you through a 9-step setup process to help you configure some basic settings for your website.
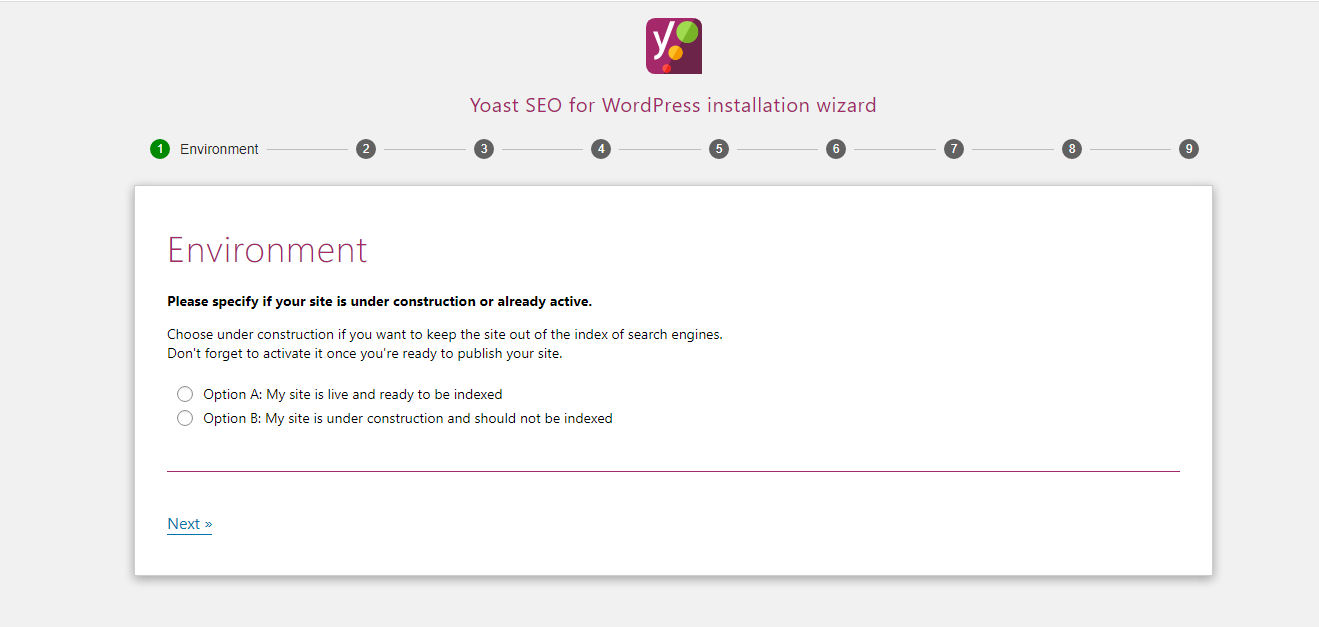
Yoast 9-step configuration
The first step you can set the environment for your site. In other words, is your site under construction, or is it live and ready for search engine indexation?
Pick the option that best describes the state of your website, and click on “next” to go to step #2.
Now it’s time to tell Yoast what your site is about. Is it a blog, an e-commerce store, a brick-and-mortar business, or something else entirely?
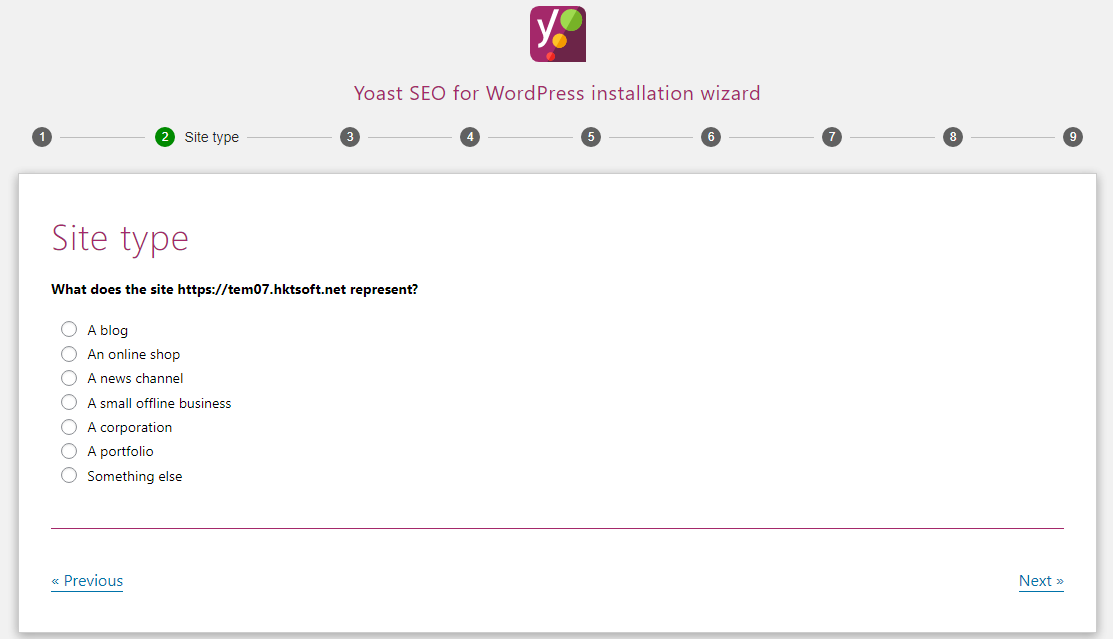
Set your website type
Pick the type that best matches your site and proceed to the next setting.
Choose whether your site represents a person or a company.

Choose what your website represents – a company or a person
If your site represents a company, set your business name and add your logo.

Set your name and logo
For a personal website, just add the name of the person its representing.
Press next to go to step #4 – search engine visibility.
This step lets you set what type of content should appear in search engines. You can set the visibility of your posts and pages.
I, much like Yoast itself, advise you to leave both these options set to ON (default). This will enable all of your posts and pages to be discovered in Google and other search engines.
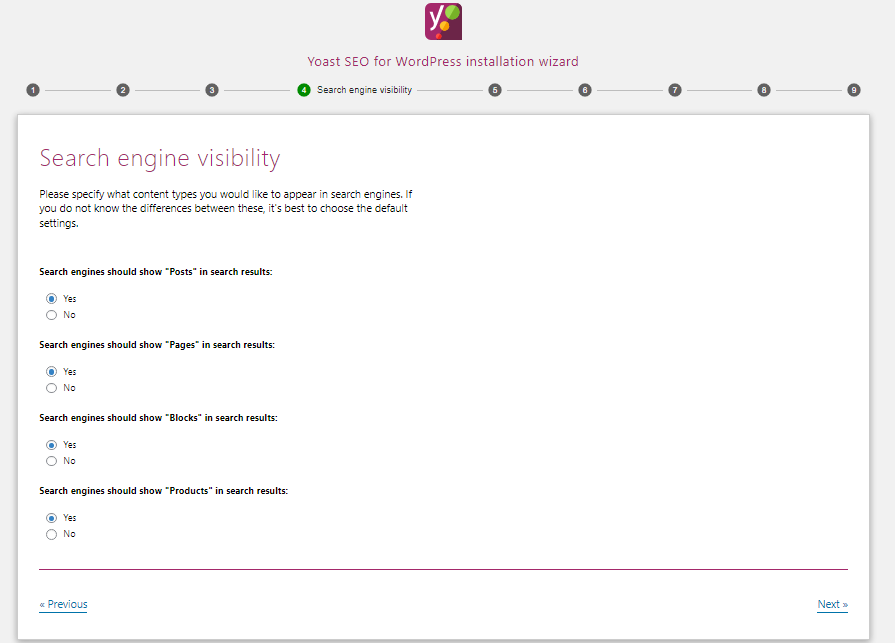
Set your search engine visibility
If for whatever reason you want to prevent some pages from appearing in SERP (i.e. thank you pages), you can later take a more granular control.
The next step allows you to set if you’re the only author or if you have multiple contributors that post on your site.
This is an important setting, even though it might not seem like it.
WordPress automatically generates author pages, which serve as an archive of all the posts from each author.
But if you write all the content yourself, your blog page will show the exact same collection of posts as your author page. This leads to duplicate content, which Google dislikes very much.
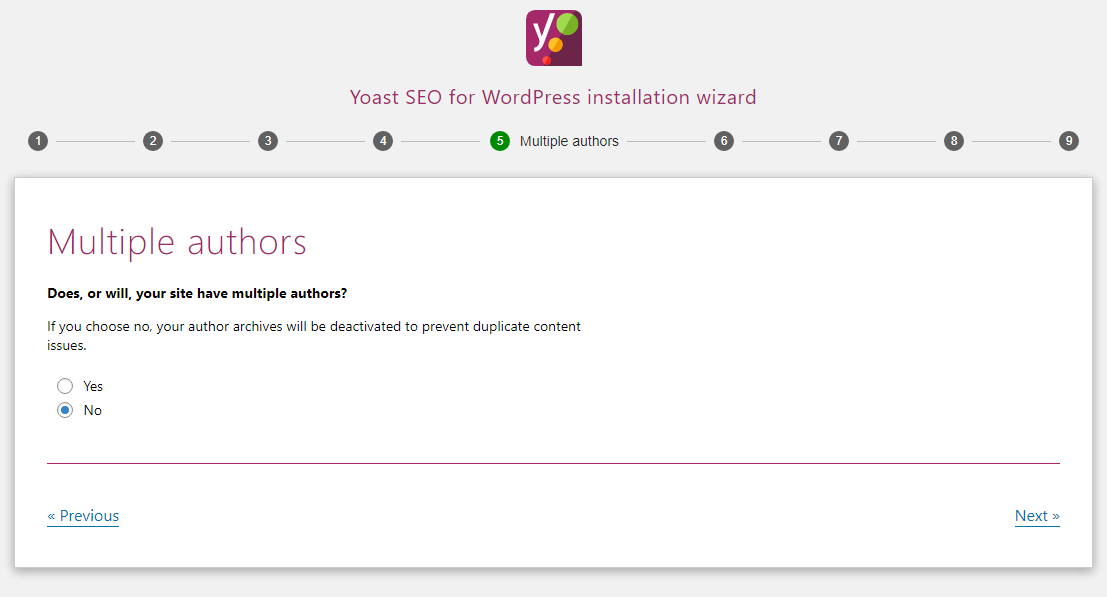
Choose whether you will have multiple authors working on your site
Next, it’s time to optimize your page title.
Having optimized page titles is not only good for SEO but also for users. Well-formatted titles grab attention and are likely to get you more clicks and drive more traffic.
And more click-throughs signal Google that you’re site is good quality, which helps you rank higher.
By default, Yoast makes your title according to the following template:
Post title “separator” site name
Step #6 allows you to set the site name and the separator you want to use across all your posts, so you can sit back and let it optimize your titles for you.
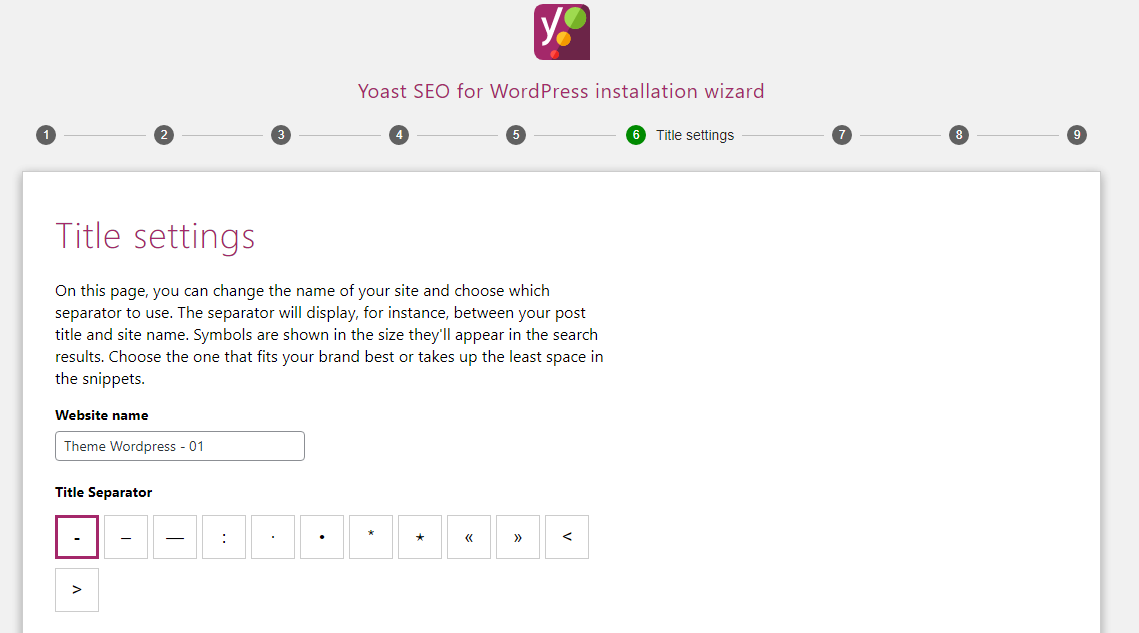
Title settings
Mind you that you can do a more detailed configuration of your post titles in the Search appearance settings (which we’ll talk about later) as well as for each post individually.
Steps 7 and 8 are optional since Yoast will ask you to sign up for their newsletter and try to upsell you on their premium plugin.
Hit next until you get to the #9 step and the configuration success page.
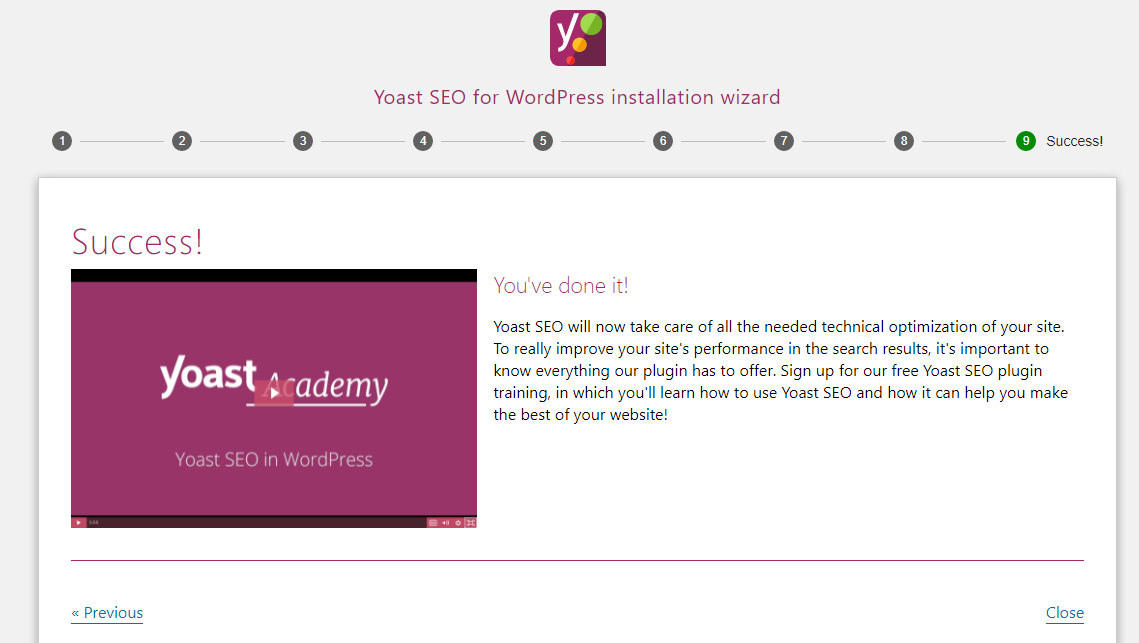
You’ve configured Yoast plugin successfully
Congratulations, you configured your Yoast SEO plugin successfully.
But these were just the basic settings, essential to get started. To take full advantage of this plugin, there are even more settings available. And I’ll show you what each of them is and how to set them up properly.
Let’s go back to the General settings menu, and look at the other two tabs here.
2.1.2. Features Tab
In the Features tab, you can enable or disable some of Yoast’s features.

Features tab
By default, all of these features will be turned on. Let me give you a quick rundown of what each of them means:
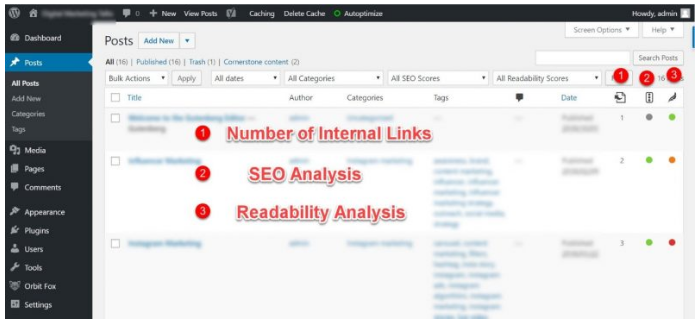
- SEO analysis – This is your content optimization checklist based on your target keywords. Yoast will grade your content and give you suggestions on how you can further improve your content.
- Readability analysis – Monitors your content for issues and grades it based on readability. This feature helps you write better content that your visitors will enjoy reading.
- Cornerstone content – Lets you mark the most important and most valuable content on your site. Enabling this feature, Yoast will help you track and easily improve your cornerstone content.

- Text link counter – Shows you how many internal links your post or page has. This can help you build an optimal SEO structure on your site.
- XML sitemaps – You can enable this to allow Yoast to automatically generate XML sitemaps for you.
- Ryte integration – Ryte will check weekly if your site is indexed in search engines and notify you of any potential issues.
- Admin bar menu – Adds Yoast icon to your admin bar menu with shortcuts and useful links to other tools available with Yoast.
- Security – Prevents authors from removing posts from search results and changing canonical URLs and only allows editors and admins to do this. You might want to keep this feature turned on.
See what features you find useful and leave them enabled, disable others to avoid distractions and annoyances.
2.1.3. Webmasters Tools Tab
The Webmasters tools tab allows you to add verification codes for the world’s 4 largest search engines:
- Google Search Console (mentioned earlier)
- Yandex – Russian search engine
- Baidu – Chinese search engine
- Bing – Microsoft’s search engine
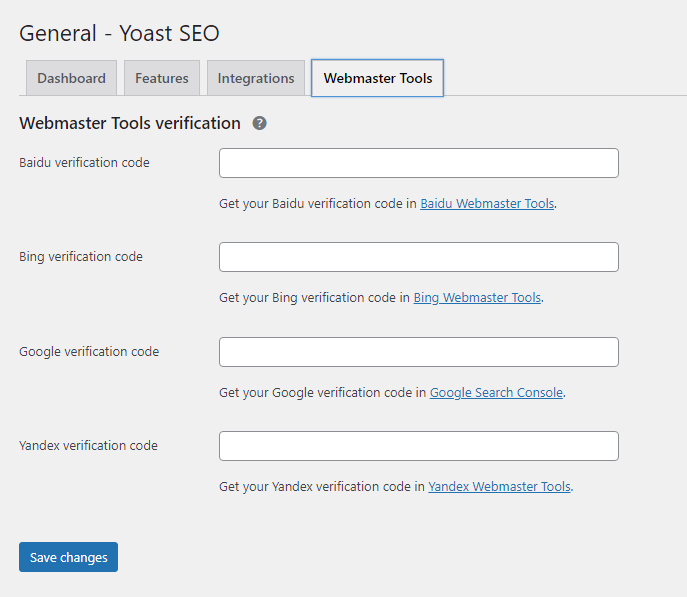
Webmasters tab
Sign up for each Webmaster Tool using the HTML verification option, and paste the verification codes in Yoast (only the part within the quotation marks).
2.2. Search appearance settings
This section allows you to set up and customize how your site appears in search engines.
Search appearance settings feature a set of 7 tabs:
- General
- Content types
- Media
- Taxonomies
- Archives
- Breadcrumbs, and
- RSS
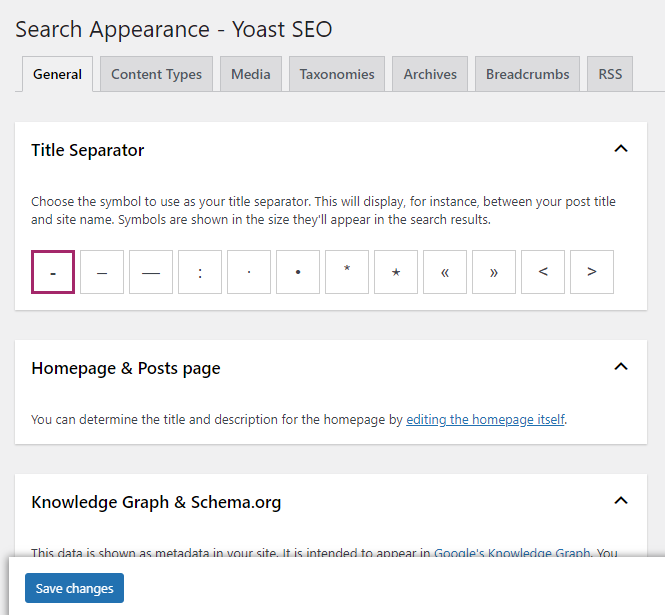
Search appearance settings
You have the same choice of title separators set if you’re using a personal or a company website, add your brand name as well as your logo.
This time, you’ll also be able to quickly navigate to your homepage and your blog page to set special titles and descriptions for each.
Your homepage usually targets a very broad industry keyword, so you want to optimize its title accordingly, which doesn’t fit into the template for your other pages and posts.
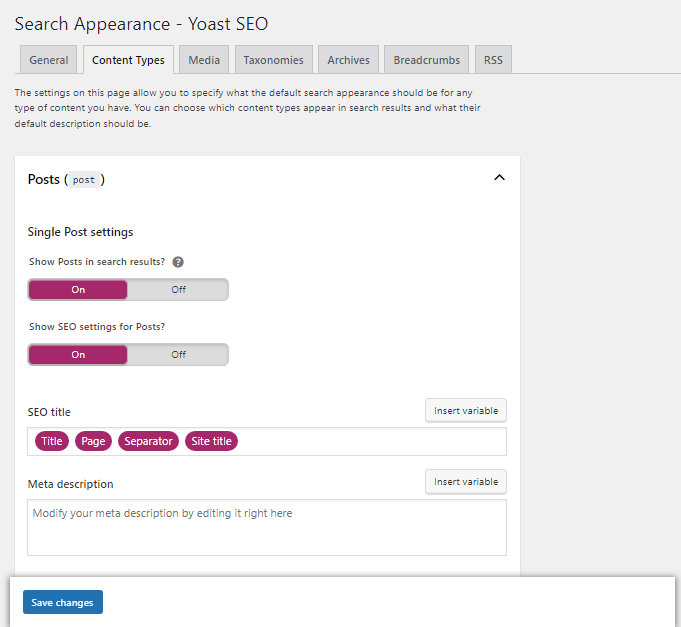
2.2.1. Content Types Tab
The Content Type tab allows you to set the search appearance for any type of content that you have (or plan to have). You can set which types of content should appear in SERP as well as their default descriptions.
Search appearance – content types
I suggest keeping all two of these switched on. I presume you want your posts to appear in Google, so keep the first one on.
And the SEO Meta Box will help you optimize content around your target keyword.
Below, you can also set the defaults for your SEO titles and your Meta descriptions. Again, this is how your site is displayed in Google SERP.
My best advice is to write custom titles and descriptions for each of your posts to keep them optimized and relevant.
But if that’s too much trouble for you, you can also set these defaults and Yoast will generate them automatically for you. Here’s a list of all the snippet variables available in Yoast.
Scrolling down, you can see the same options for your pages, blocks, products. Configure default settings for your pages the same way as with your posts.
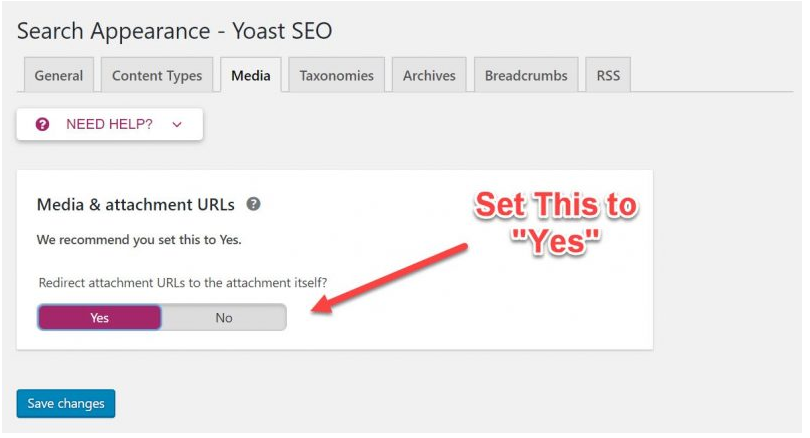
2.2.2. Media Tab
The media tab allows you to redirect users to the attachment itself instead of the created URL.
Yoast recommend keeping this turned on.
Media settings
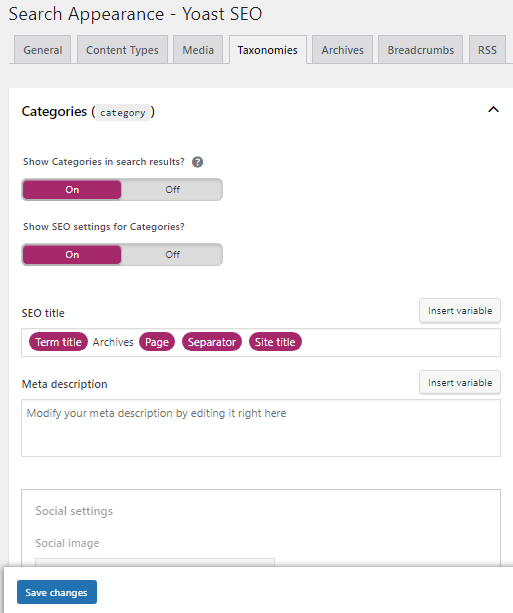
2.2.3. Taxonomies Tab
With taxonomies, you can control how your categories, tags, format-based archives, and URLs are displayed in the search results.
Taxonomies settings
If you use categories to organize your content, it would be a good idea to also allow Google to display them in the search results. So keep toggle on “yes.”
Just make sure to have enough relevant content under each category. Also, optimize your categories around relevant keywords using Yoast’s Meta box.
In this case, you can also make use of the default SEO title and Meta description variables.

Snippet settings
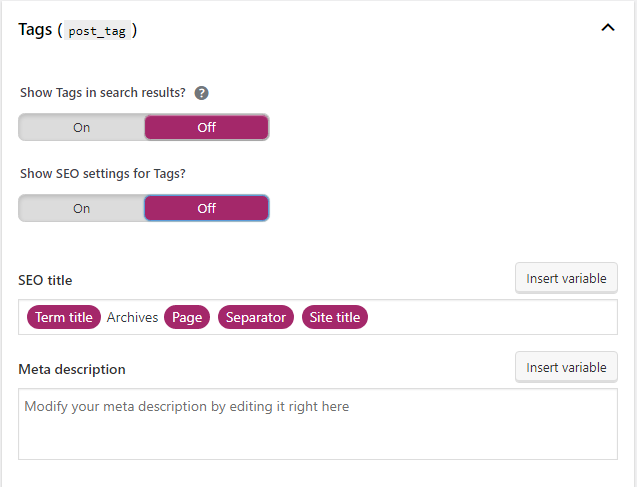
Tags, on the other hand, are not at all useful to be displayed in the search engines, so my best advice is to switch off their appearance in SERP.
Tags
Having them displayed in the search results will cause a lot of duplicated content, which is a bad signal for Google (as mentioned).
The final five options are also best kept disabled since they won’t benefit your site in any meaningful way. The category prefix will only clutter your URLs and won’t help your navigation.

Format settings
2.2.4. Archives Tab
Next is the archives tab. As mentioned previously, archives are collections of posts created by WordPress itself.
If you only have one person writing all the content, you should disable archives from appearing in search. Yoast will redirect the Author archive pages to the homepage and remove the Author sitemap.
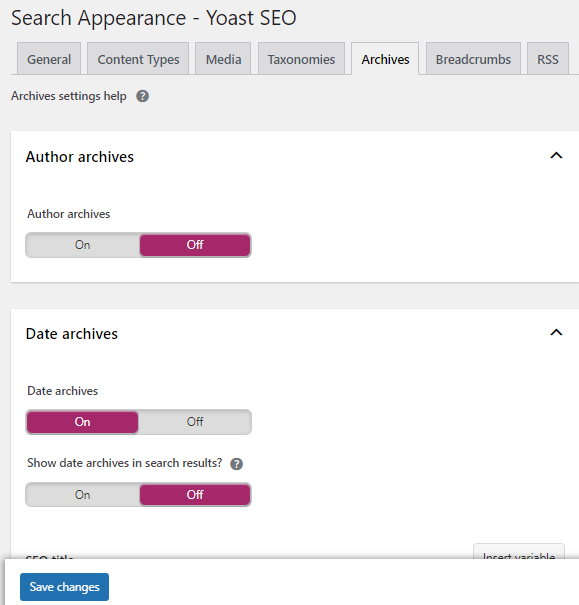
Archives settings
Date archives should remain disabled to avoid duplicated content. They are also collections of your content, only this time sorted by date.
One post can fall into multiple archives, author, tag, and date archive, for example. If all of these archives appear in search, Google will see it as duplicated content and bad user experience, which will earn you negative points with Google.
That’s why it’s best to disable archives, or only enabling one that makes the most sense to your site.
If you still want to keep them on, for some reason, mark them as “no index.” This again is to avoid duplicated content.
Simply toggle the “show date archives in search results” to NO.
The last two options, “search pages” and “404 pages” by default won’t appear in the SERP, and they shouldn’t. So keep the settings here on default settings.

Special pages settings
2.2.5. Breadcrumbs Tab
Yoast gives you the ability to easily create and add breadcrumbs to your site.
Breadcrumbs are the navigational text that appears on top of your content and implies your site architecture.

Breadcrumbs
Google uses breadcrumbs to understand the structure of your site much better, which helps to index your pages.
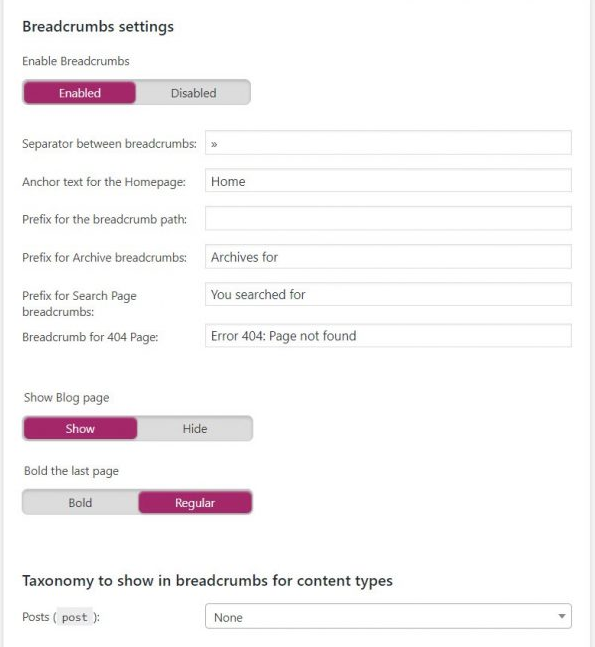
Breadcrumbs settings
Follow Yoast’s very own guide on how to optimize breadcrumbs for your site.
2.2.6. RSS Tab
The final tab in this section is the RSS tab. RSS enables users to subscribe to your RSS fe
ed, so every time you post something new on your site, they can stay up to date using their RSS reader apps.
This means you get instant viewers whenever you publish a new blog post.
RSS setting in Yoast exists to protect you from nefarious people that scrap other blogs, and republish their content without even linking back.
What RSS settings do is they add a bit of content to your posts, which scrapers cannot remove automatically. This will lead to these other scraper websites linking back to you, even if they republish your content.
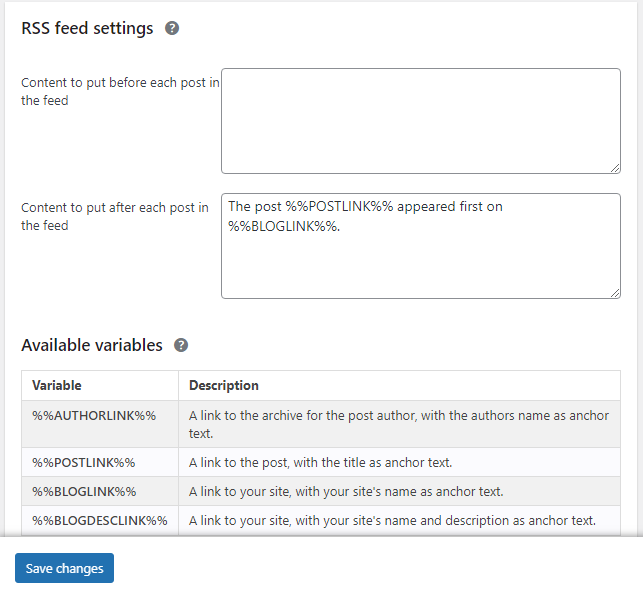
RSS settings
You can leave these settings as default, or if you want even more security, you can add a bit of text both before and after each post in the feed.
2.3. Social settings
Social settings allow you to add links to your social media account to help Google understand which profiles are associated with your site.
Now your social media profiles might appear in Google’s Knowledge Graph when someone searches for your brand or related keywords.
Insert URLs for each of your social media profiles and your Twitter handle.
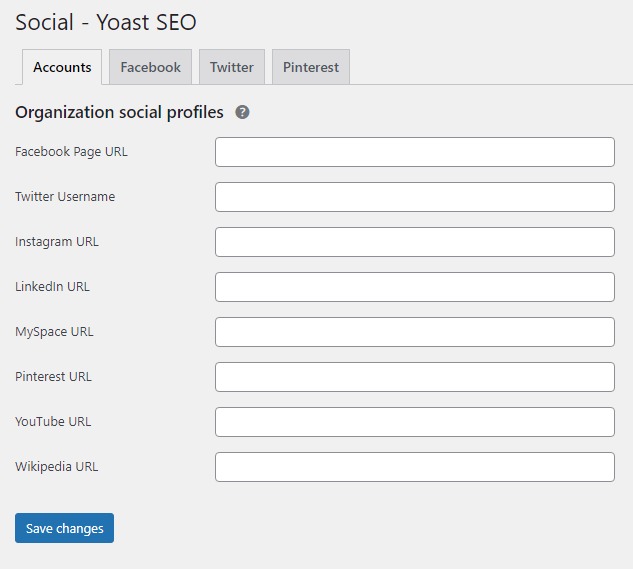
Social settings
You can also control additional settings for Facebook, Twitter, Pinterest, and Google+.
Facebook settings are probably the most important here.
Enable the Open Graph Metadata because it will display a preview with images and a text excerpt when a link to your site is shared.
This is not only used by Facebook, but other social media use it as well if there’s no Metadata available for their platforms.
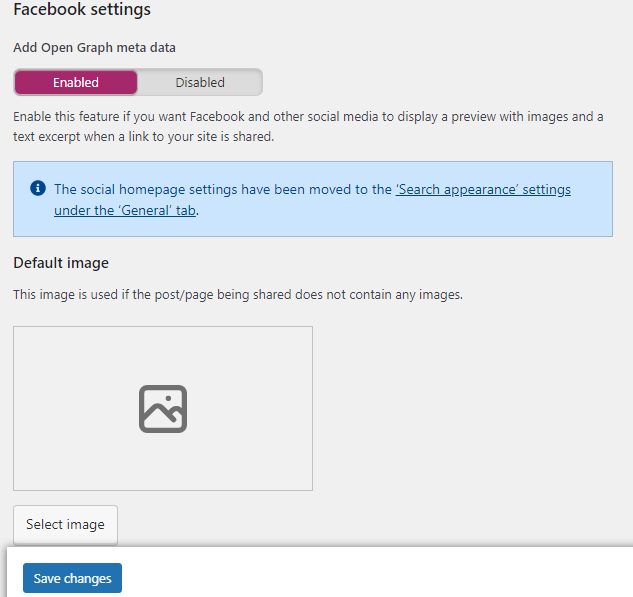
Facebook settings – Yoast
You can also add a default image that’s going to appear if you share a post from your site that doesn’t have an image, on Facebook.
Enable Twitter card Metadata to display a preview with images and a text excerpt when a link to your site is shared.
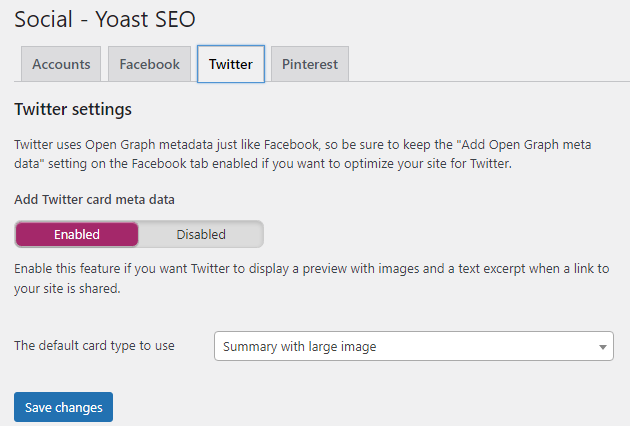
Twitter settings – Yoast
To list your site on Pinterest, follow the link in the settings tab to grab a verification code that you can then paste in the confirmation box.
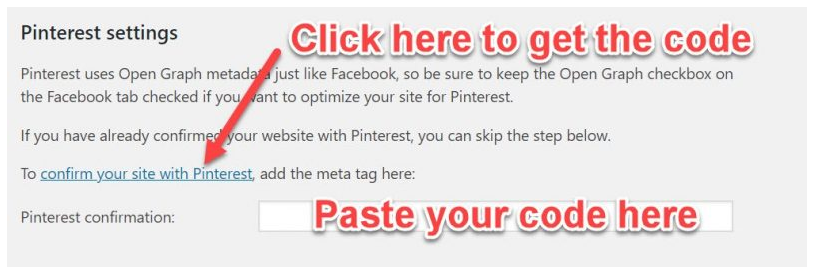
Pinterest settings – Yoast
Ultimately, you can connect your Google+ business page; however, I wouldn’t waste time with it since Google will be shutting down the platform following a huge data breach.
2.4. Tools configuration
Yoast also comes with some pretty nifty tools that can make your blogging life easier.
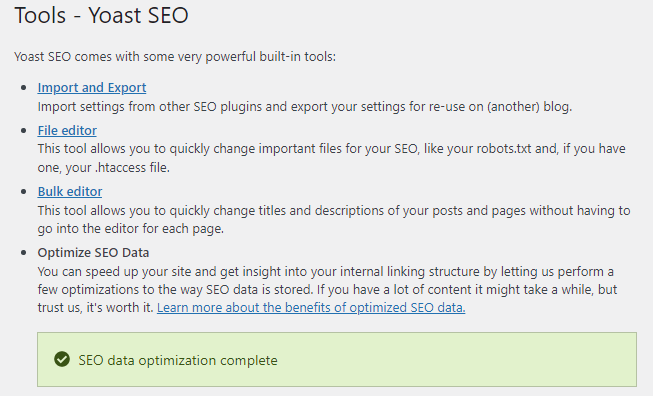
Tools configuration
You can use the file editor to create and edit robots.txt and .htaccess files.
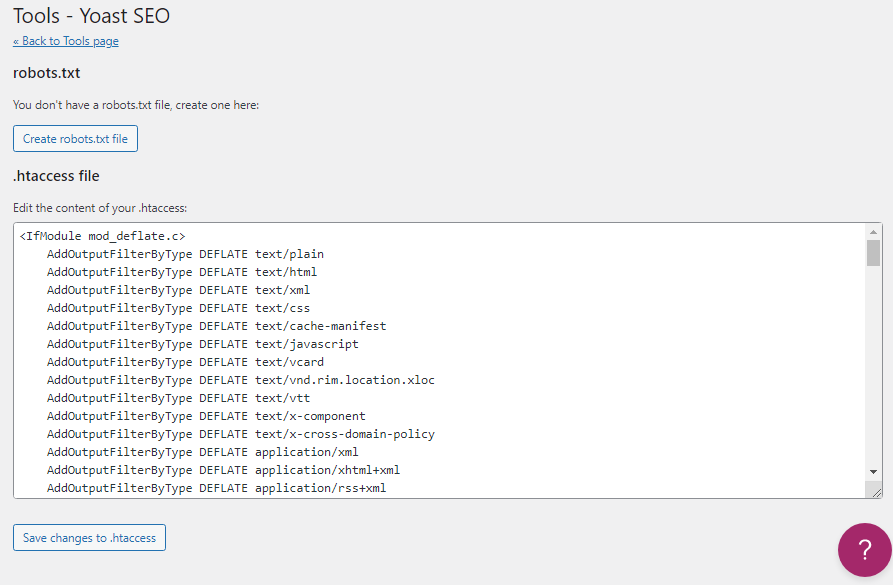
Robots.txt and .htaccess file settings – Yoast
WARNING: Proceed with caution. This part is very technical, so if you’re not familiar with this, please leave it to a professional web development team.
With the bulk editor, you can make changes to several SEO titles and Meta descriptions instead of going one by one.
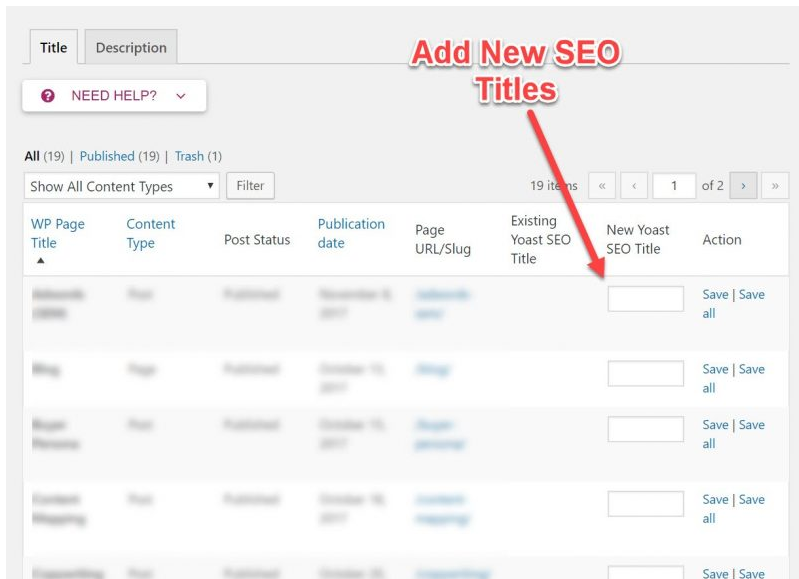
Yoast SEO bulk editor

This can significantly reduce your time and effort if you want to make changes to multiple posts.
Last but not least, you can import settings from other users or export your Yoast SEO plugin settings.
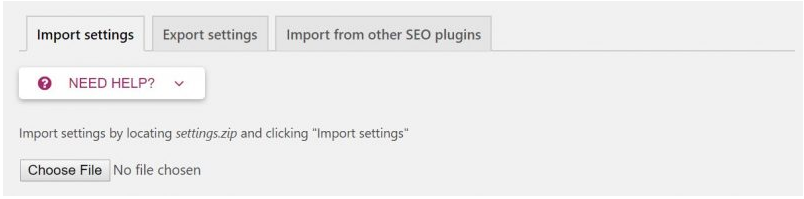
Yoast SEO import settings
While we’re on the subject, you can download our RECOMMENDED SETTINGS and save yourself the hassle of all the setup and configuration.
You can also import settings for other SEO plugins like HeadSpace2, WooThemes SEO framework, etc.