In previous lessons, you have seen the most commonly used functions displayed by default on Add New Post or Edit Post screens. It’s time now to look at the functions WordPress has been hiding to keep the screen less crowded.
With default Block Editor
With Classic Editor
You unhide each function through the Screen Options tab at the top right of the admin screen, which reveals a series of check boxes, as shown in Figure 1.
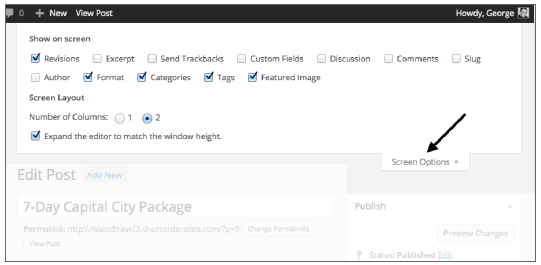
FIGURE 1
1. Revisions
When there’s at least one revision, Screen Options also displays a check box for Revisions. This displays a meta box, as shown in Figure 2.

FIGURE 2
Clicking one of these links leads to the Revisions screen. The revision you click will appear on the right, and the revision dated immediately prior to it appears on the left.
2. Excerpt
How excerpting works depends on which of two ways a theme can generate Post content for lists such as Categories, most recent Posts, and so on. You can quickly tell the difference by looking at the Blog page of your theme or a Category page:
- If you see the full content of each Post, you can make excerpts show instead only by using the More button of the Content Editor.
- If you see short excerpts with wording such as Read More and a link to the full Post, the theme is using WordPress’s automatic excerpt function. If you’re not happy with the resulting text, you can create your own excerpts using the Excerpt meta box for each Post.
Now that you know when they can apply, walk through each of the three types of excerpting.
2.1. The More Button
The idea of the More button is to place a marker where you want WordPress to end the excerpting process and create a Read More link. In Figure 3A, you can see how the button creates a line in Visual Mode, whereas Figure 3B shows how it looks in Text Mode. Above the line is the excerpt.
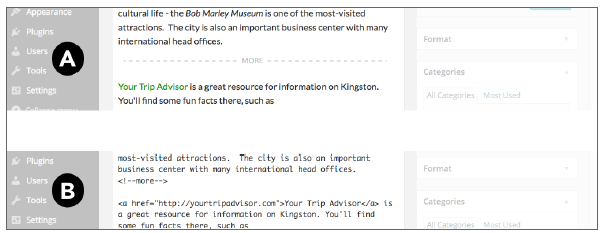
FIGURE 3
An important difference between the More button and the other two excerpting functions is that anything above the line is displayed: links, images, video, and so on—not just text.
Remember, this button functions only when the theme is not already using auto-excerpt; that is, when full Posts are shown in lists.
2.2. Automatic Excerpts
If a theme uses the WordPress excerpt function, this is the default behavior: Take the first 55 words of the Post (even if that means stopping in the middle of a sentence); add something like ellipses to indicate that the content continues; and finish with words such as Read More linked to the full Post. Figure 4 shows an example of an automatic excerpt.

FIGURE 4
Notice I had to switch themes to show you this example because the default Twenty Fourteen theme does not use the excerpting function.
You need to understand that if there are links, images, video, or other nontext content in the first 55 words, only the text displays by automatic excerpting.
Themes can control aspects of this automatic excerpt function. They may choose more or less words for the excerpt, or even allow administrators to choose the amount. They can control the symbols and the wording that follow the excerpt, so the exact look and feel of excerpts can vary widely.
Remember, the More button does not override automatic excerpts; that’s the job of the Excerpt meta box.
2.3. The Excerpt Meta Box
As mentioned earlier, this meta box is revealed through the Screen Options function, and from that point on, it shows on all Post screens (until you choose to hide it again). In Figure 5 you can see some text entered in Excerpt.
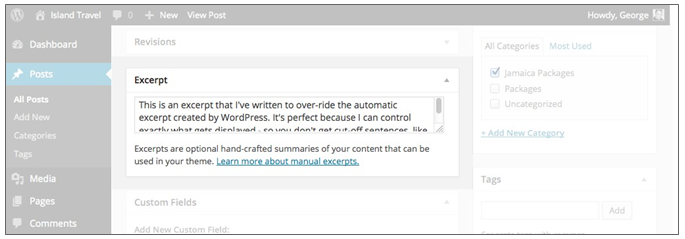
FIGURE 5
Whatever you enter here overrides the automatic excerpt created by WordPress, and there are two good reasons for doing that:
- No matter how well written your opening paragraph is, it’s not likely a proper summary of your entire Post. With the Excerpt meta box, you can write exactly the summary you need.
- Although people understand the concept of cutting off a sentence in midstream and needing to click to see the rest of the article, it’s still jarring to be cut off like that. Better to have a complete thought as your excerpt.
Although the Excerpt meta box is not large, the amount of text is not limited, and you can expand the size of the field. But you shouldn’t need much room for a well-written, short excerpt. People don’t want to see more than two or three sentences.
In Figure 6 you can see text in action in a theme that uses the WordPress excerpt function.
When I say “text,” that’s all you can put in this field—no HTML or any kind of code. That means links are not allowed and certainly no images. Some plugins are mentioned at the end of the lesson that can solve this, if it’s an issue for your site.
And remember, putting text in this box will do nothing if your theme is not using the excerpt function. In other words, if it’s showing full posts in its lists, the Excerpt will not have any effect.
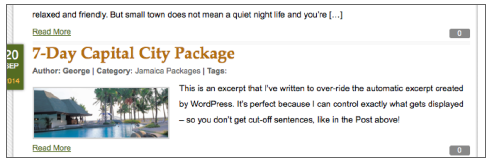
FIGURE 6
3. Custom Fields
You rarely need to use the Custom Fields meta box, so keep it hidden. Just so you know, Custom Fields are used by developers to store additional information with each Post. To use the Island Travel site as an example, WordPress could be customized to store the contact information for each supplier Post in the suppliers Category.
The actual Custom Fields interface, as shown in Figure 7, is basic and potentially confusing to users.
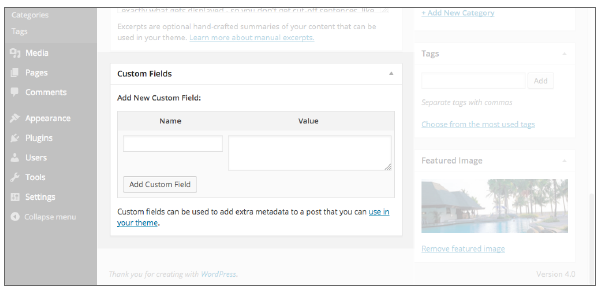
FIGURE 7
The potential for confusion is why developers typically create their own interface. Actually, you would rarely even know you’re interacting with Custom Fields.
However, from time to time a developer may not bother with a custom interface, and when they tell you to enter something in Custom Fields, now you know where you would go.
4. Discussion
The Discussion meta box is the place where you can override two of the sitewide parameters under
Settings ➪ Discussion:
- Comments
- Trackbacks/pingbacks
By default, WordPress turns on both for all Posts or Pages, so unless you’ve changed anything in Settings, both boxes will be checked, as shown in Figure 8.
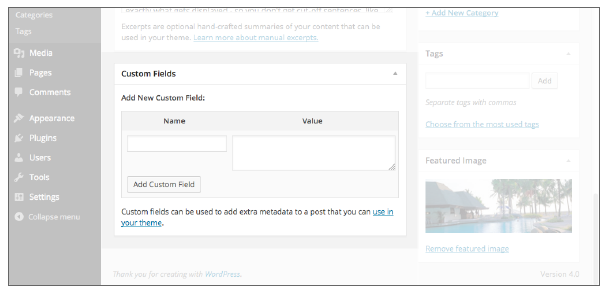
FIGURE 8
This is a box that I tend to keep open because it reminds me to check whether comments are on or off for the particular Post I’m working on.
5. Comments
While the Discussion setting controls whether the comments function is used on a particular Post, the Comments meta box displays the comments themselves, if there are any. As Figure 9 shows, you can see the details of each comment, and when you mouseover one, it shows a menu for all your options.
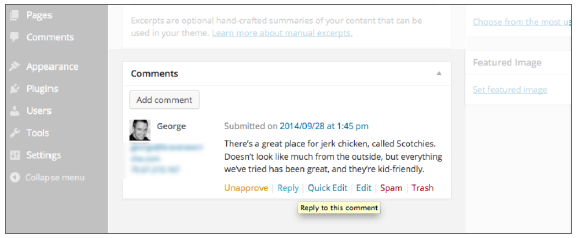
FIGURE 9
Although you can reply to a comment from that mouseover menu, you can also start a new one with the Add Comment button.
As you’ll see in Lesson 23, “Managing Comments,” there are several options for managing comments that do not involve having to go to the individual Post. This meta box can be handy for reviewing a Post’s comments when needed, but typically I leave it hidden.
6. Slug
There’s little reason these days to use this meta box, as explained in Lesson 31, “Optimizing Behind the Scenes,” when dealing with Pretty Permalinks. So, this is another meta box to keep hidden.
7. Author
If you’re the only person writing Posts for your website, keep the Author meta box hidden. By default, WordPress assigns whichever user wrote the Post as the Author. If there are multiple users on a site, this meta box could be handy if you need to manually assign authorship. Each user’s name appears on a drop-down menu.
If you do have multiple authors on a site, I would recommend not only displaying this meta box, but also moving it somewhere up near the Publish box, so you can quickly tell who has been assigned as author.