I showed you how to create a post in WordPress in the previous article. Now, I will guide you how to control basic functions of Post screen.
With default Block Editor
With Classic Editor
1. Publish
There’s a lot more to the Publish meta box than simply the Publish button. WordPress has a variety of tools to control the publishing process. Now consider all the options shown in Figure 1.
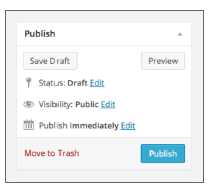
FIGURE 1
1.1. Status
This is the primary setting—essentially the on-off switch— which determines whether visitors can see your Post on the website. Clicking the Edit link reveals the possible states, as shown in Figure 2. Think of Draft as off and Published as on.
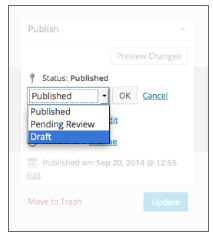
FIGURE 2
Normally, you won’t actually use this drop-down setting. When you click Publish, that sets the status to Published, and clicking Save Draft sets it to Draft. A situation in which you might use this setting is if you published an item and later want to remove it from public view.
Draft status means that when you log in as an Administrator (or other Roles in WordPress), you can see what the Post will look like by clicking View Post or Preview Changes, but it won’t show publicly anywhere.
The third state, Pending Review, is a kind of Draft mode but is used to signal Editors and Administrators that a Contributor’s Draft is ready to be checked before publishing. (A Contributor can submit but not publish items.)
1.2. Visibility
The default visibility is Public, so you’ll rarely need to touch the settings, as shown in Figure 3A.
Sticky Posts
A setting that might come in handy is the check box that says Stick This Post to the Front Page.
When you have a default WordPress blog page—it does not have to be on your front page, as the wording suggests—the normal state is for a Post to gradually get pushed down the screen by newer Posts, until finally it disappears into archives when the screen quantity limit has been reached.
However, there may be an important Post that you’d like to have taken out of that normal flow and remain at the top of the list. Checking this box will do that, therefore the name Sticky Post.
Because Sticky Post is not visible without clicking the Edit link, it’s easy to forget that it’s here, under Visibility.

FIGURE 3
Password Protection
This means a visitor must enter a password to view the Post. As you saw in Figure 3B, each Post can have its own password, so this is not like having a membership website, for example, where a user enters a single password to get into the whole site or portion of a site.
The classic example of passwording an individual Post is a photographer uploading photos to the Post and giving a client the password to view them.
Private
I’ve never fully understood the point of this setting. If chosen, it means that the Post technically is published, but only Administrators or Editors can see it. In other words, even if you have Subscribers (or Authors or Contributors) logging into your site, they cannot see Private Posts. To make it more confusing, Administrators and Editors can see Posts even if they’re drafts, so I’m not sure what this setting is meant to do.
If you want to choose which Users can see a Post or if you want to hide your entire site from the public and allow only registered users to view content, there are plugins for that. (A few are mentioned at the end of the lesson.)
Revisions
WordPress keeps track of your content as you change it, enabling you to revert back to earlier edits. This is discussed shortly as an entire subject, and not directly related to the publishing status of the Post.
1.3. Publish
Think of this as the When setting. The default is to publish the Post immediately, and most of the time that’s exactly what you want to do. But as you can see in Figure 4A, there’s the ability to set the date and time to anything you want, and that can be handy in certain situations.
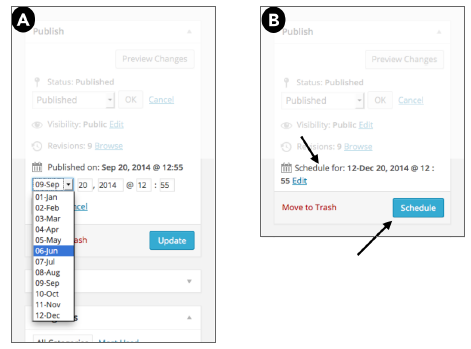
FIGURE 4
The most common use of the Publish setting is to set a future date for publication; in other words, to schedule the Post. As you can see in Figure 4B, the blue button changes to Schedule when you do that.
It’s often easier to sit down and write two or three Posts at one time, but rarely would it make sense to publish all of them immediately. Better to spread them out over a few weeks and not have to think about posting to your website for a while. That’s the power of scheduling.
Remember to use the time function when you schedule a Post. Everyone thinks about what day they want it to publish but often forget that timing can be important. From your website’s statistics you can get a feel for when people tend to visit; try to schedule your Post for the time of day when they’re most likely to return for new material.
There’s another common way to make use of the publish date setting, and that’s when you enter time-related material from the past. For example, when you start your site, you may have an archive of old press releases. If you enter each one as a Post (remember the rule from Lesson 1, “Thinking Like WordPress,” keep content in the smallest possible units), you would want to set the publish date based on the release date. That means they’ll show up in the correct order of when they were released.
1.4. Revisions
Although the Revisions link is in the Publish meta box, it’s not a setting for the entire Post, only the Content Editor, because this is a way of reverting back to earlier versions of what you’ve written. In other words, a revision of a Post does not record things such as categories, tags, featured image, and so on—only what’s in the Content Editor.
By default, WordPress keeps every revision you make, and that could be well into the double digits depending on your editing habits. (You can see the number in the Publish meta box.) However, there are plugins that enable you to control how many revisions are kept, which are mentioned at the end of the lesson.
When you click the Browse link for revisions, you’re taken to a separate screen, as shown in Figure 5:

FIGURE 5
The default layout of this screen is to have the current content on the right and the most recent revision on the left. At the top of the screen is a timeline of all revisions, and as you drag the indicator along it, the content in the two boxes changes—always the more recent displays on the right and the older on the left.
In addition, differences between the two versions are highlighted: The right version displays in green and the left in red.
The blue button at the top right—Restore This Revision—refers to the version on the right. In other words, your decision will always be whether to restore the version that’s shown on the right side.
The only exception to this—which can be a bit confusing at first—is when you first click through to this screen. In that case the current revision is on the right and the Restore This Revision button is not active. It’s only when you start dragging the timeline indicator to the left that the button becomes active, because now there will be a revision that you can restore.
By default, the timeline indicator is a single blue circle with two arrows, and you’re always compar- ing the two revisions next to each other. If you want to compare revisions far apart in time, you need to check the box that says Compare Any Two Revisions. As shown in Figure 6, you now have two separate timeline indicators, and you can select a From (left) and a To (right) revision.

FIGURE 6
Again, the Restore This Revision button refers to the revision on the right. In other words, click the button, and WordPress makes the revision on the right the new current version.
In a mobile browser for smartphones, the Revisions screen is awkward to deal with because it requires a wide format. Landscape mode is a bit better, but this is a function best left to larger screen devices.
2. Format
The Format meta box (Figure 7) is visible when you first install WordPress because the default themes make use of it. However, it’s entirely theme-dependent and may not always be visible.
WordPress has designated a set of names for Post formats: Standard, Aside, Image, Video, Audio, Quote, Link, and Gallery. You need to understand these are just names; how any particular theme lays them out or even uses one or more of them is completely open. In Figure 8, you see the same Post con-tent with the different formats the Twenty Fourteen theme can assign:

FIGURE 7

FIGURE 8
The only difference is that Asides, Quotes, and Links don’t display the title, and the particular format is listed next to the date. It can be confusing for new users who may be expecting clear differences between the Formats.
Again for this particular theme, you can get nice formatting without the help of Formats. In Figure 9 there’s no visual difference between using a WordPress Gallery in a Post (left) and designating the same Post with the Gallery Format (right).
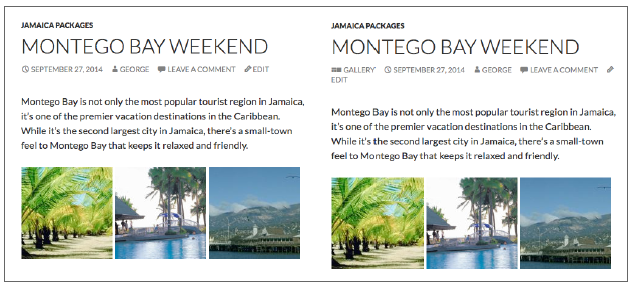
FIGURE 9
From a design standpoint—with this theme at least—there doesn’t seem to be any reason for using Format.
However, one reason might be as a way of categorizing Posts by the type of content. With the Twenty Fourteen theme, the name of the Format is linked, and clicking it produces a list of all other Posts in that format. If you want to see all Posts with a video in them, for example, this would be a way of doing it. You could do that with Post Categories, too, and because themes don’t consistently use Formats, I prefer to go that route.
If your site is a personal blog, it could be useful to find a theme that displays different WordPress Formats in interesting layouts and styles, because that’s a way of adding some nice visual appeal to your posts.
3. Categories
Now briefly consider how Categories appear when there are child categories or subcategories. You can see the child category indented under its parent in Figure 10.
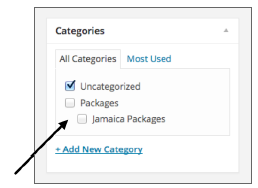
FIGURE 10
4. Tags
Tags are another way of organizing Posts and helping visitors find what they need. Lesson 6 compares Tags to the index of a book; they are meant to be specific, whereas Categories are general.
Don’t ignore Tags. People tend to remember about categorizing because a Post must be in at least one category. Because tags are not mandatory, they often get left out, yet they can be as important for search engines and helpful to visitors.
Also, when creating a new Post, you see only a blank box for Tags, whereas Categories are displayed for you. It’s just easier, for many people, to choose from a list that’s offered to them than to try and think of their own. Yet that’s part of the power of Tags: They’re open-ended and you can make up as many of them as you need right on the spot.
There is, however, one sense in which a list of Tags is presented to you, and that is when you begin to enter a new Tag into the meta box, WordPress automatically matches any existing tags to what you start typing, as shown in Figure 11A.

FIGURE 11
The real importance of waiting to see if a Tag already exists is to avoid entering misspellings, or alternative spellings or phrasings; for example, entering Fort Charles and Ft Charles.
You can enter multiple tags at one time by separating each word or phrase with a comma. After you enter a tag, it displays below the box, as shown in Figure 11B. Beside each tag is a circle with an X. Clicking the circle deletes the tag.
Unlike Categories that you add from inside a Post, which can exist even if no Posts are assigned to them yet, Tags entered from a Post exist only if there’s at least one Post with that Tag. However, if you enter a Tag through Posts ➪ Tags, it continues to exist even if no Post uses it. (Lesson 20 covers more about Tags.)
5. Featured Image
When you last saw Featured Image in your sample post from Lesson 6, it wasn’t looking so great in your theme, as shown in Figure 12.
It’s both too narrow and too tall for the way the theme displays the Featured Image above the con- tent and title.
Typically, the theme does not give you specifications for sizing a Featured Image, but here’s how to rarely get caught with insufficient sizing: Always size any image to at least 800 pixels and no more than 1,900 pixels on the longest side before uploading to WordPress.
WordPress creates smaller versions for you to use inside Posts or as thumbnails, but if you have a good-quality, large original, you’ll be fine. Just don’t upload directly from your camera—a 100 K image will fill a computer screen. There’s no need for 500 K images, let alone 2 MB or more. I’ll remind you of this again in Part 4, but right now, let’s fix the Featured Image.
After you upload a Featured Image, you see its thumbnail in the meta box, along with a link:
Remove Featured Image (see Figure 13A). Clicking that link simply removes the image, and you’re left with a link to Set Featured Image (see Figure 13B).

FIGURE 12

FIGURE 13
Using the method outlined in Lesson 6, the front end now looks like Figure 14.
This time I chose a wider and shorter image, which looks much better given this theme’s layout. Notice that the Featured Image does not appear in the body of the Post. It’s used, depending on the theme, for places like listings of categories or at the top of the full Post. Sometimes, it will be a small thumbnail and other times a full-sized version.
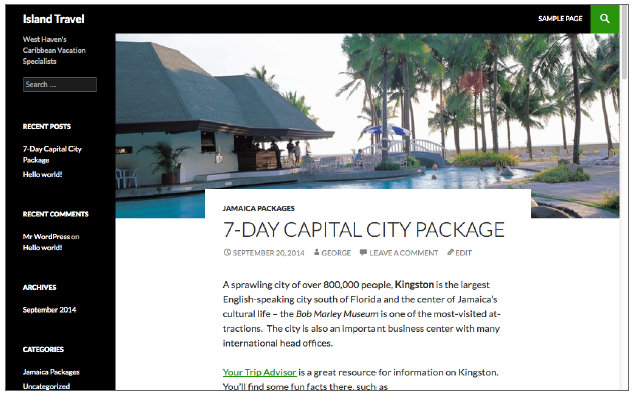
FIGURE 14
That’s it, then, for the default meta boxes you’ll see on a WordPress Post screen—the ones you’ll use the most. There are more, hidden from view, that are covered in the next lesson.
And, as always, there may be more Post meta boxes, depending on what theme you choose and which plugins you add.